28 April 2011

Maple Mousse with Walnut-Bourbon Cake

This month's Daring Bakers challenge was a good one. The April 2011 Daring Bakers’ challenge was hosted by Evelyne of the blog Cheap Ethnic Eatz. Evelyne chose to challenge everyone to make a maple mousse in an edible container.

The truly challenging part of this month's exercise was devising the edible container. Something with bacon sounded appealing, but boring—living in L.A. often means I'm quickly exhausted with new food trends, and the bacon-as-dessert phenomenon has been no exception.

I've been spending a lot of time traipsing through Tartelette's blog recently, and she has a dangerous skill: her food is so beautiful that I want to make it all right now, just this second. Luckily for my waistline, my budget doesn't allow for such profligacy, but as I thought about mousse, I couldn't get these beautiful mousse cakes off my mind.

mousse-cakes

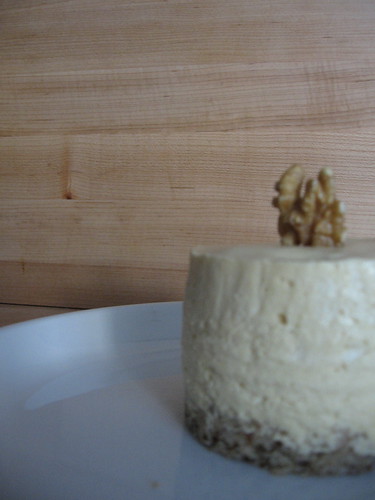
A couple hours and a few dirty dishes later, magic happened. The cake was moist and surprisingly boozy for only having two tablespoons of bourbon, and the flavor offset the maple mousse quite well.

maple mousse with walnut-bourbon cake

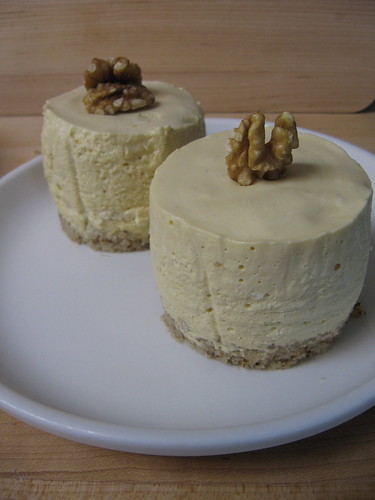
I don't know that it's not much of a container, and the molds were a little bit messy, but for someone who specializes in a simple scoop of ice cream, a rustic crumble, or some fruit tossed in sugar and tossed into a tart crust to bake, these little mousse cakes were almost too elegant to eat. Almost.


Maple Mousse with Walnut-Bourbon Cake
Inspired by several desserts from Tartelette; mousse recipe adapted very slightly from that provided by Evelyne.

If you don't like the taste of bourbon, leave it out—for such a small amount, it packs a lot of flavor.

For the cake:

1 ¼ cups unbleached all-purpose flour
¾ cup ground walnuts (a scant cup of walnut halves or pieces)
¾ cup granulated sugar
¼ cup dark brown sugar
1 tablespoon baking powder
¼ teaspoon salt
½ cup egg whites (from 3-4 eggs)
¾ cup milk (I used whole)
2 tablespoons bourbon
½ cup (1 stick) butter, melted

For the mousse:

1 cup Grade B all natural maple syrup
4 large egg yolks
1 tablespoon gelatine (7 grams; generally one envelope)
1 ½ cups heavy cream, divided

Preheat oven to 300°F. Line a half-sheet pan with parchment paper, lightly butter the paper, and set aside.

Pulse the walnuts in a food processor until finely ground but not pasty; measure ¾ cup ground nuts and reserve the rest for another use. Combine dry ingredients in a large bowl and stir to mix. Whisk the egg whites just to break them up, then combine with milk.

Add the egg-and-milk mixture to the dry ingredients and stir just until combined. Add the bourbon and melted butter and stir gently until smooth.

Scrape the batter into the pan, smoothing into one layer with a spatula. Bake, turning once after about 10 minutes, until the cake is springy and a skewer comes out clean, 20-30 minutes. Remove to a rack to cool.

To prepare the molds:

Line the inside of up to eight 3 inch molds (you can use soup cans, cleaned and both ends removed, if needed) with parchment paper. Cut the cake into rounds, then carefully place in the bottom of the lined molds and set aside.

To make the mousse:

Bring the maple syrup to a boil in a small saucepan and remove from heat. Whisk the yolks in a medium bowl. Temper the yolks by carefully and slowly pouring some of the hot syrup over while whisking vigorously. Whisking the syrup, transfer the warmed yolk mixture back to the saucepan. Set aside.

Measure ¼ cup cream into a small bowl and sprinkle with the gelatin; let rest five minutes. Carefully heat the cream in the microwave (about 45 seconds) or over a bain-marie of simmering water (a minute or two) without stirring until the gelatine is completely dissolved. Whisk into the maple mixture until well combined. Let the maple mixture cool one hour, whisking occassionally, until just over room temperature and the approximate texture of egg whites.

Meanwhile, whip the remaining 1 ¼ cup cream to stiff peaks; refrigerate.

When the maple mixture has cooled as above, stir about ¼ of the whipped cream to lighten the mixture. Scrape the remaining whipped cream into the maple mixture and fold together until just combined.

Pour the mousse gently into the molds; if you prefer the mousse by itself, simply pour it into individual dessert cups (or keep it in the large mixing bowl). Refrigerate until set, at least one hour and preferably longer.

Makes at least 8 generous dessert portions, with leftover cake scraps

27 April 2011

Bait and switch

I have pictures, and I have a recipe ... unfortunately, they don't match.

pistachio, lemon, and strawberry macarons

I went to an Easter party on Sunday: just a small get together of (mostly) family. A turkey was dragged out of the freezer and deep-fried, ribs duly oven roasted, macaroni and cheese baked (smoking oven optional). I was asked to bring vegetables—never a problem when spring has sprung—and also "those pretty meringue cookies that you brought to the Super Bowl party."

strawberry macarons

That's right. I brought macarons to a Super Bowl party. They were a big hit, and each time I make a batch of these elegant-yet-adorable cookies, they turn out a little more even in size, a little more evenly-baked, a little less likely to stick to the parchment. I use the basic recipe from the inimitable Tartelette (including this one for the strawberry macarons), baking at 300ºF instead of 280.

six of one...

I don't have much to add to the almost endless macaron-making resources ... so let's talk asparagus.

I went to the farmer's market on Saturday with no idea what I wanted to make for the party. I wandered the stalls to see what was available before settling for six bunches of beautiful skinny asparagus and two big bags of unshelled fava beans.

For several years—in fact, ever since I discovered the wonderful vegetable—I have specialized, if you will, in asparagus with olive oil and Parmigiano. Lightly dressed with olive oil, either grilled or broiled until tender and browned at the edges, then liberally sprinkled with freshly grated parmesan cheese, I could eat a full bunch of asparagus without complaint.

I wanted to do something a little bit different, but I wanted it to be simple—a good thing, because my timeline was shorter than expected and I spent the first half hour of the party rushing around the kitchen.

Grilled Asparagus with Fresh Herb Vinaigrette and Parmigiano-Reggiano
As with many other asparagus recipes, if you are using thicker asparagus (anything much bigger than a pencil), you will have the best results by blanching them for 1-2 minutes in boiling water, then shocking in ice water and draining.

3 bunches asparagus
2 cloves garlic, minced
2 tablespoons minced assorted fresh herbs, such as thyme, oregano, parsley, and tarragon
2 teaspoons red wine vinegar or lemon juice
salt and pepper
2-3 tablespoons good olive oil, plus more as needed
½ ounce parmigiano-reggiano cheese

Snap the ends of the asparagus (save the ends for soup, if you like). If you are using thick asparagus, blanch as described above. Heat a grill or grill pan (alternatively, place a rack at the top of your oven and preheat the broiler).

Mince the garlic and herbs and place in a medium bowl with the vinegar or lemon juice. Season with salt and pepper and whisk well to combine. Whisking constantly, slowly pour in the olive oil until the vinaigrette is well-combined and slightly emulsified; set aside.

Toss the asparagus in a little bit of olive oil and put it on the grill. Cook, tossing with tongs from time to time, until bright green and tender, about 2-4 minutes. Spread out on a platter to cool slightly; add the vinaigrette and toss well to combine. Grate some cheese onto the asparagus and toss well to combine; grate the remaining cheese over the top of the asparagus. Serve hot or warm.

Serves 6-8

17 April 2011

She's back

Better than ever? Time will tell.

My continued descent into internet obscurity was not entirely my choice. I have been cooking, but for weeks I've been trapped in a cycle of pasta, simply dressed with tomato sauce or aglio e olio; grilled cheese sandwiches; and nachos. I did make desserts twice—one was a Very Secret Recipe, while the other is already on this site.

The worst of it is over now. Ever since last weekend, when I finally pulled my head out the sand, I have been relishing my free time. I've been cooking every day—and even washing the dishes. I have more ideas than I can fit in my weekly menu plans (and than I have time, but that's nothing new). My weekly trip to the farmer's market is not a chore to be completely as quickly as possible, but a leisurely Saturday morning stroll.

I am grateful that I came back to life before spring passed me by. The next few weeks are some of my favorites: strawberries, drool-inducing after months of apples, grapefruit, and tangerines, are appearing in the markets; great heaps of fava beans, high-maintenance or not, one of my favorite legumes, made their way into my bag on Saturday; and sugar snap peas are appearing at every corner, a reminder that English peas will be here soon.

In general, my favorite produce is at its best in the summer: eggplants and apricots, chiles and cherries, tomatoes in any shape or color. However, the explosion of spring fruits and vegetables after months of braises and soups (even I can get tired of cabbage and cauliflower) is a welcome jolt of variety, and I find myself getting greedy at the market, trying to buy enough food to feed twelve instead of two.

I generally prefer to keep spring vegetables simple: fave dressed with olive oil and sea salt; artichokes with homemade aioli; radishes with a smear of cold butter. More often than not, I roast asparagus with olive oil and a generous topping of Parmigiano-Reggiano, which goes crispy and golden in a hot oven. However, my vegetable avarice has left me with more bunches of asparagus than I could handle this past week, so I decided to branch out.

salad!

Returning home from the market with four bunches of asparagus, a tub of feta from my favorite Greek restaurant, and some much-prized green garlic, I set to work with big plans for a light lunch. I've always preferred so-called continental salads to green salads—they're more filling, and while a nice green salad makes a welcome meal with a hunk of bread and perhaps some cheese, sometimes (oh, all right, usually) I crave a one dish meal.

asparagus salad with quinoa and feta


Warm Asparagus Salad with Quinoa and Feta
For an equally-delicious but very different salad, try replacing the quinoa with freshly-cooked (or canned, well-rinsed) beans like cannellini or peruano—see the note below for more information. Also, I like using skinny asparagus because it sautés evenly and quickly; if you prefer thicker spears, I recommend blanching them first.

olive oil
2 small heads green garlic, minced (white parts only) (or 2-4 cloves garlic)
¼ small onion, thinly sliced
¾ cup white quinoa
1 ½ cups water
2 sprigs fresh oregano, or any other fresh herb that you like, minced
salt and pepper
one bunch skinny asparagus (about 8 ounces)
2 ounces feta cheese
red wine vinegar (optional)
very good olive oil (optional)

Heat a large, heavy skillet over medium-high heat. Pour in enough olive oil to coat the bottom of the pan and add the onion. Cook until translucent and just beginning to brown in a few spots, about 5-10 minutes. Add the garlic and stir well, then add the quinoa. Stir well until coated with the oil, adding a bit more oil if needed. Cook, stirring often, until just beginning to color and pop, about 5 minutes. Add the water, stir well to mix, and bring to a boil. Reduce heat to low, cover, and let cook until quinoa is tender and the water has evaporated, about 20 minutes. When quinoa is cooked, transfer to a large plate or bowl and let cool.

Wipe out the skillet and set the heat back to medium-high. While the pan is heating, trim the ends of the asparagus and cut into 2-inch lengths. When the quinoa has mostly cooled, season with the fresh oregano and with salt and pepper.

When the pan is hot, coat with olive oil and add the asparagus. Cook, stirring constantly, until the spears are bright green and tender, about 5 minutes for skinny spears. Transfer to a plate and spread out to cool slightly.

Crumble the feta over the quinoa and stir lightly to mix. Add the warm asparagus and a bit of vinegar, if desired, and toss well to mix. If desired, drizzle the top of the salad with a bit of excellent olive oil.

Makes 2 meals or 4 side dishes

asparagus salad with peruano beans


Ridiculously Simple & Delicious Beans
These are so delicious it's stupid. It's also not much of a recipe, but so many people I know eat canned beans because they're "easier" that I feel duty-bound to add this. I try to make these every weekend, and I use them for salads, in pasta, with rice, or cold & straight from the fridge. For beans with much more character than your standard grocery-store varieties, check out your local Mexican/Caribbean market or go online to Rancho Gordo and treat yourself.

1 cup medium dry beans, such as cranberry or peruano (sometimes called canary beans)
¼ large onion, peeled and cut in half
3-4 cloves garlic
4-6 sprigs of your favorite fresh herbs (I usually use thyme and oregano because they are always threatening to overtake my garden)
1 bay leaf (optional)
salt

Place the beans in a medium heavy pot and rinse well with cold water, then add water to cover by about 1-2 inches.

Note: some cookbooks will say that you absolutely must soak all beans overnight, or that you should discard the soaking water due to "accumulated gases". I rarely do either; unless your beans are very old, they probably don't need an overnight soak (and you'd be happier buying fresher beans), and I have experimented with discarding the soaking/early cooking water—the only difference I ever noticed was that with some varieties of beans, the discarded-water versions end up with less flavor. Add to that the vitamins and minerals that are inevitably lost by discarding the water, and I keep all the liquid, invariably resulting in a rich, unctuous pot liquor.

If you prefer to soak overnight, cover the pan and stick it in the fridge or in a cool place. If not, place over high heat and bring to a boil; boil for about 5 minutes. To save a bit of energy, I then cover and turn of the heat and ignore the beans for about an hour, but it's not necessary. Add the onions, garlic, and herbs (do NOT add the salt) and either reduce the heat (if it's boiling) or heat (if you let it cool) to a simmer. Cook until the beans are just barely tender, then turn off the heat and cover; the beans will finish cooking in their juices. When tender, add salt to taste (it is thought that salt "gets stuck" in the pores of the beans and impedes water absorption, so salting at the end results in more tender, flavorful beans).

Drain the beans if desired (save the delicious juices for soup or some other use—even pouring over steamed brown rice is delicious. If using for a salad like above, drain about 2 cups of beans, let cool to room temperature or barely warm, then treat it like you would the cooked, cooled quinoa.

Makes about 3 cups—increase amounts as desired