29 September 2010

A sweet spread for a stuffed-up head

I've been fighting off some unidentified malaise (I slept until 11:30 on Thursday and 9:30 on Friday), and I'm thoroughly tired of achy muscles, headaches, and sniffly noses. After a long weekend shuffling from my bed to the couch, I finally feel like myself again. Four days into a diet of Cheerios, olive oil pasta, and chilled fruit, however, my kitchen is filled with haphazard stacks of bowls.

burnished orange

Still, in the past week I have managed to make two different batches of preserves. My pantry cupboard will soon be overfilled with bright glass jars, and heavy boxes are being tucked away upstairs for gifts, cake fillings, and winter toast emergencies.

I was excited when my grocer opened up after a week of vacation with a big box of tiny prune plums—I expected them to be out of season by the time the shop reopened—so I bought a big bagful to make plum preserves. At home I cut them open, expecting the pink-tinged gold of the prune plums I've been eating for the past month, and was surprised to find a firm, tart, green flesh encased in the violet-black skin.

After a little research, I discovered that my mislabeled drupes were in fact damson plums, a tart, "cooking" variety that I have never seen in Los Angeles before.

damson plum jam

I was uncertain how I wanted to prepare this jam at first—I still want to try the Cardamom-Plum Jam from this fantastic book—but in the end I decided to spike the fruit with white wine and fleck the jam with vanilla beans. The resulting spread is sophisticated and special—it's almost too decadent for toast, but it would be brilliant on a cheese platter, delicious warmed and drizzled over french toast, and I'm planning to try it with roast pork.

plum jam with vanilla and chardonnay


Damson plum preserves with vanilla beans and white wine
These preserves are sweet but still a little tart; if using a sweeter plum, I would reduce the sugar by at least a half cup.

3 ½ pounds (about 1 ½ kilos) damson plums
3 ¾ cups sugar
3 tablespoons lemon juice
1 vanilla bean
generous ½ cup white wine (I used Chardonnay)

Quarter and pit the plums. Place in a large heavy pot with the sugar, and lemon juice over medium-high heat. Split the vanilla bean, scrape the seeds into the pot, and add the bean to the fruit.

Bring to a boil, stirring occasionally, until the sugar is dissolved. Remove from heat. Transfer the mixture to a large bowl, place a sieve over the pot and return the syrup to the pot. Set the fruit aside.

Bring the syrup back to a boil over medium-high heat, add the wine, and boil, stirring occasionally, until the syrup is reduced by about half and is thick, about 15-20 minutes. Carefully add the plums, stirring gently to mix, and return to a boil. Boil until the plums are tender, the skins almost candied, and the mixture is set to your tastes (about 10-15 minutes longer). This preserve won't set firmly without a lot of cooking, if at all.

Can as desired.

Makes about 7 half-pint jars

23 September 2010

Last day

I was listening to my local NPR station on the way home yesterday, when the weather report came on. "Tomorrow is the first day of fall," he said, "not that we've really had much of a summer."

Fall usually enters with panache down here—after several weeks of shortening days but hot sun, making us squint on our morning commutes, autumn appears like a debutante at a coming out party. The doors are thrown open and the fog sweeps in, lingering until noon, retreating for a few hours and swarming back in by five. It wasn't much of a shock after the West Coast's abnormally cold summer, but I still say welcome! Bring on the crucifers, sweet fall carrots, and as many apples as I can eat.

First, though, I wanted to say farewell to the flavors of summer. I plucked chiles from our plants and made them into salsa with the last of the red, ripe tomatoes; last bunches of basil and bags of peaches were snatched from tables; I sigh as I pass quickly-paling melons at the market.

Catalunya is known for the spring calçotada in Valls, near Tarragona. Calçots are forced spring onions, which are grilled, then steamed, then dipped in Romesco—and eaten, as far as I can tell, with copious amounts of wine. Valls is in the same area, by the way, that is famous for the human towers—I don't know if there is a connection, but I like to think that there might be.

scallions

It may be late summer instead of early spring, and my green onions may be small and not nearly so sweet, but I wanted to take advantage of my homemade Romesco sauce.

On went the pot of pasta water. Into a very hot pan with a glug of olive oil went three bunches of green onions, darkest green parts cut off. After they were tossed and blackened and just starting to wilt, I took the pan off the heat and covered it—it may not be the traditional coals and newspaper, but it worked. Peeled and cut into mostaccioli-sized lengths, tossed with hot pasta, olive oil, and romesco loosened and warmed with cooking water, this was one of the most satisfying (and easiest) dinners I've eaten in weeks.

romesco with scallions


Pasta amb romesco i calçots (pasta with romesco sauce and green onions)
I used mostaccioli (unridged penne), but I think this sauce would also be great with fettucine—just leave the onions long and perhaps halve them lengthwise.

½ pound mostaccioli or penne rigate pasta
2 tablespoons olive oil, divided
3 bunches (about 2 dozen total) fresh green onions (scallions), tough, dark green parts removed
3 tablespoons romesco sauce

Fill a large pot with water for the pasta and set to boil; when boiling, add salt and cook the pasta to just al dente, about 10 minutes for penne.

Meanwhile, heat a heavy skillet on high heat. Drizzle one tablespoon olive oil into the hot pan and add the onions, tossing well to coat. Let cook, uncovered, stirring every few minutes, until largely blackened and beginning to wilt, 5-7 minutes. Remove from heat and cover.

Place the romesco in a large bowl, add a few spoonfuls of the pasta cooking water, and stir to loosen; set aside.

Spread the onions out on a plate or board to cool slightly. Peel off the outer layer and trim the roots from each onion, then cut into two-inch lengths (or the approximate size of your pasta). Add to the romesco.

When the pasta is done cooking, drain and transfer to the bowl with the onions and sauce. Drizzle with the remaining olive oil and toss well to combine. Adjust for salt as needed.

Serves 2 as a main course

20 September 2010

A gluten-free weekend

I don't have a lot of experience with gluten-free food—I have been lucky enough to have lived my life (thus far) without any dietary restrictions that weren't by choice. I've dabbled with restrictions: when my sister went to college, I latched onto her newfound idealism and dropped red meat from my diet for a year or two; for health reasons, I stopped eating all meat other than seafood for nine years; I fasted for the month of Ramadan while living in Egypt. Still, it was never an allergy that kept me away from anything.

In Los Angeles—home of the diet fad—I encounter countless people who are choosing to eat a gluten-free diet, but very few who have celiac sprue or other gluten allergies that force them to avoid foods, restaurants, and sometimes even friends' homes in order to remain healthy.

I wanted to spend a few days thinking about how often we find ourselves saying, "I could never live without (insert food item here)." Yes, you could. Avowed meat eater, you could live without meat if health or circumstances required it. Chocolate lover, unless you have some sort of theobromine requirement, you could live without chocolate. And all of us could, if necessary, live without gluten.

Gluten, I think, is the key - I've lurked on Shauna's blog "Gluten-Free Girl and the Chef" for ages, and if I've learned anything, it's that eating gluten free does not mean living without bread, or pasta (see below), or desserts (again, see below).

I was lucky enough to have the time to participate in the event Shauna and her husband (the Chef) called "Dancing in the Kitchen with Gluten-Free Girl and the Chef," and it taught me a few things.

First: Restocking a pantry with the staples for gluten-free food isn't cheap.

Second: I never would have bought quinoa flour without this challenge, and I can think of all sorts of uses for it.

Third: Oat flour is really easy to make with a good blender. Now I'm wondering if quinoa flour is, too.

Fourth: If you don't already, learn to love your kitchen scale.

All of the dishes below are from the new cookbook Gluten-Free Girl and the Chef: A Love Story with 100 Tempting Recipes (please purchase from your local bookstore if possible).


Seared Shrimp with Garlic-Almond Sauce

almonds & garlic

This recipe is why I love my blender: mix almonds, garlic, oil, and seasonings, and they sublimate to something akin to crack. I couldn't stop eating this - a little bit on my fork, a dab on my finger, great mounds that made the shrimp more of a utensil than a food item.

seared shrimp with almond sauce


Fresh Pasta with Anchovies, Lemon, and Olives

pasta with anchovies, capers, and lemon

Think of it as Puttanesca without tomatoes, if you like. This sauce was mind-blowing—the wine was subtle, the lemon was bright and fresh but not overpowering. I would dip bread in it, mix it with breadcrumbs to stuff artichokes or tomatoes, toss it with blanched green beans (oh, that sounds good!) ... or just eat it with mounds of freshly made fettuccine, as below. (Note: I had an olive emergency at home, so my pasta is olive-less, but I will definitely be adding them next time)

GF pasta

I found the gluten-free pasta a lot harder to handle than my standard fresh pasta, but I was very impressed with how it held up upon cooking - the freshly-cut, uncooked pasta was quite fragile, but even being tossed around by boiling water, it held together and cooked into a delicious, firm-yet-tender noodle that held the sauce like a champ.

messy chiffonade


Chocolate-Peanut Butter Brownies

peanut butter brownies

Other than not allowing the brownies to cool completely before removing them from the pan (and honestly, who does?), these were a breeze. I think I may add oat flour to my standard brownie recipe, too—they add an interesting texture and, well, oatiness. My swirling skills leave a bit to be desired—I think I should have warmed up my peanut butter, which was really quite thick, but I ended up with fudgy-rich brownies bites and gooey, chocolate-peanut butter bites mixed throughout—not a bad thing.

Peanut butter! In brownies!

16 September 2010

Smoky, sweet, and the color of sunset

Nothing says summer like peppers. Whether fiery habañeros in salsa, plump serranos in a Thai curry, or sweet roasted peppers in a goat cheese panini, they are always at their best this time of year.

I have an habañero plant that is weighed down with dozens of peppers, ready to ripen with a few more days of sun. I'm not sure what I'm going to do with them all - I may try to duplicate a sauce I had at La Cevicheria - but I couldn't be more excited.

Peppers of all kinds are available nearly year-round in Southern California, but too often they are watery or bland. The past month has yielded bell peppers that are rich, sweet, and thick-fleshed - perfect for roasting and whirling through a blender.

roasting

Romesco is a sauce from Catalunya in Northeast Spain; while traditionally made with a dried sweet pepper, I love the full-bodied flavor of fresh-roasted red peppers. After seeing a post on the Smitten Kitchen about Suzanne Goin's recipe, which uses a combination of fresh and roasted garlic, I was inspired to pull the blender out again for another nut-paste.

bread and tomatoes

This recipe is simple and relatively fast - and while there are several things that need to be cycled through the oven, it can all be done on one rimmed baking sheet. I love the addition of smoked Spanish paprika, or pimentón de la vera; it adds an incomparable smoky flavor that can't be beat.

I used a dried guajillo chile for the smallest bit of heat - guajillos are easy to find in mercados or in the "Latin/Hispanic food" section of the supermarket, but the chile in this recipe can easily be replaced with two small ancho chiles or left out entirely for a sweeter sauce.

romesco

Salsa Romesco
Romesco can be served with seafood or grilled vegetables (green onions are traditional) - I adore it tossed with some additional olive oil on hot linguine or fettucine.

3 large red bell peppers
¼ cup raw almonds
¼ cup raw hazelnuts
½ cup olive oil, plus additional for drizzling
1 guajillo chile or 2 dried ancho chiles
3 small roma tomatoes
6 cloves garlic
2 medium slices country bread
3 tablespoons red wine vinegar
¼ teaspoon pimentón de la vera
salt & pepper

Place a rack on the top level of your oven and turn the broiler on high. Wash and pat dry the bell peppers, then arrange on a rimmed baking sheet and place under the broiler. Cook, turning every few minutes with tongs, until blackened all over, 5-15 minutes (it will be faster if you preheat your broiler). Transfer to a large container or plastic bag and set aside to steam & cool.

Turn off the broiler, lower the rack to the center and set the oven temperature to 375˚F. On the same rimmed sheet, arrange the almonds on one half and the hazelnuts on the other. Toss the almonds with a little olive oil and return to the oven. Toast until golden brown (the hazelnut skin will be darker) and sizzling, 8-10 minutes. Place the hazelnuts on a kitchen towel and transfer the almonds to a small plate to cool. Peel the hazelnuts by rubbing them vigorously with the towel.

Remove the stem of the dried chile(s) and shake out the seeds. In the basin of the blender, combine the chile(s) with very hot water; cover and set aside.

Half the tomatoes and place them on the same baking sheet with three unpeeled cloves of garlic and the breat slices. Drizzle the bread and tomatoes with olive oil and return to the oven. Roast, flipping the bread once, until the bread is golden brown on both sides and the tomatoes and garlic are softened, 15-20 minutes.

Peel and seed the roasted red peppers; remove the peels from the tomatoes, if desired. Peel the roasted and raw garlic.

Drain the water from the blender and add the red peppers, nuts, tomatoes, garlic, 2 tablespoons vinegar, and pimentón to the dried chile; pulse briefly just to combine. Break up the bread into pieces and add it to the mixture, pulsing to make a thick paste. With the blender running, drizzle in the ½ cup olive oil. The mixture will be thick and bright orange-red.

Taste and add additional vinegar if desired; salt and pepper to taste.

Finished sauce may be frozen in small jars; alternatively, cover a baking sheet with waxed paper and dollop the sauce by the tablespoonful. Freeze until fully solid, then transfer to a freezer container.

Makes about 3 ½ cups

14 September 2010

The perfect party

I think I've determined the best way to have a dinner party: hold it at someone else's house. I didn't have to deal with pre-party cleaning, had a minimal amount of after-party dish washing, and someone else did the majority of the shopping, too!

Dinner was, for the most part, a smashing success. We chopped mountains of onions and piles of potatoes; I coughed and cried as I pounded masalas in the mortar; we cooked, washed the pots, and then cooked some more. A half-dozen dishes were duly made and devoured, with leftovers for us, our cousins (the official hosts), and even a few lucky guests.

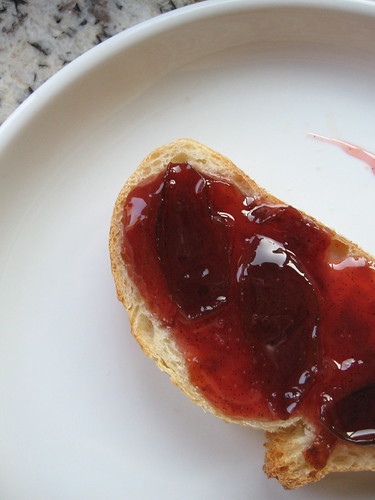
I do want to share a recipe or two from the party - the lamb vindaloo, in particular. The meat was tender and juicy, the broth spicy, tangy, and a wee bit sweet. Unfortunately, my photos from the party are being held hostage on my cousin's camera.

Instead, in honor of the perfect party we had this weekend, I will be sharing 
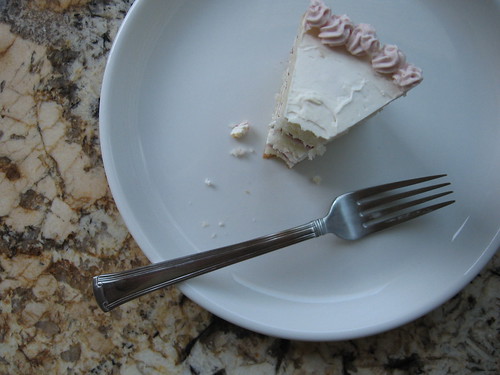
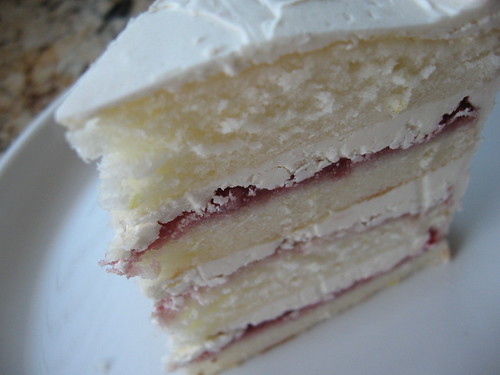
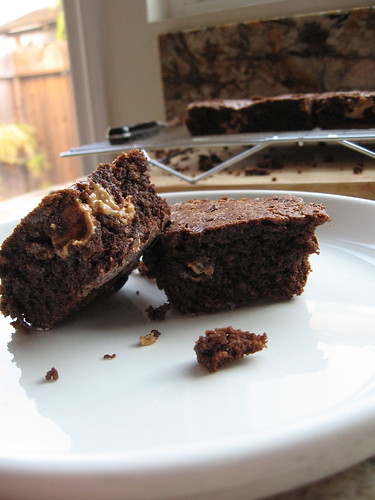
my adaptation of Dorie Greenspan's Perfect Party cake. The cake is light, fluffy, and flavorful; the icing is rich, but not overbearing; the raspberry filling adds a little zing. It is also impressive - four layers that slice perfectly and stand to attention on the plate.

party cake

Of all the things to love about this cake, my favorite was the smell when the layers were turned out of the pans - the butter browns between the pan and the parchment, releasing its nutty perfume. That smell is reason enough to make this cake again. I already have about a half-dozen adaptations for this cake: lemon curd! almonds! spices! The options are endless.

four lovely layers

The flavors of this cake are delicate, so the best quality products really do make a difference. Use the best lemon extract and raspberry jam you can find, and I highly recommend splurging for organic or unsprayed lemons, to reduce the chemical aftertaste on the zest.

Raspberry-Lemon Party Cake
The stand or hand mixer provides the lightness of the crumb, but if you have a strong arm, you could probably make it without. Also, the times I list are estimates based on my own experiences, and differed from the original recipe. Depending on your mixer, ingredients, and luck, these times may vary, so be vigilant.

Cake

2 ¼ cups cake flour
1 tablespoon baking powder
½ teaspoon salt
1 ¼ cups buttermilk
4 large egg whites
1 ½ cups granulated sugar
1 tablespoon lemon zest (from 1-2 lemons)
½ cup (1 stick) unsalted butter, softened
¾ teaspoon pure lemon extract

Buttercream

1 cup granulated sugar
5 large egg whites
1 ½ cups (3 sticks) unsalted butter, completely softened
¼ cup fresh lemon juice (from about 2 lemons)
1 teaspoon pure vanilla extract
¼ pure lemon extract

Assembly

about ⅔ cup seedless raspberry preserves (or 1 cup with seeds - see below)

For the cakes

Center a rack in the oven and set the temperature to 350ºF. Butter two 9 inch cake pans, line with parchment paper, and butter the parchment. Put the pans on a large baking sheet and set aside.

Sift together the flour, baking powder, and salt. Whisk the egg whites and buttermilk briefly in a medium bowl, until the whites are broken up. Set aside.

In a large bowl, mix the sugar and lemon zest with your fingers until moist throughout and very fragrant (note: if I have extra zest on my lemon(s), I will do this with some additional sugar and place it in the fridge for sprinkling on fruit, scones, or using in sablées). Add the butter and beat well with a stand or hand mixer at medium speed, until well mixed and very light (3 to 4 minutes).

Beat in the lemon extract, then add one third of the flour mixture. Beating at medium, alternate half of the egg mixture, another third of the flour, the remaining egg mixture, and the remaining flour, beating well to combine at each interval. Scrape the edges with a spatula, then beat for two full minutes.

Divide the batter evenly between the two cake pans and smooth the tops. Bake 25-35 minutes, until well risen and barely golden. This cake doesn't brown much, but it can become brown if overcooked, so test with a finger poke (it should be springy) and a toothpick.

Cool on racks in the pans for 5 minutes, then run a knife around the edges, unmold the cakes, and peel off the paper. Invert and cool right-side up.

To make the icing

Place the sugar and egg whites in a large heatproof bowl over a pan os simmering water. With a hand mixer at medium speed. beat constantly until hot to the touch, 5 to 6 minutes. The sugar should be dissolved and it should look like a shiny, thick foam. Remove from the heat.

Beat on medium speed until the meringue is well-cooled, 6 to 7 minutes. Add the butter one stick at a time, beating until smooth. (Note: the butter should be completely softened, like when you soften butter for cookies but then forget it for six hours in a reasonably warm kitchen)

Beat the buttercream on medium-high speed until thick and very smooth, up to 25 minutes. If it looks thin or curdles, keep beating until it comes together - I've heard of buttercreams taking up to 45 minutes of solid beating to come together, so if it looks like a failure, give it a good long time before you give up on it.

On medium speed, beat in the lemon juice a little at a time, then the extracts. The icing should be thick, shiny, and smooth. Cover with plastic wrap and set aside.

To assemble the cake

If you are using raspberry jam with seeds (I've yet to find a great-tasting seedless jam), warm it slightly or stir it well, then remove the seeds by stirring the jam vigorously in a sieve set over a medium bowl.

Split the two layers into four with a large bread knife, and carefully flatten one of the top layers, discarding the scraps. Spread a thin layer of preserves on the bottom layer of the cake, leaving at least ⅜ inch all around. Carefully spread about ¼ of the icing over the jam, taking care not to mix them. Gently top with the second layer and repeat, finally topping with the fourth layer. Cover the top and sides of the cake with the remaining icing.

If desired, reserve a small amount of icing and mix with some remaining seedless preserves to tint it; decorate as desired.

Serves at least 12 (easily 16 with small slices)

11 September 2010

Quite a contrast

I've made a goal, since starting to eat meat after 9 years (for me) and 19 (for Mike), to buy the best meat I can afford, to limit my meat consumption to no more than once or twice a week, and to waste as little meat as possible.

In that spirit, I've been buying whole chickens and jointing them myself. The two of us can get quite a few meals out of a 4 pound chicken: I set aside the wings in the freezer for when I'm making fried chicken, stow away extra fat for making schmaltz, and freeze the giblets separately for gravy (or give them to the cats). The most recent pair of hindquarters were roasted with mustard and tarragon and served with tasty roasted potatoes and some ho-hum spaghetti squash, and the breasts were browned and then poached with tequila and lime juice for tacos.

The carcass made a lovely 3 pints or so of stock, which was used to make this quick, easy, and oh-so-delicious weeknight soup. It was a nice contrast for tonight, when I will be cooking for 30. Two meat dishes, 4 main vegetarian dishes, plus appetizers, rice, and dessert. I'll try to take a photo of the carnage.

herbed chicken soup

Herbed Chicken Soup
I don't even know if it's worth posting a recipe for this - chicken soup is pretty self explanatory. The keys to this particular soup are fresh herbs, parmesan cheese rind, and manfrigul: barley-like chunks of dried homemade pasta that cook up chewy and delicious. I will update later this weekend with a recipe for the pasta, but you can replace it with any small, chunky soup pasta, rice, or barley (which will take longer to cook).

Olive oil
Garlic, peeled and lightly crushed
Onion, sliced
Celery, chopped
Carrots, chopped
Chicken or vegetable stock (preferably homemade, 3-4 cups minimum)
Bay leaf, fresh or dried
Salt & pepper to taste
3-4 inch rind of good Parmigiano cheese
Cooked chicken, cut or torn into bite-sized pieces
Sprig fresh thyme
Manfrigul, another soup pasta, rice, or barley
Fresh parsley, tarragon, and/or other assorted herbs

Heat a medium pot over medium heat with a drizzle of olive oil. Add garlic, onions, carrots and celery and cook for a few minutes, until fragrant, with onions translucent but not brown.

Add the stock, bay leaf, and season to taste with salt & pepper. Increase heat to high and bring to a boil, then add the parmesan rind, chicken, and thyme and reduce heat to a simmer. If using the barley, add it to the soup immediately.

After 5-10 minutes simmering, add the pasta or rice and simmer until tender. Finely chop the remaining fresh herbs and stir into the soup just before serving.

Remove the bay leaf and garlic clove(s) before serving, and give the cheese rind to your favorite person at the table.

Serves 2 as a main course the way I made it, with about 3 1/2 C stock

08 September 2010

Suffering in the name of thrift

I don't like to throw food away. I would be lying if I said that it was an extraordinarily rare occurrence in our home, but I don't like it. Often I will find myself with some peaches that have ripened to perfection on the twenty minute walk home from the market, or a bundle of chard that was carefully wrapped, then forgotten at the bottom of the crisper drawer. More often than not, I will carefully peel and pit and scrape out bad spots, then dump the food in the freezer to use later in smoothies or soup ... more often than I'd like, I find it a year later, freezer burnt beyond recognition under an ice pack.

So imagine my concern, a week or so ago, when I found myself with a bowl full of egg yolks in the fridge. I had sorbet in the freezer, and a tart in the fridge already ... and all I could think of was ice cream.

About ten minutes' walk from my old house at college is an ice cream parlor called Herrell's. We stopped in while I was visiting colleges in the heat of August, and it remained one of my favorite shops during my three years in Northampton. The flavors were always changing, and although I often stick with boring flavors like chocolate, I found myself yearning for new and different things whenever I went in.

I was always excited for the beginning of holiday season, and the introduction of Egg Nog Ice Cream - not a regular grocery-store item at the time. I was delighted when I walked in a few days before Valentine's Day my first year of college and discovered "Hearts & Flowers," a lavender and rose petal ice cream available for only a few short weeks. Banana ice cream, with fresh banana puréed and in chunks, made the best milkshake around.

My favorite - the flavor that I usually planned to order, that often found its way into my cup or cone even when I swore I would try something new - was Cinnamon-Nutmeg. It was rich, creamy, and devastatingly simple. No mix-ins, no hot fudge, no nuts on top - just a pale, nearly golden ice cream, flecked with the tiniest bits of spice.

cinnamon specks

Sitting at home, flipping through cookbooks (David Lebovitz, you are truly my downfall. Less than three months blogging and already I have three recipes inspired by this book?), I came upon a recipe for Cinnamon Ice Cream. A few tweaks made up a nice big batch of velvety, spicy, not-too-sweet ice cream. It is so good. So good that it transports me to my college days. So good that there is only this much left:

the dregs

I would serve this ice cream with poached fruit, with a cake or tart - and it would make fabulous ice cream sandwiches with oatmeal cookies. But I usually eat it plain.

Cinnamon-Nutmeg Ice Cream
Inspired by Herrell's and heavily adapted from The Perfect Scoop
Note: I read a lot about not reducing the fat level in ice cream because it will increase graininess. For me, I find it far more distastefull to find a thin layer of fat coating my spoon and palate (a phenomenon I can't avoid with a high ratio of cream), so I often use about a 2:1 ratio of whole milk to cream. A higher ratio of milk, without special equipment, tends to result in icy cream, but I have never had a problem with this ratio.

3 cups whole milk
1 cup + 2 tablespoons sugar
⅛ teaspoon salt
3 five-inch cinnamon sticks (I use Ceylon or "true" cinnamon), broken into several pieces each
1 whole nutmeg, roughly broken with a mallet or pestle
1 ½ cups heavy cream
¼ teaspoon ground cinnamon, or half cinnamon and half ground nutmeg
8 large egg yolks

Combine the milk, sugar, salt, cinnamon sticks, nutmeg, and one cup of the cream in a medium, heavy-bottomed saucepan. Heat until hot to the touch but not boiling. Cover, remove from heat and let steep about one hour.

Rewarm the milk mixture and remove the big chunks of cinnamon stick and nutmeg. Pour the remaining ½ cream into a large bowl and set in an ice bath and set aside. Whisk together the egg yolks in another bowl, then temper the yolks by slowly pouring in about half of the hot milk, whisking constantly. Return the yolk mixture to the saucepan and put the pan on medium heat. Add the ground spices (I usually taste before to determine how much of each) and stir constantly until thickened enough to coat the spoon.

Pour the hot mixture through a fine mesh sieve into the bowl with the cream. Stir until cool, then cover and chill thoroughly. Freeze in your favorite ice cream maker.

Makes 1 ½ quarts

06 September 2010

In order to avoid pine nut mouth

This long weekend has been much-needed, but hasn't resulted in a lot of cooking. I felt like I was coming down with something, so I spent most of Sunday lying on the couch in my pajamas, feeling sorry for myself and watching Law & Order (is that show ever not on TV?).

Still, I've found time to dirty a kitchen full of dishes. I've roasted endless peppers and eggplant for grilled sandwiches, made 3 quarts of chicken stock, simmered a fantastic ginger-plum compote that I completely forgot to photograph. I roused myself enough to make a batch of cookies last night, but the recipe needs a bit more tweaking before I share it. Instead, I'm going to share my most recent recipe for pesto.

basil & almond pesto

You may have heard about the problems people are having these days with pine nut mouth. Many people say that the Chinese crop is the cause of the increase in this phenomenon, but since I didn't feel like paying $16 for 8 ounces of Italian pine nuts, I decided to adapt my pesto recipe.

Walnuts are a common replacement for pignoli, but I've never liked walnuts. Although our relationship has recently started to soften, thanks to a marvelous piece of baklava that was brought on the house at our favorite Greek restaurant, I still tend to avoid them when I can.

pesto

Enter almonds. Any nut can make a good pesto, but I love the flavor of almonds, particularly these almonds that I bought raw and lightly roasted with olive oil and sea salt. Combined with the bite of raw garlic, the grassy, anise-like flavor of fresh basil, and a touch of red pepper, this pesto is perfect for smearing on bruschetta, tossing with hot pasta, or stirring into a soup.

penne al pesto

Basil & Almond Pesto

½ cup raw or roasted almonds (see below if using raw)
2 cups lightly packed basil leaves (from one large bunch)
4 large cloves garlic, lightly crushed
¼ teaspoon salt
pinch red pepper flakes
black pepper
½ cup good olive oil, plus additional if needed
¼ cup grated & packed pecorino cheese (substitute parmigiano if desired)

If you are using raw almonds, preheat the oven to 350ºF. Spread the almonds on a baking sheet, drizzle with some olive oil and sprinkle with sea salt. Toss well and cook, stirring once or twice, until golden brown and fragrant, 10-15 minutes. Let cool completely.

Place the almonds, basil, garlic, salt, red pepper flakes, and black pepper into a blender or food processor. Pulse a few times to combine, then, with motor running, slowly drizzle in the ½ cup olive oil. Scrape sides as needed. Alternate tablespoonfuls of water with additional tablespoonfuls of olive oil until the almonds are well ground and the mixture forms a smooth paste. Add the cheese and pulse briefly to combine.

To freeze, line a baking sheet with foil, waxed paper, or plastic wrap and drop the pesto in tablespoonfuls. Freeze until solid, then transfer to airtight container.

For pasta or gnocchi, place about 1 tablespoon pesto per serving into a large serving dish. Add a few teaspoons cooking water and stir to make a thick slurry. Drain the cooked pasta, then add to the pesto and toss well to coat. Serve with additional cheese if desired.

Makes about 1 ½ cups

02 September 2010

Stuffed squash (sandwiches)

Sometimes I see something at the market that makes me toss my week's meal plan into the recesses of my bag and start from scratch. Often, it's something that I don't usually eat and never think of, but the wheels start turning and I can't be stopped.

That happened this week when I saw lovely little spheres of zucchini - often called 8-ball squash. They were simply begging to be stuffed. I'm not normally interested in summer squashes - I remember being force fed sautéed zucchini at my grandma's dinner table practically every day in the summer - but I've grown to not mind it when mixed with other foods.

stuffed squash with roasted chick peas

These squash made a lovely and easy vegetarian main dish - for a bit of Middle Eastern flavor, the filling of onions, garlic, tomatoes and chick peas were seasoned with toasted cumin, cinnamon, a touch of red pepper, and a bit of fresh oregano. The vegetables were combined with some tiny croutons before being stuffed into the squash shells and baked. Served with crunchy roasted chick peas and an olive oil fried egg, it made for a perfect summer dinner.

The added bonus? The next day, I reheated & quartered my leftovers and stuffed them into a piece of pita. Topped with yoghurt, it made a great work lunch.

chick pea & squash sandwiches

Stuffed Squash with Chick Peas

For the roasted chick peas:

1 t cumin seeds
about 1 C cooked chick peas, or ½ a can, rinsed well, drained, and patted dry
salt & pepper
olive oil

For the squash:

4 medium 8-ball squash (1 ½ - 2 pounds total)
1 slice mild bread, or ¼ cup coarse breadcrumbs
1 tablespoon olive oil
2 large cloves garlic, minced
½ small onion, chopped
2 plum tomatoes, chopped
1 C cooked chick peas, or the remainder of the can used above, rinsed & drained
⅛ teaspoon cinnamon
pinch crushed red pepper
salt & pepper

Preheat the oven to 375°F. Place the cumin seeds in a small pan over medium heat and toast, tossing regularly, until fragrant and lightly browned but not burnt, 3-5 minutes. Transfer to a mortar or spice mill and grind.

Spread the 1 C chick peas onto a baking sheet; drizzle with olive oil and sprinkle with salt, pepper, and half of the cumin. Toss well to mix and transfer to the oven.

Roast, stirring once or twice, until the chick peas are golden brown and quite crispy, 30-45 minutes, then set aside.

Meanwhile, wash the squash well and cut the top ½ inch or so off, retaining the "hat" for baking. Using a melon baller or grapefruit spoon, hollow out the squash, leaving a wall about ⅜ inch thick all around. Reserve the squash innards, place the hats on the squash, and set aside.

If using bread, toast until very crisp and golden brown, then chop up into very small cubes; set aside.

Heat a skillet with the olive oil over medium heat. Cook the onions and garlic until fragrant and translucent, then add the tomatoes and chick peas and cook until the tomatoes begin to break down, 3-5 minutes. Chop up the scooped-out squash and add it to the vegetables with the remaining cumin, cinnamon, crushed red pepper, and salt & pepper to taste.

Stir in the croutons or bread crumbs and mix well. Stuff the squash with the mixture, being careful not to pack too tightly. Mound slightly and top with the squash "hat", then transfer to a glass pie pan or baking dish. Bake at 375°F for 20-40 minutes, until the squash are tender when squeezed or poked with a sharp knife (20 minutes will produce a more tender-crisp squash).

Serve with some roasted chick peas and an olive oil fried egg, if desired.

For squash sandwiches, halve and heat pita bread. Quarter the squash and stuff in the pita with any remaining chick peas. Drizzle liberally with thick plain yoghurt and a dusting of cumin, if desired.

Makes 4