27 October 2010

A toe in the pool and a deep breath

Whew.

Since my birthday weekend, I've been faced with a bout of culinary ennui more powerful than I could have expected. Dinners have been mindless batches of pasta with tomato sauce from the freezer, big bowls of spicy lentils with rice, or simple salads and sandwiches. Lunches were comprised of leftovers, and my camera languished in the back of the drawer.

After a great meal of roast chicken with sausage-and-apple stuffing and a big deadline at work passing, I think I'm back—and what plans have I for the coming weeks!

I have so many things to show you: I've perfected a cookie recipe; I finally have a book I've craved for years; the cool weather is making me crave my family's lentil-and-kielbasa stew.

This Sunday I woke up to rain, and decided to celebrate by baking my first Daring Bakers' challenge - doughnuts!

a slow rise

The October 2010 Daring Bakers challenge—myfirst—was hosted by Lori of Butter Me Up. Lori chose to challenge DBers to make doughnuts. She used several sources for her recipes including Alton Brown, Nancy Silverton, Kate Neumann and Epicurious.

I've made cake doughnuts dozens of times in my life, but I've never made yeast doughnuts. A flour-coated kitchen and endless bowls of glaze later, we had a feast of fried dough.

wide variety

Doughnuts offer endless variations. In addition to plain, creamy maple and sweet-tart raspberry glazes, I filled some hole-less varieties with sweetened fresh ricotta and lemon. A granny-smith apple, chopped and cooked in butter and brown sugar until tender. The apple fritters were oddly puffy, but delicious.

maple glaze

The cake doughnuts held so much promise—I tried to duplicate the fantastic blueberry-buttermilk doughnuts from Stan's, but my oil temperature was off, and they turned out as slightly gooey bites of almost-perfection.

cake doughnut

Recipes for the adapted recipes will follow—everyone should make homemade doughnuts at least once.

18 October 2010

On virtuous eating ... with bacon

The beans-and-greens combination is nearly perfect. Not only are both ingredients healthy and delicious, but there are so many combinations! Kale-cannelini, chard-chickpea, beet-black bean; in soups, salads, or sautés, the final result is a dish that will leave you feeling righteous, even while you lick your bowl clean.

Unfortunately for you and me, even the warmer climes are reaching the sad end of fresh black-eyed peas. After six weeks of walking past heaping boxes of purple-green pods, I took the plunge in time for only two meals; at the market this Saturday, only one vendor had one sad pile of beans left.

fresh black-eyed peas

Even when I've bought canned beans for the sake of simplicity, I've long been in the dried-beans-are-better-than-canned camp, but I have had few opportunities to try fresh shelling beans. The spring is filled with hours of thumbnail-splitting fava bean preparation, but I've yet to see the beloved fresh limas, borlotti, or cranberry beans of which I've heard so many tales. If they're anything like black-eyed peas, though, I'll be on the hunt.

This is a virtuous dish despite the use of bacon. After lardons of bacon are sautéed until crisp, sweet onions are caramelized in some of the rendered bacon fat. The greens are added with some stock, garlic, and liberal amounts of pepper, then gently mixed with the tender beans and the bacon. I served it over brown rice, but it would be equally delicious with pasta, or perhaps made with a little bit more broth and poured over a piece of crusty, toasted bread.

fresh black-eyed peas with swiss chard and bacon

If you can't find fresh black-eyed peas, this dish would also be great with dried beans—I've included notes for adjusted soaking/cooking times in the recipe below.


Fresh Black-Eyed Peas with Swiss Chard
This dish can easily be made kosher/vegan by omitting the bacon and replacing the bacon grease with 2 tablespoons of good olive oil. If you would like a smoky flavor that the bacon brings, try sprinkling the dish with a bit of smoked sea salt before serving.

This dish doubles easily and reheats well, so make lots while fresh beans are available!

¾ to 1 pound (unshelled) fresh black-eyed peas (for 1 ½-2 cups shelled beans), or 1 cup dried
2 slices bacon
½ large sweet onion, thinly sliced
2 cloves garlic, peeled and chopped
½ cup chicken or vegetable stock
2-3 sprigs fresh thyme (optional)
1 medium bunch Swiss chard, center ribs removed (about 8 oz net), chopped or roughly torn up
salt and coarsely ground black pepper
1 teaspoon apple cider vinegar

Shell the fresh beans into a medium saucepan. Rinse well and cover with cold water at least one inch above the beans. Bring to a boil over medium-high heat; reduce heat, cover, and simmer until just tender, 15-25 minutes (for best results, do not salt). Rinse with cold water, drain, and set aside.

Meanwhile, cut the bacon crosswise about ½ inch (1 cm) thick and cook until golden and crisp over medium-high heat. Transfer the bacon to a paper towel to drain. Pour off roughly half the grease, leaving about 2 tablespoons in the pan. Add the onion, reduce the heat to medium-low, and cook, stirring regularly, until caramelized to your taste, about 20 minutes.

Add the garlic and cook, stirring until fragrant. Add the stock and thyme; deglaze the pan, then increase heat to medium. Add the chard a handful at a time, stirring gently until wilted. When all the chard is added, partially cover and simmer until tender, about 10 minutes.

Add the bacon, drained beans, and cider vinegar; taste and add salt as needed and liberal amounts of cracked pepper.

Serve over rice, toss with pasta or add additional stock to make a hearty stew.

NOTE: If you are using dried black-eyed peas, you can pre-soak or not.

To pre-soak: rinse, then cover with cold water in a medium saucepan. Bring to a boil, then turn off the heat, cover, and set aside for one hour. Drain, cover again with cold water and simmer until tender, about 30 minutes. (Pre-soaking will take longer; some people think it makes the beans easier to digest, but it is not necessary with black-eyed peas)

To cook directly: rince, cover with cold water in a medium saucepan. Bring to a boil, then reduce heat. Cover and simmer until tender, about 45-60 minutes.

Serves 2-3; doubles easily to serve 3-6.

16 October 2010

Not that we need a reason for cake

for the birthday girl

A birthday is always a good reason for cake, no?

After my cake-off a couple weeks ago, I settled on a recipe that I liked: an adapted version of 
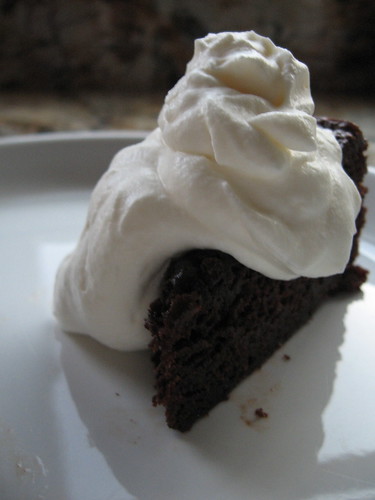
this recipe, made with strong coffee and bittersweet chocolate. I first frosted it with a simple bittersweet ganache, but after a few bites decided that the flavors were fighting for dominance. A simple whipped cream was fantastic; a soft counterpoint to the assertive cake.

In the end, I chose a mild espresso buttercream, an adapted version of this frosting recipe. I've never been a fan of buttercreams—they are generally cloyingly sweet and much too rich—but the sweetness of this frosting is tempered by both the espresso and the bitter-but-not-too-sweet cake.

My cake-decorating skills aren't the sharpest—the cake resembles a shoddy spackle job from 1973 more than anything else—but modern art food styling aside, this cake was a perfect end to the day.

espresso buttercream

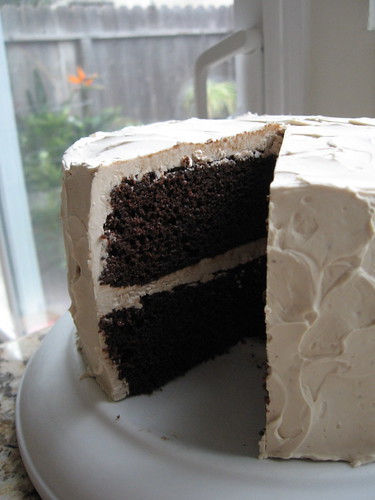
The cake itself is marvelous and grown-up, with a tender crumb and a complex flavor. The coffee, chocolate's favorite supporting cast member, is only identifiable in the cake if you're looking for it, but it makes the bittersweet chocolate stand up and get noticed. In fact, the only thing I would change would be to increase the coffee in the buttercream.

cake geometry


Bittersweet Chocolate Cake with Espresso Buttercream
Adapted from Epicurious and Baking: From My Home to Yours

I used an Americano-style coffee in the cake batter, as I only have a small stovetop espresso maker. This recipe makes 3 eight-inch layers, 2 ten-inch layers, or 3 dozen cupcakes. My third eight-inch pan was mysteriously swallowed by my pantry, so I made 2 eight-inch layers and a dozen cupcakes.

Note: in my experience, this cake is vastly improved from an overnight nap in the refrigerator before frosting; just make sure to let the cakes come to room temperature fully wrapped before frosting.

Cake

3 ounces bittersweet chocolate (I use Valrhona)
1 ½ cups hot coffee, or 6 ounces espresso mixed with water to make 1 ½ cups
3 cups sugar
2 ½ cups unbleached flour
1 ½ cups natural unsweetened cocoa powder (I ran out and used a 9 ounce for $1.99 box from Trader Joe's—and it was remarkably good)
2 teaspoons baking soda
¾ teaspoon baking powder
1 ¼ teaspoons salt
3 large eggs
¾ cup canola oil
1 ½ cups buttermilk, shaken
¾ teaspoon vanilla

Buttercream

1 cup granulated sugar
5 large egg whites
1 ½ cups (3 sticks) unsalted butter, completely softened
¼ cup strong espresso, cooled completely
1 teaspoon pure vanilla extract

To make the cakes

If you are using cake pans, butter the pans, line the bottoms with parchment paper, then butter the parchment; set aside. If making cupcakes, line the pans with cupcake liners or butter and dust with additional cocoa powder.

Coarsely chop the chocolate and pour the hot coffee over. Let cool, stirring occasionally, until the chocolate is completely melted. Set aside.

Sift together the sugar, flour, cocoa powder, soda, baking powder, and salt into a large bowl; set aside. Place the eggs in a very large bowl and beat with a hand mixer on medium speed until pale yellow and slightly thickened, 3-5 minutes. Beating constantly, slowly add the oil, buttermilk, coffee mixture, and vanilla. Add the dry ingredients in one go, beating just until combined; to avoid overbeating, stop the machine a bit early and use a stout spatula to finish the job.

Bake just until a skewer or toothpicks poked into the center comes out clean, 20-30 minutes for cupcakes, 50-70 minutes for cakes. Cool completely in pans on racks, then remove from pans. Peel the paper from the bottom of the layers, wrap tightly in plastic wrap, and keep at room temperature or refrigerate overnight. Let come to room temperature before frosting.

To make the frosting

Place the sugar and egg whites in a large heatproof bowl over a pan of simmering water. With a hand mixer at medium speed, beat constantly until hot to the touch, 5 to 6 minutes. The sugar should be dissolved and it should look like a shiny, thick foam. Remove from the heat.

Beat on medium speed until the meringue is well-cooled, 6 to 7 minutes. Add the butter one stick at a time, beating until smooth. (Note: the butter should be completely softened)

Beat the buttercream on medium-high speed until thick and very smooth, Anywhere from 6 to 25 minutes. If it looks thin or curdles, keep beating until it comes together - I've heard of buttercreams taking up to 45 minutes of solid beating to come together, so if it looks like a failure, give it a good long time before you give up on it.

On medium speed, beat in the espresso a little at a time, then the vanilla. The frosting should be thick, shiny, and smooth. Cover with plastic wrap and set aside.

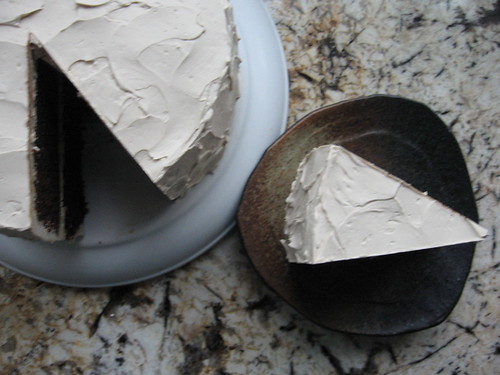
Store the cake in the refrigerator. For the neatest slices, cut while cold and let come to room temperature on individual plates.

Serves 8-12 as a two-layer 8" cake, 14-16 as a three-layer

14 October 2010

The best and the worst

I've been eyeing the fresh black-eyed peas at the market every Saturday for a month, coveting and planning—and getting distracted. I buy favas in huge amounts throughout the spring, spending hours shelling, blanching, and peeling—I've never shied away from working for my dinner—but I never really new what to do with fresh black-eyed peas.

Enter Alice Waters' Chez Panisse Vegetables, a leftover package of bacon, and the mother of all swiss chard (that's a large dinner fork).

big chard!

Add some caramelized onions, a dab of cider vinegar, and some brown rice, and we sat down to the best dinner I've eaten in months. The beans-and-greens combination is always a great one, and this is no exception.

As I tasted, wrote notes, and muttered to myself about how good it was going to be, I was already planning my post, excited to share such a healthy, easy, and fan-freaking-tastic meal with you, when I stumbled upon a problem.

We ate it all. Every bite. That photo of the chard up there? It's all I've got.

In my defense, it's far too dark here for photos when dinner is ready, and I have to rely upon leftovers for a picture of anything that I cook at night. Unfortunately, the empty skillet and a bowl of rice was all that was left to photograph.

So, I leave you with a request, and a promise: look for fresh black-eyed peas at your local market, and if you find them, by a pound or two and stash the bag in your crisper drawer. This weekend, I will post the recipe (and some photos). I'm only sorry I didn't start doing this a month ago.

11 October 2010

Crab canapés

Growing up by the sea has distinct advantages.

The salt-seaweed-shellfish smell, the funny feeling when you poke an anemone, a slip on kelp-covered rocks and hands bleeding with barnacle cuts—all of these things are tied up in my childhood.

scavengers
(Picture taken by my cousin José)

We drove past the harbor whenever we went, well, anywhere. On a lucky day, we would see a piece of plywood propped at the entrance with a dripping orange spray-paint sign: HALIBUT $4/LB, and I've never quite forgiven a close family friend for bringing us King Crab straight off his boat the same day I had my wisdom teeth removed.

If you are every lucky enough to visit Juneau, Alaska, make sure you go to Jerry's Meats. Nestled in an industrial area behind the wetlands and near Lemon Creek, Jerry's does a fine business smoking and packing everything the locals bring in, from halibut to moose. Luckily for the rest of us, they also sell a wide variety of fresh and frozen seafood and meats. Every time I go to Juneau I stock up with a styrofoam box full of halibut, King, and the best smoked Sockeye salmon you'll find—but I never have enough room left for Jerry's famous crab dip.

butter crackers

I've seen all sorts of recipes for hot crab dip online, but this dip is from a different world. It tastes like something you would find on a canapé platter from 1957: creamy and delicately flavored, it pairs equally well with crusty bread or a buttery table cracker.

Good articifical crab (or "krab," as it once was called) is not to be scorned—made properly, it's better in dip than real crab. Besides, who wants to take that carefully-extracted crab meat and mash it all up? Still, if you have a source of cheap crab or are prepping half a dozen for freezing, it's worth tossing the little bits in a bowl and making up some of this dip.

crab dip


Cold Crab Dip
Inspired by Jerry's Meats

Note: if you choose to use artificial crab, please take a look at the ingredients and buy the most environmentally-friendly variety you can find. Many varieties of articifical crab are made with overfished or farmed varieties; Wild Alaskan Pollock is a good-tasting, well-managed fish (listed as a "good alternative" on the Seafood Watch website).

5 oz real or artificial crab, cooked and chilled (or frozen and thawed)
¼ cup cream cheese
2 tablespoons mayonnaise
¼ teaspoon celery salt
1 teaspoon fresh dill, finely chopped
salt and pepper to taste
lemon juice (optional)

Place the crab in a medium bowl and shred it into small pieces with two forks.

Add the cream cheese and mayonnaise and mix well to combine. Add the celery salt, fresh dill, and black pepper. Mix well, taste, and add salt and/or lemon juice as needed.

Serve with bruschette, warm crusty bread, or crackers.

Makes a scant 2 cups

09 October 2010

A small slice

Where has the time gone? My days have been a whirlwind; I think I've spent more time washing the ever-growing stack of dishes that fills my kitchen than I have cooking. I'm sometimes convinced that there's some sort of kitchen sprite that cooks great meals while I sleep, leaving the empty plates and bowls for me.

I had a cake-off earlier this week—my birthday is fast approaching, and I wanted to experiment with a few recipes. After making three different chocolate cakes—a deep, dark chocolate cake; an adapted version that was more torte-like; and my childhood chocolate-mayonnaise cake—I took them to work and asked for opinions.

side-by-side

This was a serious job, it seems. The cakes were devoured and I was left with three pages of detailed notes outlining the positive and negative aspects of each cake. The big winner, and my favorite, was the first cake (adapted from this recipe). Although I have yet to find a frosting that can stand up to the deep, rich, espresso-and-chocolate flavors of this cake without overwhelming the palate, it was perfect mounded with a sloppy tower of whipped cream.

chocolate gateau

More adjustments will be made before the weekend, and I will be able to give you more than just a picture. Hopefully in the weeks to come, the other two recipes will be presentable, as well. After all, you can never have too much chocolate.

05 October 2010

The perfect pancake

I have a love-hate relationship with pancakes (which I, by the way, called "hotcakes" until I got to college and began losing my Alaskan-with-Southern/Midwestern-origins dialect; I still say "fair to middlin'" and "Down South" when I mean "Seattle," though).

batter

I grew up on a hybrid pancake mix, which involved blending Bisquick, a Belgian waffle mix, and a honey-oat waffle mix into one giant plastic container. Nearly every Saturday, I would get up and expertly blend the mixture with just the right proportions of egg and milk, then heave our big electric griddle from the pantry to the kitchen counter. If I had a friend over, we would invariably take some batter aside and add a horrid mixture of food coloring to make maroon, teal, or chartreuse pancakes.

The pancakes themselves were thin but relatively flavorful. Since those days, however, I have abandoned not only wildly-colored pancakes but also pre-purchased mixes, preferring for years to jump from one recipe to another every six or eight months, tweaking an amount here, replacing an ingredient there. My standby has been the buttermilk pancake recipe from what we always called "The Stone-Buhr Cookbook," a beloved baking cookbook that my mom received by mail for a few UPC codes and about $2.25 back in the seventies.

griddle cakes

It's a fantastic cookbook, with many of my family favorites: chocolate-banana bars, cornbread, blueberry muffins. Like any good family cookbook, its pages are filled with scribblings from various family members, with many a GOOD written in bold black Sharpie. Dozens more recipes have never been tried and are waiting for me to find them when I'm in the mood for something new.

I love breakfast, but I'm more likely to eat cereal, toast, or maybe a fried egg sandwich than make pancakes on the average morning, so we usually enjoy our pancakes and waffles at dinnertime. Breakfast for dinner was a much-loved meal in my childhood home—and pancakes with jam or syrup are like dinner and dessert all wrapped up in one!

oaty pancakes

I originally planned to make this recipe, but just like every other time I've intended to make it, I forgot that the batter has to sit overnight. Instead of settling with a basic buttermilk pancake, I decided to play around with it. The resulting pancakes were an advertisement for adapting recipes—thick, flavorful, and just oaty enough.


Half-Oatmeal Pancakes
Adapted heavily from Cooking with Gourmet Grains (aka "The Stone-Buhr Cookbook")
Note: As of February 2011, we have started referring to these as "wheaty oaty pancakes"—I replace ½ to 1 cup of the unbleached flour with wheat flour, and I like them even better that way.
Note (April 2012): I have added weights in for those who may prefer using a scale. I do still dirty a ½ cup measure for scooping the batter onto the griddle, though. Also, if you don't have oat flour, just increasing the amount of oats to 3.5 ounces/1 cup works fine.

6 ounces (about 1 ½ cups) unbleached flour, or 4 ounces/1 cup flour and 2.5 ounces/½ cup wheat flour
1.75 ounces (about ½ cup) oat flour
1.75 ounces (about ½ cup) rolled oats
1 teaspoon baking soda
¼ teaspoon baking powder
1 teaspoon salt
2 tablespoons raw sugar
2 large eggs
2 cups buttermilk
2 teaspoons mild oil
butter for cooking

Heat a griddle or a couple heavy skillets on medium to medium-high heat. If you would like to cook all of the pancakes before eating, set your oven to warm (about 200ºF) with a baking sheet on the top rack.

Combine the dry ingredients in a large bowl. Beat the eggs well and add to the dry mixture with the buttermilk and oil, stirring just to combine; batter will be lumpy.

When the griddle/pans are hot, drop a small knob of butter to melt. Pour the batter by half-cupfuls; do not spread out. Let cook until the edges are beginning to firm and the bottom is golden brown, three to four minutes. Carefully flip and cook until golden brown and cooked through, another two to four minutes.

Transfer cooked pancakes to the warmed baking sheet, overlapping each slightly.

Makes about eight 6-inch pancakes