25 August 2011

It's a start

I've managed, in the past several days, to work my way from lying prone on the couch, sipping soup and running through entire boxes of tissue to having some ability to put together coherent thoughts, interrupted only by the occasional three-minute coughing fit. I guess I'll call it progress—on the bright side, a hacking cough provides a fantastic ab workout. Amazingly, I've actually been cooking. My favorite sick foods are not exactly blog-worthy (eggs poached in milk, served over toast, ramen noodles, and tomato-rice soup with cinnamon), but I didn't entirely lose my sense of taste, so once my throat had recovered a bit, I decided to take advantage.

panini with tomato salad

Shortly after returning from my trip, I went to the farmer's market to find that summer had finally taken hold: piles of peppers, boxes of beautiful (and horribly overpriced) heirloom tomatoes, great heaps of fragrant basil. On my own little patio, habañeros are beginning to turn orange, tomatoes are ripening almost as fast as we can eat them, and a sunflower kindly planted by one of our local songbirds is swiveling from east to west each day.

fresh basil tops it off

I came home with a shock of sweet Italian basil, a big bag of red peppers, and a plan. Particularly in California, bell peppers seem to be forgotten around the summertime. Eggplant are everywhere, towers of corn stack up on tables and in grocery stores, and boxes of watermelon and cantaloupe loom like bodyguards at store entrances. But bell peppers? Eh, you can get those any old time.

True? Perhaps. But deeply colored peppers, small and firm, with sweet and lightly acidic flavor—those are harder to find. Red peppers (or their orange and yellow siblings) are all right raw, I suppose, diced with some red onion and a tangy vinagrette or used as a vehicle for hummus or some other sort of dip, but their flavor deepens when cooked. They pair well with spicy Indian flavors and are delicious blended into a nutty sauce, but they are at their most simple and versatile when roasted.

Every summer, I try to find a big bag of super-ripe red peppers on the cheap. Sometimes they are beginning to wrinkle with age, or they're strangely wrinkled and collapsed on themselves, or even beginning to bruise and turn brown. No matter—a hot, hot oven or grill wipes away all those sins. A bonus? Tuck them away in your freezer, and you can add color to soups and stews, or grill up crusty panini, all winter long.

panino tricolore

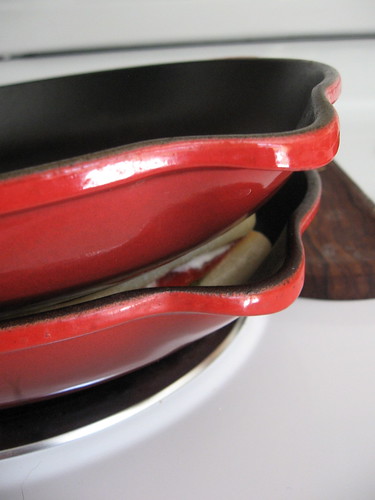
I adore toasted sandwiches. Nearly anyone who is passionate about food would agree that texture and mouthfeel are integral parts of any meal, and for me, any proper sandwich has to have some good crunch. If it doesn't have lettuce, or cucumber, or maybe even some potato chips when the time is right, it's gotta be toasted. (That is not to say that some sandwiches don't require toast and a crunchy filling ... I don't want any soft bread on my BLTs.) A griddle and some melted butter will make a fine toasted sandwich, but the rippled, crusty ridges are what make panini really special. You don't need any special apparatus, although the panini presses look pretty cool; you don't even need one of those special cast-iron grill lids. Any heavy pot that fits into your grill pan or will balance on a flat grill will work fine. I use a 10-inch cast iron skillet that nests into my 10 inch grill pan, but any dish - even a plate weighed down with a bag of beans or a foil-wrapped brick will do.

squashed sandwich


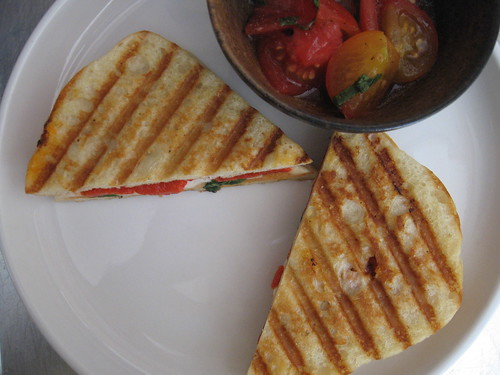
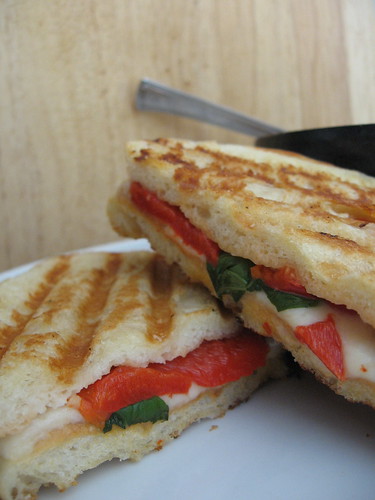
Roasted Red Pepper Panini
To be honest, I usually make these with goat cheese instead of fresh mozzarella (it's less fussy, as the goat cheese doesn't get as gooey when it melts); just sub the goat cheese and spread it a little farther on your sandwich.

4 slices, about ⅜ inch thick, rustic country-style white bread (like a ciabatta loaf), or 2 individual ciabatta rolls
4 ounces fresh mozzarella
roasted red pepper, about one medium pepper total (see below)
8-10 fres basil leaves
salt & pepper
1 tablespoon olive oil
1 tablespoon butter

To make roasted red peppers, preheat your broiler or grill. Rinse red peppers (I can get about a dozen in my oven at once); arrange on a baking sheet and place near the top of the oven or pile them in a single layer on the grill. Cook until the skin is blackened, turning with tongs as needed until tender and mostly blackened all over. Place the peppers in a paper bag or a lidded container and set aside to steam and cool for a few minutes. When cool enough to handle, peel away the skin and remove the stem and seeds; discard all but the flesh. To freeze, you can either set little puddles on a baking sheet, then transfer to a bag when frozen, or stuff them into an ice cube tray and do the same.

To make the panini, heat a heavy, ridged grill pan over medium-high or high heat (because the mozzarella melts quickly, make sure it's higher than you would usually use for a sandwich); have ready an unheated matching skillet or a heat-resistant dish (with weights if needed).

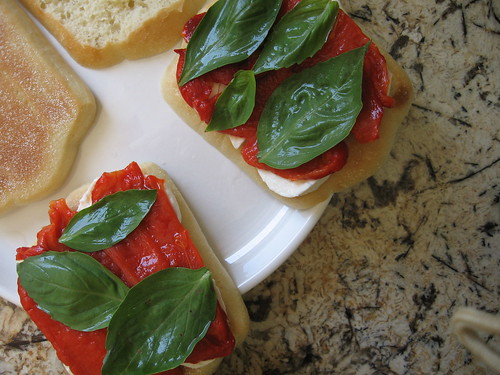
If using individual rolls, cut a thin slice from the top of each roll, then cut crosswise into two ⅜ inch slices. Arrange the bread slices on a plate; if using the rolls, face the cut side down.

Thinly slice the fresh mozzarella and pat dry with a paper towel; if it is very fresh and juicy, you may want to press a little bit to remove a bit more whey. Arrange over two slices of bread, leaving a half-inch clear around the edges. Pat the red pepper pieces dry as well and arrange over the cheese. Scatter basil leaves over, season with salt and papper, and top each sandwich with the other slices of bread.

Melt the butter in a little bowl and mix it with the oil. Brush about half of the mixture over the tops of the sandwiches, then flip the bread, cheese side up, into the grill pan. Set your weight over the top, pressing down if needed to force the bread into the ridges.

Toast 2-3 minutes, until golden brown and crispy. Remove the weight, brush the tops with the butter mixture, and carefully flip. Note: if your pan was too cool or your fillings too juicy, you may have some pepper- or cheese-juice drip into the pan; if so, don't panic - just hold them over a plate to catch the drips before flipping them.

Press on the toasted side just briefly, then remove the weight to finish cooking. If necessary, use your spatula to poke any errant cheese back into the sandwich.

Toast until golden, 2-3 minutes more. Remove to a cutting board to firm up for 1-2 minutes, then cut and serve.

Makes 2 sandwiches

20 August 2011

Jiggedy-jog

There's something to be said for simultaneous refreshment and frustration. After a fantastic 10 days visiting my parents (and an old friend from high school), I returned home, only to contract a nasty virus on the plane ride home. I limped my way through the short week at work and am sniffling, coughing, and sneezing my way through the weekend. Alaska, as always, was a blast. We climbed mountains.

lupine over stephens passage

sunny valley

full dome

devil's paw

tracy arm reflection

climbing down to gastineau peak


We saw ice ...

icy sailing

big bergs

nugget falls mist

south sawyer glacier

ice peaks


 ... and water ...

hole-in-the-wall falls

tongass rain

mountain stream

nugget falls 


 ... and quite a few animals.

harbor seal

marmot

porcupine butt

 (That's a porcupine, by the way, but he was on the move.)

black bear cub

bald eagle


 We also ate a lot of good food, but I didn't take any pictures. Halibut tacos; pea purée (this time with mushrooms, as a topping for pasta); seared coho salmon; and the best fried chicken I've ever made, if I do say so myself. We introduced Mike to zucchini patties and my mom to Swiss chard; we ate spring rolls, crusty pizza, and other hometown favorites; and we made three quarts of ice cream with cherries and dark chocolate stracciatella for my dad. It was fun—in some ways, I could have stayed much longer. Given that they had record-breaking rainfall the two days after we left, though, I suppose it was time.

goodbye!


 Coming soon: red pepper panini, and the mushroom tart-that-almost-wasn't.

07 August 2011

No regrets

It's that time of year again. The time when I make big batches of pesto, fill my freezer with fish and blueberries, stock my pantry with canned peaches and (if I'm lucky) tomatoes, and consequently, find myself trying desperately to use the last of the previous summer's precious haul.

Most recently, it's been blueberries. Good berries are hard to come by, and in my opinion, you've never really eaten a blueberry if you haven't had one from Alaska. Juneau may be rainy and cool, but the fertile soil and wet weather makes for the best blueberries I've ever had; even frozen for nearly a year, these little guys are incredible.

I'm not sentimental—childhood toys and never-looked at photos don't hold much appeal for me—but nothing brings out my inner hoarder like a treasured stash of delicious (and hard-to-find) food. If I find and splurge on a real Spanish chorizo, my meal portions become pauper-like. Bring me a jar of homemade jam, and I'll be spreading it over toast and biscuits for months. With a big freezer bag full of blueberries, I found myself making Blueberry-Maple Syrup (for our now-regular Sunday brunch of pancakes) and little else.

Finally, a year after I picked them, I really needed to make room in the freezer. But what to make? I had an odd desire for blueberry coffee cake, but I also had a half-cup of Meyer lemon sugar languishing in the fridge. However, I was worried about trying something new: wasting a few cups of flour on a failed dish is expected from time to time, but what if I had to throw away—or worse yet, eat and not enjoy—a dessert studded with those carefully picked and lovingly saved blueberries? Quelle horreur!

I googled; I paged through cookbooks. I scribbled little notes and peered into the pantry, agonizing over blog postings and measurements. Eventually, Blueberry-Lemon Cheesecake Bars were born, and I have no regrets.

cheesecake bites

I initially was going to make an actual cheesecake, but despite my husband's endless love for it, it's usually a little too much for me. Cheesecakes are always too rich and too massive—perhaps I should invest in a 6 inch springform, but as it is, I need a special occasion to start working with that much cream cheese at once.

Instead, I decided to take it a bit easy. These bars are like cheesecake on Valium; there's the rich, lemony cheese custard swirled with violet fruit, but the amounts are nearly equal, and the crumbly tart-like almond crust is around half the thickness of the topping. The result is the kind of harmony I expect, but never experience, with cheesecake. Each bite has a little bit of everything and too much of nothing.

an almond crust


Blueberry-Lemon Cheesecake Bars
Note: Meyer lemons are long gone here, but whenever I come across a recipe that calls for juicing (but not zesting) a Meyer lemon, I make lemon sugar. Zest 1 Meyer lemon into ½ cup granulated sugar, distributing the oils with your fingers, then cover well, label the amount of sugar, and refrigerate or freeze. It will last almost forever—though the sugar will go rock-hard—and it saves you throwing away that lovely lemon zest.

For the crust:

¼ cup unbleached flour
¼ cup sugar
pinch salt
1 ½ cup almonds (I usually use raw, but I had a surplus of slivered and used those instead)
6 tablespoons cold unsalted butter

For the blueberry mixture:

1 ½ cups fresh or frozen blueberries (use the best you can find)
1 tablespoon lemon juice

2 tablespoons sugar
1 tablespoon cornstarch or arrowroot (I've been using the latter lately and preferring it for unknown reasons)
For the cheesecake:

12 ounces full-fat cream cheese, room temperature (I find that low-fat or Neufchâtel don't set up properly, but feel free to experiment)
2 eggs
½ cup (Meyer) lemon sugar (see above, or substitute ½ cup sugar with zest of one lemon)
1 teaspoon vanilla extract
pinch salt

Preheat the oven to 350°F. Line an 8 inch baking pan with foil and butter well; set aside. In a food processor, combine all crust ingredients save the butter and pulse until it resembles coarse meal. Cut the butter into 5 or 6 pieces and add to the mixture. Pulse in 10-15 second increments until the dough holds together well with few crumbs. Press into the buttered foil evenly (this will make a nice thick crust of a scant centimeter; leave some out if you prefer a thinner crust) and bake 15-18 minutes, or until beginning to puff all over and turn golden. Remove from the heat and press the puffed parts down with the curved part of a spoon; set aside to cool.

Lower oven heat to 325°F.

Meanwhile, combine the berries and lemon juice in a small saucepan and set over medium heat. Stir together the sugar and starch and add to the mixture. Cook, stirring occasionally, until the berries have completely thawed (if frozen) and are getting bubbly, about 10 minutes (fresh berries will heat faster but take longer to break down a bit, so the time will probably be about the same, fresh or frozen). Remove from the heat and set aside, partially covered, to cool.

Combine all the cheesecake ingredients in a large bowl - make sure the cream cheese is fully softened or you might end up with lumpy cheesecake. Whisk all ingredients together well to combine.

Make sure that the crust is no longer too hot to touch (it needn't be room temperature). Scrape the Cheesecake mixture over the crust, spreading it evenly to the edges. Spoon the berry mixture, now barely warm, over the surface. Using a knife or your spatula, gently swirl the berries and cheesecake together a bit.

Bake 40-50 minutes, until cheesecake is set and beginning to turn golden at the edges, but just a little bit wobbly still in the center. Transfer to a rack to cool completely, then cover with plastic wrap and transfer to the refrigerator. For best results, refrigerate overnight before cutting.

To cut clean slices, remove the cheesecake from the pan with the foil and set on a cutting board. Cut into squares by heating a long, sharp knife under running water and drying it before cutting; rinse the knife between cuts.

Makes 16 cheesecake bites

03 August 2011

Devilish

Stop reading.

No, really. Turn off your computer, put on your shoes, and go to the store to buy some eggplant. You know you want to.

Eggplants are like reverse ugly ducklings. Find a farmer with several varieties of eggplant, you might well be overwhelmed: small, pea-sized green ones; big, nearly black American ones; skinny eggplants in shades of violet and fuschia, sometimes streaked with green or white; pristine white ones that finally explain how they might have gotten their name. Once cooked down to that velvety texture I love, however, even the prettiest specimen has faded to an unappealing grey-brown. Unless you take great pains to keep its shape, it will also slump into almost a paste. Luckily, it's much more delicious than it looks (and sounds).

I eat a lot of eggplant, especially in the hotter summer months, but it almost inevitably becomes baingan bharta. Smoky, creamy eggplant spiked with spices and cooled with mint and yoghurt is delicious, but what about the delicious but oh-so-unfashionable eggplant parmesan? What about Greek-style egpplant sandwiches, and ratatouille, and all the other recipes that I always forget about?

Just over a year ago, I saw a recipe that looked just about perfect. Francis Lam, food writer extraordinaire, fantastic chef, and person whose wisdom I'd very much like to tap, reposted a Gourmet article about eggplant pasta.

eggplant pasta

It was devilishly simple. Salt some eggplant, then cook it with olive oil and garlic until velvety soft. Mash it, toss it with sun-dried tomatoes and basil, and toss it with some spaghetti. It sounded delicious ... but still, when eggplants came into my home, I made more Indian food.

I may be a year late—as with so many aspects of my life, I am unfailingly uncool in the food world—but better late than never. I left Francis behind while I flipped through pages of Marcella and Giuliano Hazan's respective cookbooks, took a look in my refrigerator and my little patio garden, and came up with my own version. This pasta is relatively fast (I think it took me 45 minutes; with proper mise en place it would have been scarcely more than 30) and very forgiving; it would be good with any number of herbs, and even eggplant that's going slightly leathery in the crisper will make a fine meal.

devilishly simple


Eggplant Pasta
Adapted from Francis Lam and Marcella Hazan

1 lb eggplant (I prefer a couple smaller Italian eggplants, but any variety will work)
½ sweet onion, thinly sliced
4 cloves garlic
¼ cup olive oil
1 cup water
2 plum tomatoes (peeled if desired)
pinch crushed red pepper
8 ounces spaghetti or linguine, or some similar skinny pasta
salt and pepper
a small handful parsley, chopped

If you don't like eggplant skin, peel half or all of the eggplants—although with this very soft recipe, I never bother. Slice the eggplant into ½ inch medallions and salt each layer; stack them up and set aside for about fifteen minutes.

Meanwhile, pour most of the olive oil into a 10-12 inch skillet. Add the sliced onion and peeled garlic and set over low heat until fragrant and just beginning to sizzle.

Squeeze the eggplant to expel some of the excess liquid (I do this sloppily, with my hands—it's just going to be mashed up anyway); chop the eggplant into medium chunks. Add it to the pan, stir well to coat, and increase the heat to medium-high. Chop up the tomatoes and add them to the mixture with the crushed red pepper. When the mixture is sizzling happily, add the water and bring to a boil; reduce heat to medium and partially cover; ignore for about 20 minutes.

After about 10 minutes, set a pot of water to boil. Salt it and add the pasta. Cook until 1-2 minutes shy of al dente; drain, reserving ½ cup cooking water, then cover and set aside.

Return to you pasta. Using a fork, wooden spoon, or potato masher, bash it all up into a coarse purée; note that it will look kind of like baby food. If your pot is big enough, toss in the pasta; otherwise, toss the pasta and sauce in the pasta pot. Add about half of the pasta cooking water and toss it all together to coat the noodles; if it's very dry, add more water.

Serve topped with parsley (which does minimize the baby-food effect, if you care).

Serves 3 as a main or 4 as a side