29 July 2011

A real love affair

We were spared the heat dome that covered most of the country (and the news) last week—in fact, it's been unseasonably cool in Southern California, with the overcast mornings and cool evenings more expected in the Pacific Northwest.

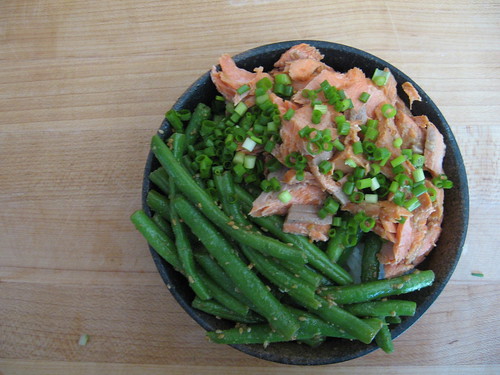
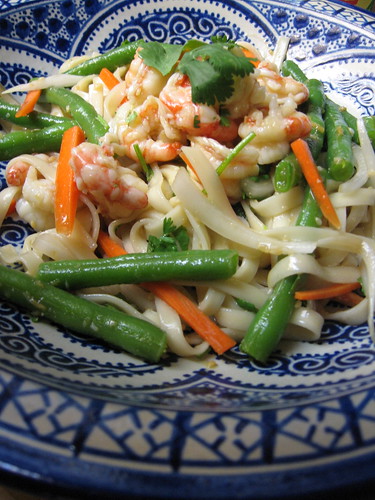
However, when I saw a recipe for cold noodles with sesame sauce, I couldn't help myself. I just so happened to have some prawns in the fridge and a bag of green beans that needed to be used. I seem to be having a real love affair with sesame seeds these days, and who can blame me? The dry nuttiness is well suited to most vegetables, and when mixed with the salty-sour-sweet ingredients and a big pile of cold noodles, it makes the perfect summer meal.

sesame noodles

Despite a few foibles, like forgetting to allow time to let the meal be well chilled—resulting in a colander full of pasta and ice cubes—and adding a bit too much water to the sauce, this meal was fast and easy. My beloved blender recently broke, so I used an immersion blender for the sauce; the resulting mixture was not perfectly smooth, but had lots of whole sesame seeds studded throughout.

Cold Sesame Noodles with Green Beans
Adapted from a recipe at Dispatches from Whitcomb Street

For the sauce (have more of the first four ingredients to adjust flavors):

2 tablespoons good soy sauce
2 tablespoons rice wine vinegar
2 tablespoons mirin
1 tablespoon sugar
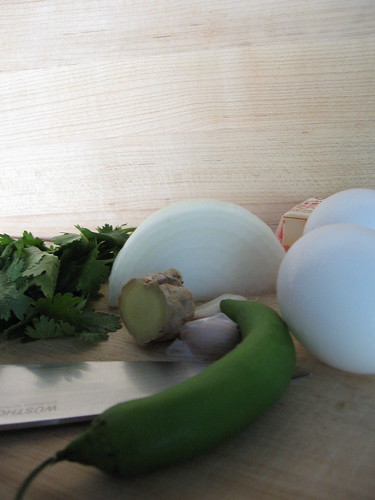
a small lump of ginger, peeled and coarsely chopped (about 1 tablespoon)
1 clove garlic
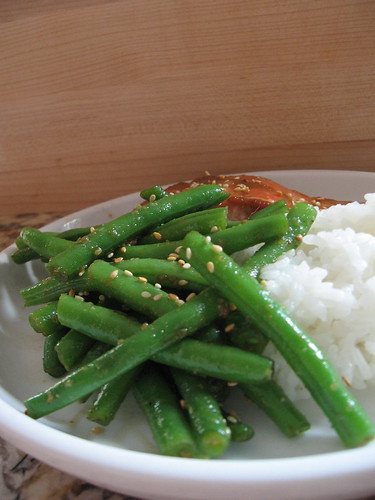
2 tablespoons sesame seeds.

For the noodles:

12 ounces green beans
8 ounces wide Asian wheat noodles
¼ small sweet or red onion
2 small carrots
6-8 ounces peeled prawns, preferably butterflied
2-3 tablespoons cilantro, plus additional for garnish

Place the sauce ingredients in a medium bowl and blend with an immersion blender until well blended but with plenty of whole seeds—use a stand blender if you prefer a smoother sauce. Taste the sauce and adjust to your desire; I added a bit more mirin and soy sauce. Thin the sauce a bit with 1-2 tablespoons water; set aside in the fridge.

Bring a big pot of salted water to boil; meanwhile, snap the ends of the green beans and break them into 2 inch pieces. Boil the green beans just until tender, 4-6 minutes. Fish the beans out and transfer to a large bowl of cold water. 

Return the pot of water to the boil, add the noodles, and cook until a bit shy of al dente, probably 4-6 minutes. Meanwhile, sliver the onion and julienne the carrots. Drain the green beans and add the other vegetables to the bowl.

Toss the prawns into the pasta water for the last 1 minute of cooking; when the prawns are opaque throughout and the noodles are al dente, drain the works and rinse well in cold water. When cooled, add to the vegetables and pour about half the sauce over. Toss until the noodles are completely coated in sauce; chill until cold.

Before serving, chop the cilantro and mix it in, adding additional sauce as desired. Serve cold.

Serves 4


    18 July 2011

    Wild America

    Los Angeles has much more wildlife than most people (even Angelenos) would believe. I see raptors at least a couple times a week on light poles overlooking the freeways; deer, rabbits, and rattlesnakes are commonplace in the hills; raccoons wander along the sidewalks at night; I once even saw a brief glimpse of a coyote slinking through the trees by the side of the road.

    This, though, was nothing short of exceptional.

    wild america!

    Mike's photo isn't the best, to be sure; that's what happens when shooting through a screen door in need of a wash. That, viewers, is a full-grown Red-tailed Hawk ... sitting on our fence, not 8 feet from the door. Presumably he decided that our bird feeder, which draws dozens of songbirds throughout the day, was a good little snack bar for him—and personally, I'd be happy to lose a few finches if I got to see a hawk up close more often.

    In food news, I'm still scouring the market every week for ever-elusive Blenheim apricots (I still haven't made any jam this summer), and quite possibly eating my weight in pasta.

    A couple months back, two of my favorite bloggers proclaimed a shared dislike for macaroni and cheese. Everyone's tastes differ, to be sure—after all, I won't get within ten feet of any cooked broccoli if I can possibly avoid it—but what shocked me more than anything was their shared complaint about how greasy macaroni and cheese is. Setting aside the terrible, junky, non-greasy wonder that is Velveeta mac 'n' cheese, and politely ignoring the terrifying Tang-colored powder that accompanies the boxed stuff, I've been making homemade macaroni and cheese for years without a spoonful of grease in sight.

    crusty cheese

    I may have a place in my heart for cheap boxed macaroni (along with ramen noodles, probably my favorite junk food), but for years I had wanted a good homemade recipe: something to make when going to a barbecue or craving bubbling brown cheese. When flipping through an issue of Bon Appétit several years back, I found a possible candidate, but I decided to make some changes.

    Several months later (after all, how often can a person make macaroni and cheese?) I proclaimed it finished. The base is simple enough—provolone and sharp cheddar cheeses blended into a roux flavored with onions and garlic—but a dash of Spanish smoked paprika and a handful of chipotle chiles add a smoky, spicy kick. I like to top it with fresh buttered bread crumbs, but it's equally good (and crustier, to boot) when naked on top. No matter what you do, you won't have any puddles of grease.

    no grease!


    Smoky Chipotle Macaroni and Cheese
    Adapted from Bon Appétit's recipe here

    As is, the recipe is not particularly spicy; if you like spice, note that a vinegar-based hot sauce (we like Secret Aardvark's habañero sauce) is fantastic stirred into the served pasta.

    Also, this makes a pretty big batch; if I'm not making this to take to a party, I use one 8 inch square dish and two small-ish soufflé dishes, freezing the smaller dishes unbaked and without bread crumbs. When you're ready to eat them, they can be baked as below, increasing the baking time as needed.


    1 pound elbow macaroni
    2 cups chopped green onions, lightly packed
    2 tablespoons chopped fresh oregano

    ½ cup (1 stick) unsalted butter, divided
    1 very large or 2 medium onions, chopped
    4 cloves garlic, chopped
    ½ cup flour
    4 cups whole milk
    1 pound extra-sharp cheddar, grated
    8 ounces provolone, grated
    2 teaspoons paprika
    1 teaspoon pimentón de la vera (Spanish smoked paprika)
    1 teaspoon salt
    1 teaspoon freshly ground black pepper
    3-4 chipotle chiles in adobo, minced (from one small can; I use Embasa, a readily available brand)
    ¼ teaspoon cayenne pepper (or to taste; optional)
    1 ½ cups fresh bread crumbs (optional)

    Cook the macaroni in boiling salted water until just barely al dente; drain and mix with the green onions and fresh oregano in a very large bowl; set aside, loosely covered.

    Preheat the oven to 350ºF. Using the same large pot, heat 6 tablespoons of the butter over medium heat. Add the onions and garlic and cook, stirring often, until softened but not browned, 6-8 minutes.

    Add the flour and cook, stirring constantly, 2-3 minutes more. Gradually whisk in the milk. Increase the heat and whisk constantly until boiling. Reduce heat again and simmer until slightly thickened, 2-5 minutes - be sure to stir regularly to avoid letting the milk burn. Add the cheeses, seasonings, and chipotles; stir well and cook until cheese is all melted, 2-3 minutes. Adjust seasonings to taste.

    Pour the sauce over the pasta and mix well. Mound into on 9x13x2 pan or one 8" square pan and two approximately five inch soufflé dishes.

    If covering with bread crumbs, melt the remaining 2 tablespoons butter. Toss the bread crumbs until uniformly coated with butter, then sprinkle over pasta (note: if freezing, I recommend leaving off the bread crumbs). If freezing, wrap the dish(es) with plastic wrap, then foil.

    Bake, uncovered, until heated through and brown & bubbly on top (about 1 hour; 1.5 hours if frozen).

    Serves at least 12

    10 July 2011

    Then and now


    When I was growing up, my family spent every summer visiting my grandparents in Washington and Oregon. Growing up in Alaska, the quality of our produce relied on the vagaries of the few airlines that came into the city. The Pacific Northwest, however, benefits from abundant winter rains and long hours of sun (or at least daylight) in the summer months.

    Weeks were whiled away at my grandparents' house in Eugene, watching enough television at night to last my sister and I through the rest of the year, and passing the day having water fights, playing in the sprinklers, and being put to work by my grandma in the garden.

    Even as a small child, I loved working (or, to my mind, playing) in the garden. My grandma took advantage of her large yard, growing an abundance of vegetables—for every tomato or zucchini plant that was planted each spring, she would experiment with something new. Romanesco was tried and added to the regular rotation; eggplants were discarded as not worth the effort. While I loved shoveling up potatoes and plucking crimson tomatoes from their vines, not everything was fun—I developed an irrational fear of artichokes for years after several ants crawled out of one onto my hand. Without a doubt, my favorite time to visit was late June, when both strawberries and green beans would be coming into season.

    rice bowl

    Eating as many strawberries as I could stomach was fun; making the rest into jam or tart fruit leather was like a special treat. None of that could compare, gardener protégé that I was, to snapping and canning green beans. My grandma must have canned 50 quarts of green beans every summer, all from one row of the garden, and if we had come to visit, we were all put to work.

    I would go outside with the big stock pot, picking beans until my back ached and my neck was sunburnt. The pot brimming, we would lug it up to the patio. Three generations, my grandma and mom in chairs, my sister and I on the steps, would sit around the pot, grabbing handfuls of beans and snapping them with that satisfying "pop" into an even bigger bowl. I would take a few tentative bites of the raw bean—even now, when I can use that bite to gauge the freshness and ripeness of a bean, I still don't particularly enjoy it. The quarts would be packed and set in the pressure canner (still not something I've ventured to play with on my own), then set in rows along the kitchen counter to cool. Without room to work in the kitchen, our dinner that night would be cooked by my grandpa out on the grill—with green beans, of course, on the side.

    For years green beans were my exception to the rule—I preferred them soft and cooked nearly into oblivion (or "Southern-style", as I was told once), like they were when canned, then reheated on the stove months later. However, in recent years, I have begun cooking my green beans quickly. My most common method is from Marcella Hazan: the beans are tipped, then boiled in salted water until just tender throughout, 3-5 minutes; they are then drained, spread out to cool quickly, and tossed immediately in olive oil with lemon juice, salt, and some coarsely ground pepper.

    Last night I decided to do something different. I had thawed a Sockeye salmon fillet the night before, and I suddenly decided that I wanted to do a broiled, miso-glazed salmon instead of my typical nearly-naked salmon, seared with nothing more than salt and pepper. That inspiration encouraged me to do a quick google search, and half an hour later, I sat down to salmon, rice, and toasted sesame green beans.

    sesame green beans


    Toasted Sesame Green Beans
    Inspired by several recipes, including these two.

    1 tablespoon white sesame seeds
    1 lb green beans, preferably Blue Lake
    2 teaspoons mirin (Japanese sweet rice wine)
    2 teaspoons soy sauce
    1 teaspoon vegetable oil
    2 teaspoons toasted sesame oil

    In a dry wok, toast the sesame seeds over medium heat, stirring regularly, until very fragrant and golden-brown, about 4-5 minutes. Transfer to a bowl or mortar and let cool.

    Set a large pot of water to boil. Meanwhile, rinse the beans and snap the tips off; if the beans are very large, break into two pieces. When the water is boiling, salt it and carefully add the beans. Cook until just nearly tender, about 3 minutes.

    Meanwhile, set aside a pinch of seeds for garnish and crush the rest into a rough paste with a pestle or wooden spoon. Transfer to a small bowl and add the mirin and soy sauce and stir well to blend.

    When the beans are cooked, drain them and soak briefly in cold water to stop the cooking; drain. Reheat the wok over medium-high heat and add the two oils. When the wok is hot but not quite smoking, add the drained beans. Cook 2-3 minutes, stirring regularly, until hot all the way through. Add the sesame paste mixture, stir well to blend, and cook 1-2 minutes more—the beans should be cooked through but still a little bit crunchy. Sprinkle with the reserved sesame seeds and serve hot (or at room temperature, some people say, but I'm not okay with that).

    Serves 3-4

    04 July 2011

    When all else fails

    It's depressing to spend as many hours in the kitchen as I have in the past week with nothing to show for it, but it's been a week of failures.

    Last weekend, I carefully planned out a savory tart. There were mushrooms, there was cheese, there was a buttery crust and rich custardy base. After an hour in the oven, the tart was puffed up, golden-brown, and smelling of heaven. I'd forgotten to parbake my crust earlier in the evening, and the clock was creeping steadily to a time even the most traditional European would find absurd, so I was hungry, excited, and hurried—a bit too hurried.

    I would have taken a picture for you if I hadn't sat down on the floor and wept when the entire tart fell to the ground, upside-down of course, onto a freshly cleaned floor. I'm usually one to curse at food failures rather than cry, but facing a 9:30 dinner smeared across the kitchen floor was just too much.

    You will forgive me, I hope, for spending putting my kitchen in time out for a day or two—save cobbled-together lunches and pasta or sandwiches for dinner, it took me nearly half a week to get the fortitude to start cooking again.

    Perhaps I was still a bit frustrated, because kneading bread was the most appealing thing I could think of when I returned to the kitchen. I made chapati to go with Indian food (the chapati didn't puff), and made my own phyllo dough for spanakopita (not a failure, necessarily, but no better than storebought and definitely not worth the aching arms I have today).

    fresh ingredients

    When all else fails in the kitchen, I make eggs. Eggs are one of the world's perfect foods, and they're pretty hard to mess up. Granted, I've made my share of egg disasters—boiled eggs forgotten on the stove for 30 minutes, fried eggs put in a too-hot pan, soft boiled eggs taken off the heat too early—but on the whole, I can rely on eggs in a pinch to make a great meal.

    I swear, I could work for the American Egg Board—I love them cooked just about every way, and I'm a big proponent of eggs-for-meals-other-than-breakfast. A fried or poached egg on braised cabbage or kale is one of the great pleasures in life; a boiled egg with a bright yellow yolk tops pickled asparagus for a delicious (and beautiful) appetizer; swirled into nearly any brothy soup just before serving makes a filling and rich meal.

    While I normally prefer my breakfast eggs fried or soft boiled (or really, any way that offers a runny egg for satisfactory toast-dipping), my favorite way to eat scrambled eggs is akuri. I first discovered akuri when browsing through My Bombay Kitchen, a fantastic cookbook (and fascinating read) by Niloufer Ichaporia King. The book focuses on traditional Parsi dishes, and within a day of buying the book, I was searching through it to find something I could make without going to the store. My eyes caught the words "scrambled eggs", and I headed to the kitchen.

    Like any dish, from pasta with tomato sauce to green beans, there are as many different ways to make akuri as there are people to argue that their method is the best one. Some people may add tomatoes, others turmeric, still others garam masala or cumin. I've made it a dozen different ways, but eventually I settled on this method as my favorite.

    akuri - parsi scrambled eggs


    Akuri, or Parsi-style scrambled eggs
    Adapted from My Bombay Kitchen

    I usually eat eggs alone (how sad!), so this recipe is just for one—it scales up easily: just use a bigger pan and allow more cooking time. Also, the original recipe called for ginger-garlic paste, a staple of Parsi cuisine, but I rarely have it made; if I'm making a big meal, I'll make some, but for breakfast I just mince them together as below.

    2 large eggs
    2-3 teaspoons heavy cream
    salt
    ½ tablespoon butter or ghee
    3-4 tablespoons finely chopped onion
    1 clove garlic
    1 small knob ginger
    1 small serrano chile
    1 ½ tablespoons chopped cilantro

    Beat the eggs very well with the cream and a generous pinch of salt; set aside.

    Heat a small pan over medium heat. Melt the butter, then add the onion. Let cook, stirring occasionally, until softened but not browned, 4-5 minutes.

    Meanwhile, peel and finely mince the garlic (I use enough to make nearly a teaspoon). Peel and mince the ginger, making sure that you have about the same amount of ginger as garlic. Quickly mince the ginger and garlic together, crushing them lightly with the side of the knife to release the juices and make a coarse paste (some salt helps; also, a mortar makes quick work of this if you don't mine the additional dishes); set aside. Mince the chile, first removing the seeds if you like less spice. Chop the cilantro and set aside.

    When the onion is cooked, reduce the heat to low and add the ginger-garlic paste and the chile. Stir well and let cook until very fragrant but not sizzling loudly, 1-2 minutes more. Briefly beat the eggs again and add them to the pan with the cilantro. Cook slowly, stirring often, until the eggs are softly set and very creamy.

    Serve immediately with some sort of bread—I'm partial to buttered wheat toast, but it's also great wrapped in a piece of chapati or naan.

    Serves one, but can easily be scaled up - just use a bigger pan and allow more cooking time