31 January 2011

We interrupt our regular scheduled programming

I do intend to post the recipe for the orange cream and the entremet, but yesterday something happened. I made dinner, and it swept me off my feet.

roasted cauliflower

With each bite, I fell more in love, and by the end of dinner I was eyeing the leftovers with anticipation. Who would have thought that I could be brought low by little more than a head of cauliflower and a box of pasta?

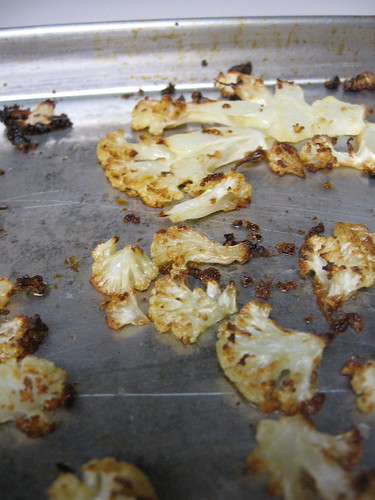
My love for cauliflower isn't well documented on this site, but it helps me get through every winter. I love it curried with potatoes or peas; I adore it sautéed or fried with cumin and salt, Moroccan style; I can't get enough of it puréed into a simple, perfect soup. Like so many things, I tend to fall into a rut, but a vague memory of a recipe seen once before inspired experimentation last weekend. Thin slices of cauliflower were roasted until golden brown and caramelized; cut into chunks and mixed with pasta, it was very nearly sublime. Unfortunately, my lack of attention to timing had led to a lackluster final result, and the lack of parsley in our kitchen contributed to a photograph that resembled baby food more than a fantastic winter pasta dish.

After several days of thought and many hours of anticipation, methods were tweaked, timing was thought out, and herbs were purchased. The result? Heaven.

campanelle al cavolfiore

I could roast a bushel of cauliflower, dressed in nothing more than olive oil and salt. I'd admire its pretty caramelized hue, make a little pillow out of it, and eat nothing but its lovely florets until there was nothing left. I've hidden batches of roasted cauliflower before, in order to save it to add to risotto and the occasional quinoa salad, but it always seemed to take away from the cauliflower—most often, I've gone back to a pile of burnished brown slices next to a piece of seared fish or supplementing a dinner of good bread and cheese. This dish, however, takes all the goodness of roasted cauliflower and makes it into a meal.

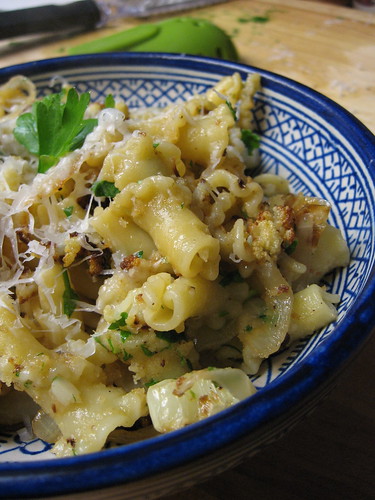
The sweetness is complemented by barely-caramelized onions; a liberal amount of dried breadcrumbs add some body and carry the flavor into every bite; the primary seasoning is black pepper, with the smallest pinch of red pepper flakes for a little zing. While any chunky shape of pasta will do, I yielded to my occasional impulse for whimsy by choosing campanelle, bell-shaped, ruffled, and echoing the shape of the cauliflower.

This is a simple dish, so I recommend the freshest cauliflower you can find—if you typically buy from the supermarket, you may be surprised by the flavor of good, fresh, local cauliflower. Also, for all that's beautiful in the world of food, get some fresh parsley (or at least something green) to mix in before serving—even the most delicious dish will disappoint if it looks as monochromatic and bland as this one does without it.

pasta

Pasta with Caramelized Cauliflower and Breadcrumbs

For the caramelized cauliflower:
½ large head cauliflower (or 1 small)
olive oil
sea salt

For the pasta:
2 tablespoons butter
olive oil
½ large onion, sliced
black pepper
pinch red pepper flakes
3-4 cloves garlic, minced
¼ cup fresh parsley, minced
¼ cup dried breadcrumbs (preferably fresh)
generous ¼ cup grated pecorino cheese
½ pound chunky pasta, such as campanelle (farfalle, orecchiette, and penne would all be acceptable substitutes)

Preheat the oven to 425ºF. Slice the cauliflower about ¼ inch thick (much of it may crumble, which is okay). Spread in a single layer on two rimmed sheet pans. Drizzle on both sides with olive oil and sprinkle with sea salt. Roast for 20-30 minutes, turning once or twice during the cooking time, until the cauliflower is tender and well browned on both sides. Remove from the oven and set aside.

Fill a pot with water and put it on to boil. When the water comes to a boil, salt it liberally and add the pasta. Cook until al dente, then drain, reserving ¼ cup cooking water (and set aside, if needed).

Set a large, heavy skillet over medium heat and melt the butter with a slosh of olive oil. Add the sliced onions and season with salt, black pepper, and the red pepper flakes. Cook, stirring from time to time, until the onions are tender and beginning to brown, about 20 minutes. (The pasta should be mostly cooked at this point). Add the garlic and cook 1-2 minutes more, until quite fragrant. Cut the cauliflower into bite-sized pieces and add to the pot; reduce the heat to low and stir gently until the cauliflower is heated. Add the drained pasta and reserved cooking water as needed to make a uniformly moist pasta.

Add the parsley, breadcrumbs, and cheese, and stir just to combine. Top with additional cheese if desired. Serve. Eat with abandon.

Serves 3-4

29 January 2011

First time's a charm

I've never seriously thought about going to pastry school—it's always been a pie-in-the-sky idea for an idyllic early retirement after some happy accident left me independently wealthy. I've always known that I don't have the temperament to be a chef, and pastry is no exception.

Sometimes, though, a glance in the window of a particularly talented baker will make me stop, jaw dropped, and wonder why I never went to pastry school, who came up with such a lovely creation, where I can go to learn how to make that.

In fact, I had that exact experience just a few weeks ago—wandering through a local Korean market, I stopped at the French-style bakery to ogle the lovely cakes and entremets. How lovely, I thought—I wonder if I could make one of those at home?

blood orange-caramel entremet

The January 2011 Daring Bakers’ challenge was hosted by Astheroshe of the blog accro.
She chose to challenge everyone to make a Biscuit Joconde Imprime to wrap around an Entremets dessert.

Considering my first attempt at the design on the cake as a learning experience, I simply piped silly designs on the cake. In the future, I may go for a more ... elegant design.

Entremets are traditionally filled with mousse, custard, or bavarian cream of some sort, and traditionally is layered with several fillings of different colors, making a lovely presentation once cut into.

The flavor of this dish is unparalleled. A thick layer of caramel bavarois was allowed to set, then covered in a thin layer of rich, buttery blood orange cream. A thin layer of blood orange gelée was then poured over the top to set.

I was hesitant to try caramel with blood orange, despite the many recipes I see combining them. The flavor of blood orange is perfect by itself: sweet, berry-stained, and the tiniest bit tart. I took the plunge, however, and I was not disappointed. The caramel custard layered with the blood orange cream made for an elegant and complex final product.

caramel

The whole process of making an entremet takes a lot of time—between preparing the different parts and allowing them to set before proceeding, it's a good day in the kitchen. I will provide the additional recipes soon, but in the meantime ... have some bavarian cream. Use the bavarois to fill cream puffs or just pour into individual serving dishes to set.

caramel custard


Caramel Bavarian Cream
Do note that once refrigerated, the cooled custard goes from "just barely beginning to thicken" to "completely set" in a matter of a few minutes. Once you noticed the custard thickening, whisk vigorously to even the temperature and check every minute. You want to add the whipped cream as soon as it is thick enough to fold easily, and before the custard solidifies.

¾ cup granulated sugar
½ (2 standard envelopes) ounce gelatin
2 ½ cups milk
7 egg yolks
pinch salt
½ teaspoon vanilla extract
1 ½ cups heavy cream

Have the milk measured out and the gelatin in a small bowl. Whisk the yolks in a medium bowl and set aside.

Place the sugar in a large, heavy, light-bottomed pot (this will make it easy to see the sugar caramelize). Place the pot over medium to medium-high heat and cook the caramel to a deep amber shade (check out this fantastic tutorial if you are not accustomed to making caramel).

As soon as the caramel is deep amber but before it begins to smoke and burn (I use my nose more than my eyes at this point; you can convince yourself that the caramel is "too brown" when it still doesn't have much flavor, but you will smell before the caramel begins to burn and turn acrid), pour in the milk, stirring carefully. The mixture will bubble up and steam furiously, so keep your face well away and use a long-handled spoon to protect yourself from spit and steam.

With the heat on medium, stir until any petrified bits of caramel have dissolved. Add 3 tablespoons cold water to the gelatin and stir. Let the gelatin absorb the water, then stir it into the milk.

When the milk is hot but not boiling, temper the egg yolks: while whisking the yolks rapidly, slowly pour a cup or so of the hot milk into the eggs. Return the pot to the heat and whisk the eggs in carefully; add a pinch of salt. Lower the heat slightly and cook until the custard coats the back of a spoon and leaves a clear line when you run your finger through it, 10-15 minutes.

Transfer the custard to a large bowl and mix in the vanilla. Cool to tepid at room temperature (You can use an ice bath if you are in the kitchen to stir it regularly), then refrigerate until just beginning to thicken. The amount of time this takes will vary wildly depending on the temperature of your house and refrigerator—set your timer to five minutes, stir well, and check the temperature until it begins to cool.

When the custard is almost thick enough, Pour the cream into a cool bowl and whip until it just holds stiff peaks. Remove the custard from the refrigerator and stir briskly. Stir in about a third of the whipped cream to loosen, then fold in the remaining cream. Pour into prepared entremet mold, individual serving dishes, or a big bowl; press a layer of plastic wrap over the surface of the custard and let chill until firm.

Serves 8-12

21 January 2011

A little bit of glamour

Save two meals of delicious cabbage-and-noodle soup from a local Chinese restaurant, I don't think I've eaten anything beyond toast, cheese sandwiches, and pasta for the past two weeks.

Thank goodness for homemade pesto, frozen by the tablespoonful in the summer and gathered into big bags. It was hard work not eating all of it right away, but it was worth it—nothing adds pizzazz to the litany of winter vegetables like summer, stocked away in the freezer.

Still, it's difficult to find something interesting for a food blog when one's diet is so unequivocally boring. I have a few Big Secret recipes for Secret people that I am working on, but Big Secrets aren't much good when posted on the internet.

citrus

In the meantime, I have a meager offering for you: Blood Orange Cream.

It sounds like a makeup shade for someone using artificial tanners, and I don't have any pictures to prove how light and lovely it is—even if I did, a mere photo couldn't begin to express how wonderful this stuff is—the creamsicle of your childhood, suddenly glamorous, sexy, and desired by everyone in the room.

Lighter than curd, the orange cream is made by heating eggs, sugar, and blood orange juice in a double boiler until the custard is cooked. After a few minutes to cool, the whole mixture is whizzed in a blender with a positively irresponsible quantity of butter, which melts and emulsifies. The resulting custard, when cooled, has richness from the eggs; a luscious, velvety texture from the butter; and a bright flavor from the oranges that makes for a surprisingly light dessert.

Spread this custard in a baked tart shell (this is my favorite recipe) for a simple, elegant-yet-rustic dessert (you can top with fresh fruit or serve with a compote of frozen berries for a little something extra); smear it onto scones or biscuits for an easy breakfast; or just scoop it into little shot glasses or bowls and serve with nothing but a few leaves of fresh mint.

Blood Orange Cream
Adapted from Baking: From My Home To Yours
Use the best blood oranges you can find, as their flavor is the primary part of this dish. Be careful later in the season: the fruit that is heavily tinged with red on the skin is often bitter inside.

A note for those who don't eat gelatin: I've not tried this recipe without, but I make a similar lemon cream without gelatin that turns out fine. The lower level of pectin in oranges might result in a thinner custard—please let me know if you try it and tell me how it turns out.

1 scant cup granulated sugar
grated zest of 3 blood oranges
grated zest of 1 lemon (I used Meyer lemon for the zest and juice)
4 extra large eggs
¾ cup fresh blood orange juice
2 tablespoons fresh lemon juice
1 ¼ teaspoons gelatin
1 tablespoon cold water
10 ounces (2 ½ sticks) unsalted butter, room temperature

You will need a good thermometer (preferably digital), a sieve, and a blender ready. Bring a few inches of water to simmer in a double boiler or a pot with a heatproof bowl that fits nicely over it.

Zest the oranges and lemon directly into that bowl with the sugar. Rub the zest together with the sugar until moist and aromatic. Whisk in the eggs, then the blood orange and lemon juices (don't worry about straining chunks of pulp or seeds at this point).

Set the bowl over the simmering water; start lightly whisking as soon as the mixture is barely warm to the touch. Set up the thermometer and cook the custard, whisking constantly, until the mixture reaches 180ºF (usually 8-15 minutes).

Immediately remove the bowl from the heat and pour through the sieve into the blender, pressing out all of the custard. Discard the solids.

Mix the gelatin with the cold water to bloom and add it to the mixture; place the lid on the blender and pulse once, just to combine. Let the mixture cool, uncovered, until it reaches 140ºF (an additional 5-10 minutes).

Meanwhile, cut the butter into small pieces. When the custard has cooled to the correct temperature, turn on the blender and add the butter pieces, about ¼ cup at a time. Blending constantly (you can give you machine a rest from time to time if necessary), let the butter emulsify completely before adding more. You will notice the custard lighten from a salmon-pink shade to a very pale orange pink.

When all the butter is added, blend on high for an additional 3 full minutes. Transfer mixture to a bowl, cover directly with plastic wrap to avoid forming a skin, and place in the refrigerator to cool completely, at least 4 hours and up to three days.

Makes about 3 cups

11 January 2011

Karma chameleon

There are several things I can say about Indian cuisine, chief among them that it is, almost without exception, both delicious and unphotogenic.

Through some mysterious alchemical process stews and braises, purées and fritter, unwanted cuts of meat and boring winter vegetables alike are saved from ubiquity with a deft addition of chilies, ginger, and a few ingredients from the spice cabinet, but the resulting dishes are often smooth and monochromatic—not the best fodder for the camera.

Take cabbage, for example. A beloved staple of our winter table, cabbage nonetheless tends to tumble into the same meals again and again. There's the braised cabbage with carrots, made no less than a dozen times a year. Slaw of a pseudo-Asian variety is commonly thrown together with the occasional orphaned quarter, and to heck with lettuce—a taco just isn't a taco without finely-shredded cabbage on top. Add to that the periodic dabbling with kimchi recipes and regular meals of cabbage and mushroom stir fry, and I sometimes think I should turn my patio into a petite cabbage farm.

Indian tomato sauce

A few weeks ago, I decided to expand my cabbage repertoire with an Indian dish. I had experimented briefly with curried cabbage of several varieties a few years back, and quite frankly, they left me cold. Not so this time! Using mostly pantry ingredients, thinly sliced cabbage is braised in a curried tomato broth, resulting in a dish that is spicy, a bit crunchy, and colorful.

The two things that take Indian food from an occasional weekend undertaking to a regular weeknight meal are mise en place and a well-stocked pantry. A few items uncommon in Western pantries, such as coriander seeds, cumin seeds, and cardamom pods will make it easy to make most curry powders—and it's easy to leave out an ingredient here or there when something is missing. Making the curry powder and chopping the vegetables makes the composition of the dish a snap, giving you time to prepare rice, wash the dishes, and start thinking about dessert.

pre-curry powder

Unlike many Indian dishes, this one is pretty. The tomatoes, the turmeric-stained cabbage, and the peas make a lovely rainbow of red gold and green.

Last night I scribbled notes as I hummed dated New Wave singles and puttered in the kitchen. I whipped up spiced rice and dal, read a few pages of Murakami, and washed half of my dishes. I kept an ear open for the timer while I watched a basketball game, and I feverishly finished the last few minutes of cooking, an hour late and famished. I snapped some quick photos and sat down to quiet my complaining stomach.

It wasn't until later that I loaded the photos and looked at them.

curried cabbage and tomatoes

Red, gold ... and no green.

I forgot the peas.

So, let it be known: if you don't have peas in your freezer, this meal is delicious without. If you are really, really hungry, polling suggests that you might not even notice that they're missing. Do add them, though, if you have them.


Curried Braised Cabbage with Tomatoes and Peas
If you find good cabbage and good tomatoes at the same time, feel free to replace the canned tomatoes with 3-4 fresh chopped tomatoes (you may need to add a couple tablespoons water from time to time). In the winter, though, canned tomatoes are quite nice.

For the curry powder:

½ teaspoon coriander seeds
½ teaspoon cumin seeds
6 black peppercorns
4 whole cloves
3-4 cardamom pods, or ¼ teaspoon seeds
¼ teaspoon caraway seeds (optional)
pinch fenugreek (optional)

For the cabbage:

2 tablespoons ghee, vegetable oil, or 1 tablespoon each butter & oil
½ medium onion, chopped
4 cloves garlic, minced
½ teaspoon turmeric
½ teaspoon cayenne (more or less, to taste)
1 - 14.5 ounce can whole or diced tomatoes, with their juice (or 3-4 whole fresh tomatoes)
½ head cabbage, halved and thinly sliced
1 cup frozen green peas (keep frozen)
1 teaspoon salt
2 tablespoons chopped cilantro (optional)

To make the curry, combine the ingredients in a mortar or spice mill and grind well; set aside.

Heat the ghee in a large pot over medium-high heat. Fry onions until translucent. Add garlic, turmeric, cayenne, and curry powder; stir until fragrant and beginning to stick to the pot, 1-2 minutes.

Add the tomatoes and juices and bring to a boil. Lower heat to a simmer and cook, uncovered, until sauce is thickened and fat separates, 15-20 minutes. Add shredded cabbage and mix until well coated with sauce. Partially cover and simmer about 15 minutes more, until cabbage is cooked but still a bit crunchy; add water by the tablespoon if dry. Add peas and cook 1-2 minutes, just until heated through. Add salt and cilantro. Serve over rice.

Serves 4 with another Indian dish, or two generously

07 January 2011

Discombobulated

I learned a few things over the past two days.

1. Access to cheap, fresh vegetables after my neighborhood market has been closed for 10 days inspires a frenzy in me similar to a pre-teen at a Jonas Brothers Concert.

mise en place

2. It is exceedingly difficult to cut garlic into a fine julienne when one's hands are shaking from hunger.

3. A simple winter stir fry of cabbage and mushrooms, tossed with a sauce of black and white soy sauces, fish sauce, and a touch of sugar, does wonders for a head cold.

4. The citizens of Seattle are lucky indeed.

winter salumi

We enjoyed a dinner last night of crusty baguettes, good pecorino, and two salume from Salumi Artisan Cured Meats. Cured meat was a revelation the first time I visited Europe, and while I've enjoyed the occasional bite of prosciutto (and even one ecstasy-inducing bite of jamón ibérico de bellota) since I began eating meat in March, I've had no more than a spare whiff of salumi as I wrapped it up as a gift to family.

Needless to say, between the head cold and the salume, there hasn't been much actual cooking going on. This weekend, though, things may change. There will be tacos if I have anything to say about it.

01 January 2011

Half a cabbage and a cake

With a small batch of soup today, the leftovers from last week's Thanksgiving dinner (I can't think of turkey & fixings as anything but "Thanksgiving Dinner," no matter what the date) are confined to 4 quarts of stock and a pint of turkey bits in the freezer for more soup later this winter.

The past week has been filled with sleeping in late, afternoon walks, reruns of The West Wing, and an utterly boring menu of oatmeal with spiced apple butter, turkey sandwiches, and whatever could be thrown together from the fridge and pantry.

with spiced apple butter

The fresh vegetables in my house have dwindled to half a cabbage, two onions, a couple carrots and one head of garlic—I don't begrudge my one-family grocer their vacation, but I can't wait to roast a big head of cauliflower, braise countless bulbs of fennel, or perhaps make some spiced sweet-potato fries in my brand new deep fryer.

In the meantime, I decided to take advantage of the only good deal I found at the Tuesday Farmers Market: fat, juicy Meyer lemons at 25 cents a pop.

I am thankful to whatever capricious deity that put lemons in their prime four months after blueberries have disappeared for also making blueberries so eminently freezable. I have a bag still in the freezer from my blueberry picking adventures back at home this summer, from which I have carefully meted out a half-cup for a tiny batch of pancake syrup here, a few tablespoons for a bowl of yoghurt there. For weeks now, though, I have been dreaming of cake: a simple, rustic cornmeal cake, flavored with lemon and studded with purple-blue orbs of blueberries.

lemon cornmeal cake with blueberries

Back again, then, is the gâteau au yaourt. As I said in that post, the yoghurt cake recipe can be bent to your needs: add or subtract fruit; swap half a cup of flour for nuts or, in this case, cornmeal; change zest and other flavorings to your taste.

lemon and blueberry cornmeal cake

The resulting cake is near perfection. The cornmeal adds texture, fullness, and lovely golden color; the crumb is dense and intensely moist; the zest permeates the cake and the glaze soaks in for intense, lemony flavor; the blueberries stud the cake with little fireworks of indigo.

There really is nothing like wild, hand-picked blueberries, but if you aren't lucky enough to have them, buy the best you can find. Small wild berries from Maine are quite good and much more flavorful than the almost golf ball-sized commercial ones that can be found from time to time.

Happy New Year—may it be filled with safe and happy adventures, in the kitchen and outside of it.

with whipped crème fraiche


Meyer Lemon-Blueberry Cornmeal Cake
While standard Eureka lemons will work in this recipe in a pinch, they have a much stronger, more acidic flavor; you may want to increase the sugar in the glaze by one or two tablespoons, or to taste, to avoid a harsh flavor. Use the best blueberries you can find.

While I generally bring my eggs to room temperature before baking, I use cold eggs and yoghurt so that the blueberries melt as little as possible—this ensures a lovely yellow crumb without purple streaks.

1 cup granulated sugar
2-3 teaspoons Meyer lemon zest (from one large or two small Meyer lemons)
3 large eggs
½ cup yoghurt (I prefer whole milk yoghurt, but nonfat will work)
1 cup unbleached flour
½ cup cornmeal
2 teaspoons baking powder
¼ teaspoon salt
½ cup flavorless oil, such as canola
1 cup frozen or fresh blueberries (do not thaw if frozen)

For the glaze:
juice of two Meyer lemons (about 6 tablespoons)
4-6 tablespoons confectioners' sugar

Preheat oven to 350ºF. Butter a nine inch cake pan and set aside.

Zest the lemons into a large bowl and add the sugar. If desired, rub the zest into the sugar with your fingers until very fragrant and moist. Add the eggs and yoghurt and whisk together until well combined. Add the flour, cornmeal, baking powder, and salt; whisk lightly until just combined. Add the oil and mix with a spatula until you get a homogeneous mixture (it will start out gloppy and gross).

When you are ready to bake the cake, remove the blueberries from the freezer. Mix into the batter very quickly, just stirring three or four times to distribute. Scrape the mixture into the pan. Bake 40-50 minutes, until a tester comes out clean and the cake springs back in the middle. Cool in the pan on a rack for about 20 minutes.

Meanwhile, make the glaze: juice the lemons into a small bowl; remove any seeds or large chunks of pulp. Add 4 tablespoons confectioners' sugar and mix well to make a thin, sweet-tart glaze. If you like, add one or two tablespoons more sugar.

Run a knife around the edge of the cake, invert to remove from pan and invert again onto a rack (so the cake is right-side up on the rack). While still warm, use a basting brush or spoon to distribute the glaze over top and sides of the cake—you may wish to place the rack over a large plate or piece of waxed paper to catch drips. When the cake has absorbed glaze all over the top, let cool completely.

Serve with a simple blueberry sauce, softly whipped cream, or nothing at all.

Serves 8-12