31 May 2011

Stranded

I enjoy a certain amount of time away from technology. I'm not a technophobe by any means, but I would be happier without cable than with it, and I felt more liberated than lost when my mobile phone broke a few months ago.

However, I felt a little bit lost this weekend when I discovered that my always-precarious internet connection had gone down. Three long days later my computer has revived enough to share a few pictures with you. I'm already late with this post, though, so the recipe will have to wait until tomorrow.

cherry-almond marquise

The May 2011 Daring Bakers’ challenge was hosted by Emma of CookCraftGrow and Jenny of Purple House Dirt. They chose to challenge everyone to make a Chocolate Marquise. The inspiration for this recipe comes from a dessert they prepared at a restaurant in Seattle.

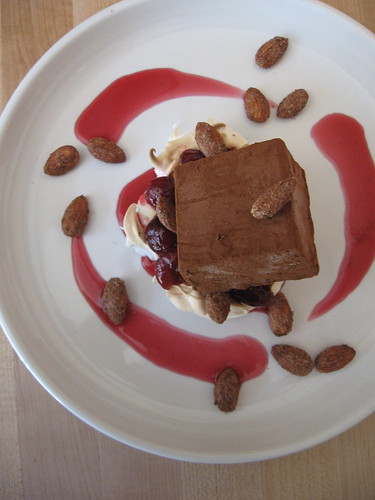
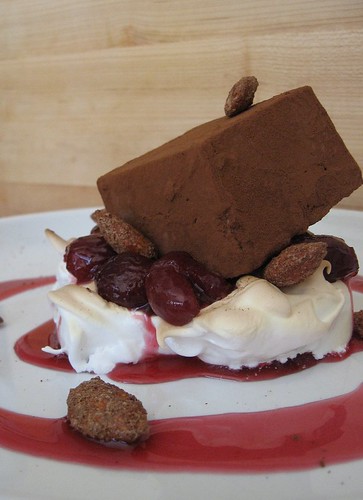
I used the marquise and (an adapted recipe for) meringue from the challenge, baking the meringues into nests since I was without a blowtorch. I then filled the nests with spiced candied cherries and topped it off with a handful of sweet and crunchy cinnamon almonds.

While the cherries and almonds alone would have made me happy enough (and they did, as I picked at the cherries cooling in their syrup and crunched on the almonds all morning), the marquise is what really makes this dessert. Similar to a mousse, the mixture is made from copious quantities of eggs, whipped until the motor on your hand mixer dies of exhaustion you are ready to cry from boredom. For the first time in several years, I cursed my limited counterspace and dreamt of a stand mixer. The eggs are then heated with a sugar syrup, whipped for another lifetime 5-10 minutes more, then briefly mixed with a cooled ganache and some butter. After you fold in some whipped cream, the mixture is molded (in my case, in a 8" square baking dish) and frozen.

The frozen block is finally turned out onto a cutting board and cut into 9 cubes. However, even with the rounded edges from my pan trimmed away, this made a large, rich dessert; I could have easily made 12 or perhaps even 16 smaller portions. The cubes are coated with cocoa powder, arranged on their plates, and allowed to thaw. When ready to eat, you have an architectural masterpiece—soft, fluffy, rich mouthfuls of chocolate in an incongruously severe shape. The bitter chocolate flavor paired ideally with the sweet meringue, almost-tart cherries and crunchy almonds.

I'm usually one for simple desserts: tarts or rustic cakes, a single scoop of ice cream or sorbet. However, every once in a while I like to be pushed to do something a little bit more complicated. This dessert fit the bill, and the best part? With two people in the house, I have 7 more servings of marquise in the freezer, ready to impress after a roll in cocoa powder and a fifteen minute thaw.

chocolate marquise

22 May 2011

Mushy and delicious

Something strange has happened.

Yesterday, I went to the market to buy peas, greens, and strawberries. I also a bought cherries. Cherries! Generally my signal that summer has begun, this year they've appeared, plump, juicy, and flavorful, mid-May. While I'm not sure where they came from, and they're a welcome treat after a difficult past month or so.

I will make no complaints, just buy as many as I can afford. I may preserve a few jars, I may make a pie, I'm definitely making a super-secret something to show you in a week or so—but I may also just sit on the patio with a bowl in my lap, eating cherries and soaking up the sun.

One of my favorite parts of spring is not waiting for the stone fruit that will arrive shortly, but enjoying the greens vegetables that are at their best early in the year. Fava Beans, Sugar Snap Peas, Shelling Peas, and the Green Beans that will come into their prime in the following weeks—all of them call my name.

green pea crostini

Fave with Bacon is one of my favorites, and while it deserves a recipe (that it's not getting, at least not today), it doesn't really need one: fry some lardons until cripy, drain, and cook some onions and garlic in the bacon fat; add shelled & peeled fave, salt & pepper, and some fresh herbs and cook three or four minutes; toss in the bacon and devour.

Sugar snap peas are a constant disappointment for me; one that stems back to childhood summers at my grandparents house. After eating firm, shiny, perfectly-sweet peas straight off the vine, farmer's market peas just won't cut it. Like corn, peas begin turning their sugars into starch the moment they're picked, and every hour—every minute, it seems—makes the difference between delicious and ho-hum. While I usually break down and buy them once or twice each spring (I'm a particular fan of this Bon Appétit recipe), more often than not I follow their purchase up with a return to long-range garden planning.

English peas (also called shelling peas), on the other hand, are a different story. They're prone to the same sugar-to-starch phenomenon as sugar snaps, but they also have an easy solution. Yes, you can certainly grow your own and toss them on the heat as soon as they come off the vine, but you can also eschew the common just-cook-peas-until-they're warm advice. Anyway, if Francis Lam tells me to do something, I do it.

green pea purée

The basic idea is this: when you get peas, embrace their true nature as beans and cook the heck out of them. When they're tender and creamy, I like to roughly mash them, though it's certainly not a requirement. Smear them on crostini, toasted in an oven with just a drizzle of olive oil, and serve with a simple green salad and shallot vinaigrette, and you have a perfect spring dinner.


Mashy-Mushy Green Pea Crostini

2 T olive oil
½ small onion, chopped
2 cloves garlic, minced
1 kilogram/2 pounds unshelled English Peas (about 500g/1 pound shelled)
1-2 cups mild stock (preferably vegetable, but a poultry stock will work as well)
salt and pepper
decently-large sprig fresh thyme
Good baguette or Italian bread for crostini
Additional olive oil for crostini

Heat the olive oil on medium-high heat in a medium pan. Add the onions and garlic and cook briefly, until very aromatic; add the peas. Mix well and cook 1-2 minutes, until the peas are heated and well coated. Add 1 cup stock and some salt & pepper, bring to boil, and simmer, partially covered. Stir occasionally, adding more stock if the mixture becomes dry.

Meanwhile, cut the bread into thin diagonal slices, drizzle on both sides with olive oil, and toast until golden brown under the broiler or in a very hot oven. Flip and toast the other side; set aside.

When the peas are very tender and beginning to turn "pea-green", 20-30 minutes, remove from heat and mash roughly. Taste and adjust seasoning as desired. If the mixture is very thick, add more stock by the tablespoon until it reaches desired consistency.

Serve with crostini and salad.

Serves 4 with a salad as a light meal, 6-8 as an appetizer

08 May 2011

Last gasp

One of the most frustrating—and also exciting—aspects of seasonal produce is its unreliability. One summer you may be waiting weeks for that first perfect apricot; the following spring, you may find tender baby asparagus weeks before you expect them.

I love the seemingly endless parade of citrus varieties throughout the winter, but I'm particularly happy at the end of the season when kumquats arrive to jolt me out of my root-vegetable-and-tangerine stupor. Kumquats are the ideal end-of-winter fruit: they have a touch of bitterness (they are one of the few citrus fruits that you eat, peel and all) and a zingy flavor—if you could pack all of the flavor of a fantastic tangerine into a package the size of a grape, this is what you'd end up with.

As I progressively bored of apples, pears, oranges, grapefruit, and tangerines this winter, I began to keep my eye out for kumquats. January passed, then February. March rolled on by, and the next thing I knew it was spring. When April arrived and I began finally seeing a few lone baskets of kumquats, I snatched them up like I'd never see them again.

kumquat-ginger marmalade

While kumquats can certainly be eaten raw, I usually halve and simmer them in syrup (sometimes spiked with mint) for a simple compote. They're also delicious in savory dishes (stuffed in roasted fish or cooked into a spicy glaze for chicken), and I've been meaning to try a sorbet or granita, too. This time, I managed to keep my conniving fingers off of them long enough to make a preserve, a perfect bridge from winter to spring, bursting with zesty citrus and spicy ginger.

I hope you can take advantage of this recipe; here we are, well into May, and I'm still seeing kumquats all over the market.

Not for long, though, I'm sure—they're moving over for strawberries already.

winter-spring hybrid


Kumquat-Ginger Marmalade
Once upon a time I didn't worry about preserving my jams and marmalades in a boiling-water bath. I still don't worry about health issues in particular, but the discoloration common in well-sealed, unprocessed cans bothers me enough that I started hauling out the canner again. Do as you prefer

Scant 3 pounds whole kumquats (about 1 ½ quarts)
½ cup peeled and minced ginger, packed
1 pound sugar (about 2 cups)
1 cup water

Bring a large pot of water to a boil. Pick over the kumquats for any bad fruit, then blanch them in water for 1 minute. Drain; pour cold water over. Slice the fruit into 3 or 4 pieces, picking out and discarding all seeds; transfer cut fruit into a clean heavy pan (about 4-5 quarts is a good size).

Peel and mince a good-sized knob of ginger; measure ½ cup, packed, and add to the fruit (you can reserve any additional ginger for stir=fry or another use). Add the sugar and water and bring to a boil. Lower heat to a simmer and cook, stirring occasionally, until ginger is beginning to soften and the marmalade is ready to set, 45 minutes to 1 hour (I am partial to the freezer test: place a couple saucers in the freezer; as you want to test the preserve, put a dab on a place and return to the freezer for a minute. Press the edge of the preserve with your finger; if it wrinkles, it's ready).

Meanwhile, wash (and sterilize, if desired) your jars. Fill with marmalade, leaving ¼ inch headspace. If processing in a bath of boiling water, process 10 minutes. After removing from the water bath, let sit undisturbed 12-24 hours; remove any unsealed jars to the fridge.

Makes about 5 half-pint jars