20 February 2011

In pursuit of real food

The occasional package of ramen noodles is all well and good, and I could eat quick-and-mindless pasta al pesto or mascarpone three or four nights a week without complaint, but after several crazy weeks, I was craving some lazy time in the kitchen. I would have been happy doing something, anything but washing dishes—I'm not clear how I dirtied every dish in the house when I was cooking little and eating less.

This morning I woke up and just couldn't take it any more. It was a perfect morning for baking—our skies were clearing after a few days of rain, and the whole house was chilly.

I've had a bit of an obsession with muffins lately. Good muffins are sweet but not sticky, substantial but not heavy. They're quick to make, and rarely require more than you have in your pantry, and if you have a small family like I do, odds are good that you'll have leftovers for the next day.

muffins

I'm equal-opportunity when it comes to muffins. I like the newfangled orange-cranberry and the classic almond-poppy seed (although I prefer lemon); I enjoy more cake-like chocolate and barely-sweet corn; I'm happy to gobble up gingerbread and banana alike. Recently I've made doughnut muffins and spice muffins, and I just bought bran, but mostly, I've been experimenting with blueberries.

blueberry-streusel muffins

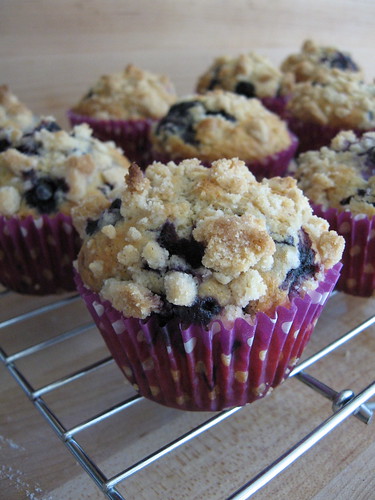
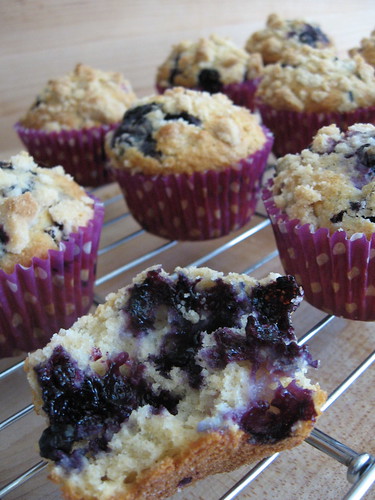
Blueberry muffins have always been my favorites; they're a lesson in simplicity. The fruit greatly reduces the structural integrity of the muffin (particularly while warm), so I like to counteract that with some whole wheat pastry flour, a bit sturdier than white flour. I like to spike the batter with a few good pinches of mace or nutmeg, but the most important element is certainly the berries. I still have a few cups of blueberries from home in my freezer, but when I need to buy them I try to find small, wild Boreal blueberries, as they seem to have the best flavor. While I don't hesitate to use fresh berries when I have them, I find that frozen berries reduce or eliminate the purple streaks that are the bane of so many berry-lovers. These muffins are chock-full of berries and will stain your fingers purple if given half a chance—just like they should be.

berry-tastic


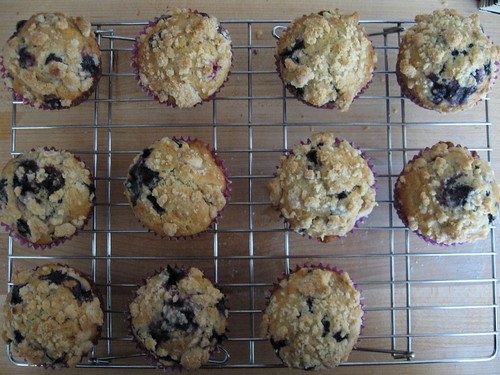
Blueberry Muffins with Cinnamon Streusel
Adapted from the Stone-Buhr Cookbook

Baking manuals usually abound with instructions to have all ingredients at room temperature, but for this recipe, I recommend keeping the milk and egg cold. The blueberries are frozen, and having a cool batter will slow down the thawing process and help reduce any unnecessary purple streaks.

For the streusel:

3 tablespoons butter, melted
3 tablespoons sugar
pinch cinnamon
½ cup flour, divided

For the muffins:

1 cup whole wheat pastry flour
¾ cup unbleached white flour
5 tablespoons sugar
2 ½ teaspoons baking powder
¾ teaspoon salt
2 pinches mace or nutmeg
1 egg, lightly beaten (cold)
¾ cup milk (cold)
⅓ cup oil or butter, melted and cooled
1 cup blueberries, kept frozen

Preheat the oven to 400ºF. To make the streusel, mix the melted butter, sugar, cinnamon, and ¼ cup flour. Add additional flour by tablespoonfuls until the mixture crumbles but holds clumps easily; set aside.

Grease a muffin pan or line with paper or foil liners; set aside. Mix the flours, sugar, baking powder, salt, and nutmeg in a large bowl with a fork or whisk. Make a well in the center and add the egg, milk, and the oil or butter. Fold the ingredients together swiftly with a spatula, folding three or four times. Add the blueberries and quickly mix to distribute - the dry ingredients should be just moistened.

Distribute the batter in the muffin pan (I often leave one empty to keep the muffins nice and tall). Sprinkle the streusel over the top of the muffins—if you have leftover streusel, you can cover it and refrigerate for up to a week.

Bake 30-35 minutes, until golden brown. Remove from the pan and cool on a rack for at least 10 minutes.

Reheat any leftovers in the microwave or in a 250ºF oven.

Makes about 12 muffins

13 February 2011

Climbing out of the crater

Lately, I've felt like my life has exploded around me like a meteorite. Things haven't been bad (in fact, most of the chaos has been the good variety), but I've felt like I haven't had a chance to breathe. My days have been longer (at least the sun is playing along); I go to bed mentally and physically exhausted, and can hardly sleep for the thoughts rattling my brain; every item checked off my list warrants a celebration, but it seems that three more things are tacked onto the end.

I have been cooking, believe it or not. We made roasted chile salsa and tacos de papa for the Super Bowl; I'm eating bowls of spaghetti al mascarpone and penne with pesto frozen last summer; I even made a batch of diminutive lemon macarons with raspberry buttercream filling. Unfortunately, my current level of disorganization resulted in a disastrous kitchen and a missing camera (found it—in the cabinet where it belongs).

I'm sure there's an embarrassment of riches on all the lovely blogs I read; people are probably creating all sorts of delicious fare—but I wouldn't know, as I haven't had a chance to read any of them.

I think I'll be crawling out the crater and joining the real world soon—there will be muffins, and marmalade, and something made with the beautiful chuck roast in my fridge—but in the meantime, I thought I'd share my tips for making ramen.

Ramen may be touted as the food of poor college students and hung over young adults, but when gussied up properly, it makes a fast, cheap, and easy meal, and that's always a comfort when life gets crazy.

Not Your Average Undergrad's Ramen
Adapted from a David Chang recipe I saw somewhere and then forgot.

1 package ramen noodles (any flavor)
1 half-inch piece ginger, peeled and coarsely chopped
2 large cloves garlic, peeled
½ teaspoon sesame oil (plus more if needed)
3 green onions, thinly sliced
1 fresh serrano chile, minced, or a large pinch crushed red peppers
soy sauce to taste
rice vinegar to taste

Bring water to boil in a small pan and add the noodles. Cook until barely tender, 2-4 minutes.

Meanwhile, crush the ginger and garlic in a mortar and pestle. Add the sesame oil.

Drain most of the water from the noodles. Add the ginger mixture, the green onions, and the chile and mix well. (If you want to add the flavoring packet, you can, but it's really not necessary.)

Add a splash of soy sauce and a sprinkle of rice vinegar. Eat, and add the pot to your growing pile of dishes.

Serves one

06 February 2011

Best-laid

Are you watching the Super Bowl today? Will you be eating salsa and guacamole? I know I will.

I hope that you, like me, find that the weeks after the Super Bowl leave you starved for salsa and guacamole, because we made a batch of Mike's Famous Salsa last night ... a few days too late to offer it to you for your Super Bowl party.

Instead, I decided to offer you orange cream. Blood orange cream, to be precise. Lest you think that this might be some sort of wimpy flavored Chantilly or boring custard, let me explain.

This orange cream, adapted from yet another Dorie Greenspan recipe, is similar to an orange curd, with juice, zest, eggs, sugar, and butter. However, to make the cream you cook all of the ingredients together except the butter. The slightly cooled custard is then whizzed in the blender with the butter, creating a creamy, emuslified, rich-yet-deceptively light cream.

This recipe could hardly be more versatile. Spread it in a tart crust; spread it between macarons; smear it over toasted English muffins or freshly-baked scones; layer it in an entremet; eat it from the bowl while standing in front of the fridge: spoon optional.

The only unusual thing about this (and some other citrus recipes) is the instruction to rub the zest into the sugar. I encountered these instructions in several books and have decided that it does help distribute the citrus oils (and therefore flavor) throughout the dish, but feel free to omit that step if desired.


Blood Orange Cream
Adapted from yet another Dorie Greenspan recipe.
Note: if you do not or cannot eat gelatin, I think this recipe would be fine without it; the next time I make it I will try it without and report back.

1 scant cup granulate sugar
zest of 3 blood oranges
zest of 1 lemon (preferably Meyer)
4 extra large eggs
¾ cup fresh blood orange juice (from 3-5 good-sized blood oranges)
2 tablespoons fresh lemon juice
1¼ teaspoons unflavored gelatin
1 tablespoon cold water
10 ounces (2½ sticks) unsalted butter, in pieces and at room temperature

You will need a strainer, a blender or food processor, and a good digital thermometer handy.

Choose a bowl that fits snugly into one of your pots; bring water to a simmer in that pot (the water should be just below the bottom of the bowl. Measure the sugar into the bowl and zest the fruit directly into the bowl; rub the zest into the sugar with your fingers until the sugar is moist (it should smell heavenly). Whisk in the eggs and the two juices.

Set the bowl over the pan of simmering water and start whisking as soon as it is beginning to warm. Cook the cream, whisking constantly, until the temperature reaches 180ºF (it will lighten as you whisk and will start to thicken shortly before it reaches the correct temperature). The heating process can take as long as 10-15 minutes.

Pour the hot cream through the strainer into the blender, pressing all of it through with a spatula; discard the solids. Bloom the gelatin with the cold water in a little bowl, then add to the cream, cover, and carefully (it's still hot) pulse briefly to blend. Uncover and let cool to 140ºF, 5-10 minutes.

Cover the blender again and turn the speed to high. Using the little hold in the blender lid, add the butter in 4 or 5 additions, letting the butter become completely absorbed before adding more. When the butter is added, blend for a full three minutes (I do it in 1-minute intervals, scraping and giving the machine a rest for a few seconds in between.

Transfer to a bowl, press plastic wrap against the cream and refrigerate until well chilled.

Whisk well to loosen before using.

Makes about 3 cups (enough to fill a standard 9 inch tart pan)