27 December 2010

Last-minute

What timing! Did you know that today is National Fruitcake Day?

fruitcake

The 2010 December Daring Bakers’ challenge was hosted by Penny of Sweet Sadie’s Baking. She chose to challenge Daring Bakers to make stollen. She adapted a friend’s family recipe and combined it with information from friends, techniques from Peter Reinhart’s book ... and Martha Stewart’s demonstration.

Stollen is a German fruitcake that bears a similarity to panettone and other traditional holiday yeast breads. This bread is stuffed with dried fruit, zest, candied citrus, and nuts, and the mildly sweet dough is topped with melted butter and confectioners' sugar after baking.

cranberry-orange stollen

I have a fractious relationship with fruitcake at best. I didn't grow up with a family that baked traditional fruitcakes, but I heard the stories from friends and, well, the world at large, which told me that fruitcake was heavy, saccharine-sweet, and stuffed with everything from raisins to the frightening red and green jellied cubes that were supposed to be candied citrus.

Of course, I've moved on from that point in my life, at least a little bit. I still prefer my raisins eaten out of hand to mixed into bread, and I only recently discovered that homemade candied citrus is not only edible, but absurdly delicious, but I've eaten various fruitcakes from around the world over the years.

I made a few variations to the recipe based on my desires and my pantry stock: I substituted the traditional raisins with cranberries that needed terribly to be used; I soaked them in orange juice instead of rum (to avoid waste from the fruit I was zesting and candying); I used finely chopped almonds rather than slivered almonds because I don't like big pieces of crunchy things in my bread. I also added the candied orange peel only when I was rolling the dough into its wreath shape, as I didn't start making it until I was ready to make the bread. Luckily for us, there was enough orange peel left over for us to munch on it throughout the evening, as well.

fruitcake

Due to this bread's longevity—supposedly, it lasts for a couple weeks at room temperature—I may continue to fiddle with the recipe before next year's holiday season. I'm sure my family wouldn't be bothered by the addition of a fruitcake to the cornucopia that I mail out.

24 December 2010

Short and sweet-tart

Were you thinking, perhaps, that cranberry sauce wasn't worth the effort this year? That the recipe on the back of the back didn't turn out much better than a can, or that the solid mass of ribbed, jellied sauce that slurps out of the can would make up for what it lacks in pure amusement value?

Reach to the back of your freezer, then, for the bag of cranberries that you stashed away when they were on sale last January, because this cranberry sauce is so much more.

toasted almonds

The most obvious addition is slivered almonds—toasted to perfection, half are mixed in with the hot sauce, the other half sprinkled over the top before serving. More subtle is star anise, a beautiful spice with subtle, complex flavor.

spiced cranberries

All told, this takes about 15 minutes to make—at least thirteen of which can be spent paying attention to other things—so it's ideal to make on Christmas Eve or even in the morning when you are brewing your tea or coffee. Just reserve time for the sauce to cool and chill (an hour or two if you put it directly in the fridge).

The turkey is brining, the sausage is made. Stale bread is finishing the drying process in the oven, and bottles of Prosecco and grape juice are chilling in the fridge. I have a mug of spiced cider in hand, and the presents are all wrapped and under the tree.

The only thing left to do is decide what's for dessert tomorrow. Oops.

cranberry sauce with almonds


Spiced Cranberry Sauce with Tangerines and Almonds
If you don't have star anise, most Chinese five-spice powder mixes would would as a replacement (just make sure it doesn't have chile, pepper, or salt); just add about ¼ teaspoon powder.

1 cup slivered almonds
12 ounces fresh or frozen cranberries (one standard bag)
1 tangerine or small orange
¾ cup water
¾ cup granulated sugar
1 nutmeg, broken into large pieces with a pestle or rolling pin (or 1 pinch ground nutmeg)
2 whole star anise
¼ teaspoon cinnamon

Preheat oven to 350ºF. Spread almonds in a single layer over a rimmed baking sheet and toast, stirring once or twice, until light golden and fragrant, 5-10 minutes. Set aside to cool.

Pour the cranberries into a medium saucepan and briefly rinse, then pick over to remove any bad berries. Zest the tangerine directly into the pot, then cut in half and juice into the pot. Add the water, sugar, and spices, stir to combine, and place over medium-high heat.

Bring to a boil, then reduce heat and simmer 10 minutes. The cranberries will be breaking down and the mixture will have thickened slightly. Mash one quarter to one third of the mixture roughly with a wooden spoon, then stir well to combine. Remove from heat and stir in half of the almonds.

Transfer the mixture to a bowl and cool completely. Chill before serving—mixture will thicken further as it cools.

Makes about 3 cups

21 December 2010

Raise your glass

Are you planning a feast of some sort this Saturday? I know I am. Roast turkey (I contemplated goose for a day or two); dressing with homemade pork sausage and apples; Mike's fantastic, rich, and rustic mashed potatoes; braised pearl onions; roasted carrots & parsnips; the essential cranberry sauce with tangerines, almonds, and star anise; and the ugly duckling of the holiday feast: sautéed Brussels sprouts with bacon & herbs.

Brussels sprouts with bacon

I had never eaten a Brussels sprout until a year or two ago. My mother had grown up hating them, so she never made them at home, and while I spent college tentatively trying new foods and cuisines, I wasn't quite ready for institutionally-prepared, boiled-and-buttered sprouts, however good my school's food might have been.

Finally, finally, I spent one winter Saturday wandering through the farmers' market, looking for inspiration. There they were: little miniature cabbages, so cute and unoffending, so green and bright among the root vegetables and butternuts, so lonely and unwanted. I grabbed a few—their bad rap renewed my tentative streak—and went home to my internet and my trusty, dog-eared, and stained copy of Chez Panisse Vegetables.

It was love at first bite. Why on earth does everyone malign the poor, defenseless Brussels sprout? When cooked properly, they are nutty, sweet, and not at all stinky like their reputation suggests, and they are now a regular winter guest in our home. I've tried them hashed (delicious tossed with hot pasta) and whole, and you can't go wrong roasting the halves in a hot oven until caramelized around the edges—adults and children alike will be filching them off the platter like candy.

My new favorite way to prepare sprouts, discovered this November, is with bacon. It may be unoriginal, and it may counteract the various health benefits—but try it and you may be converted. The sprouts are sautéed in some of the rendered fat just until hot, after which point a splash of white wine and stock are added to deglaze the pan. As the sprouts finish cooking, the sauce coats them in a silky emulsion of smoky bacon, herbs, and wine—the flavor is bright and springy, fending off the winter blues, making you raise your eyebrows and reach for more with each bite.

If you're afraid of Brussels sprouts, if you've been trained to think of them as little ping pong balls of evil, please, take a deep breath, drink a glass of wine, and try them with bacon.

Sautéed sprouts

Sautéed Brussels Sprouts with Bacon
Adapted from a few recipes in Chez Panisse Vegetables

If you don't like bacon or don't eat it, add a couple tablespoons of olive oil to replace the lost fat. This recipe will double (or even triple, I suppose) easily, but you want the sprouts in a single layer if possible so that they will cook evenly.

About 1 pound fresh Brussels sprouts (chose smaller heads with compact leaves)
1 tablespoon butter
2-3 ounces uncured bacon (about 2-3 slices for most)
½ small onion or one shallot, chopped (optional)
2-3 sprigs fresh thyme, or 1 teaspoon dried thyme
1 bay leaf
salt & pepper
splash white wine
2-4 tablespoons mild stock or water

Peel off the tough, blemished outer layers of each sprout, revealing clean, bright heads. Trim the root end of each sprout and cut in half or quarters; if the size varies, cut smaller specimens in half only.

Meanwhile, heat the butter a large pot over medium-high heat. Cut the bacon into lardons about ½ inch thick and add to the pot. Cook, stirring once or twice, until just beginning to brown (note: if your bacon renders a huge amount of fat, you may want to remove a small amount before proceeding). If desired, add the onion or shallot and stir to combine.

Add the sprouts, thyme, and bay leaf and season with salt and pepper. Cook, stirring regularly, until the sprouts are hot and just beginning to wilt and brown, 3-4 minutes. Add a splash of white wine and stir well to deglaze. Add two or three tablespoons stock, partially cover, and let cook until the sprouts are tender throughout, about 5-10 minutes more. If the mixture is dry, add a bit more stock. Serve hot.

Serves about 4 as a side dish at a normal meal; at a feast with many dishes, would probably serve 8 easly

20 December 2010

Pretty darned fantastic

Can we all get together and agree that chickpeas are pretty darned fantastic?

For one thing, they really do look like miniature naked chickens, and that can't do anything but improve them. Further, there's no complaining about any food that has multiple, fun names. Chickpeas has a whimsical ring to it, the kind of word that I like to use for finger foods like roasted, spiced chick peas and falafal. Garbanzo beans, then, are like the chickpeas' smoky, all-the-boys-love-her older sister, sultry, mysterious, and brooding. Garbanzo beans are just cool.

So really, could it be anything but garbanzo beans in this dish? What happens when you mix garbanzo beans with chard, and cook them both with handfuls of shallots, scads of garlic and buckets of olive oil? Good things happen. Magic happens.

I stumbled upon a recipe for Roasted Garbanzo Beans and Garlic with Swiss Chard several years ago in a Bon Appétit, and I believe I made it for dinner that night. I've made this dish countless times since, a cure for an uninspired fall, the winter blues, or a misty spring day alike.

The original recipe, provided by Michael Psilakis, was mindblowing, but it was no suprise: what wouldn't be good with 1 ¼ cups of olive oil? I'm not anti-fat by any means, but my frugal wallet winced at roasting the beans in that much oil, just to drain it off. Sure, I could (and did) reuse it, but still. I slashed at the amount until I found the perfect level of olive oil—all of the flavor and none of the waste.

As if roasted, garlicky, herb-covered garbanzo beans bathing in velvety chard wasn't enough, I dare you to find a way not to serve this. I've had it under seared salmon and aside roast chicken. I've tossed it with pasta; I've added stock for a soup. I've topped it with a runny-yolked poached egg (oh, the unctuous sauce that resulted!); I've drained it and stuffed a pita for a sandwich. Truly, the versatility of this dish knows no bounds.

I waited all day to finish this post so that I could take photos; unfortunately, I was at work with nothing but my leftovers to eat, so they were gone before I got to my camera. Still, I've got more garbanzo beans in the refrigerator, so I'm sure I'll make more in the next week, and I promise you pictures at that point. Until then, I exhort you—soak some garbanzo beans tonight, or get out a few cans and start immediately. You won't be sorry.


Roasted Garbanzo Beans with Swiss Chard
Adapted from this Michael Psilakis recipe on Epicurious, from Bon Appétit

This dish calls for a large amount of garlic, but as most of it is roasted, and the rest lightly sautéed, it offers a mellow flavor. Use whatever kind of chard you like; the red chard, which I usually buy, will stain the broth and the beans lightly pink.

For the garbanzo beans:
3 cups cooked, drained garbanzo beans (or about 2 cans, rinsed well and drained)
1 teaspoon fennel seed
2 bay leaves
2 shallots, thinly sliced (can replace with ½ red onion)
10 cloves garlic, peeled
salt & pepper
¼ cup good olive oil

For the chard:
2 tablespoons olive oil
2 shallots, thinly sliced (see above)
5 cloves garlic, peeled and crushed
2 bay leaves
1 large or 2 small bunches chard, ribs removed and leaves coarsely torn
1 ½ cups mild broth (I prefer vegetable stock)

Preheat the oven to 350ºF. Toss the drained beans with the herbs, shallots, garlic, and liberal amounts of salt & black pepper (at least ½ teaspoon salt and 1 teaspoon pepper for me). Drizzle the olive oil over, toss lightly, and cover the dish tightly with foil or its lid. Place in the oven and roast, stirring once or twice, until the beans are tender and a light gold color, and the garlic and shallots have relaxed completely. Remove from heat and set aside (can make a day ahead if desired; bring to room temperature before proceeding).

Heat the olive oil over medium-high heat in a large, deep pot. Add the shallots and garlic and cook for a minute or two, until fragrant. Add the bay leaves, then about a third of the chard. Stir well until wilted, then add remaining chard in batches. Add the stock, bring to a boil, and cook until the chard is tender, 5-10 minutes. Add the garbanzo beans, mix well, and cook one to two minutes more, until the beans have absorbed a little of the broth. Adjust seasoning as desired, remove bay leaves and serve.

Serves 4 as part of a main dish (with an egg, pasta, etc.), or 8 as a side dish

17 December 2010

An unassuming trio

I'm running behind schedule—and not just when it comes to blogging. My parents came to visit, which was fantastic ... but wow. Christmas is one week from tomorrow.

I'm behind on my blogging, to be sure, and my blog reader is about to burst from all the unread posts, but that's the least of my worries.

I'm behind on gifts—there are some downsides to focusing as much as possible on hand made items. I'm behind on knitting, on wrapping, and on so much as thinking about stocking stuffers. And 
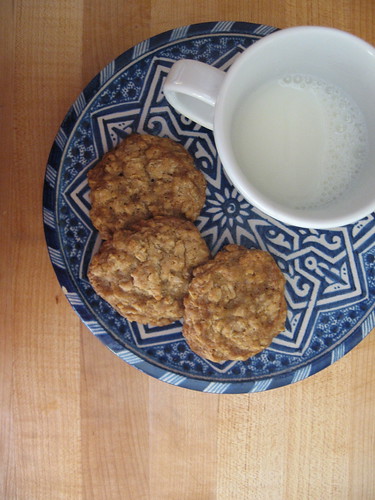
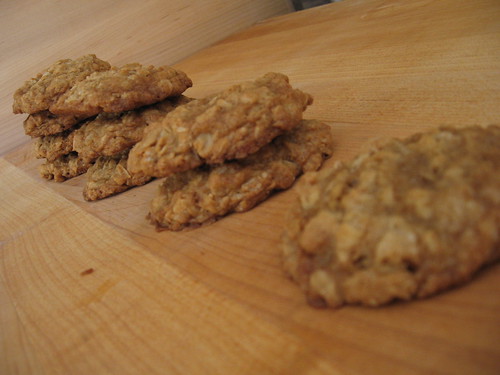
until yesterday, I had not made a single Christmas cookie.

How is that possible? I'm usually the queen of Christmas cookies, with half a dozen varieties baked up before the second week of December begins. I may have a party to go to this weekend, but I think I will be stocking up on butter, buying another bag of sugar, and dirtying every baking sheet I own. Several times.

an array of shortbread

Luckily for my blog (and for my belly), I made shortbread last night. Shortbread is one of my favorite kinds of cookie, and one that I rarely make after December. A simple, sugar-flour-butter cookie—complimented with a dash of vanilla and a sprinkle of salt—is all that anyone should ask for, but what can I say? My favorite thing about shortbread isn't the rich butter or the melt in your mouth sandy texture (no wondering why these are called sablées in France), but rather the endless tweaking that I can do to a recipe.

Last year I became more than a little bit obsessed with dark chocolate-drizzled cardamom shortbread, but I'm a fickle girl, and they haven't even crossed my mind. This year, it's time for something old, and something new; for tradition and experimentation. Yesterday afternoon, after recovering from a vicious migraine, I made up for lost time by making four different batches of shortbread. One I'm saving for later, but I'll show three of them to you today.

an unassuming trio

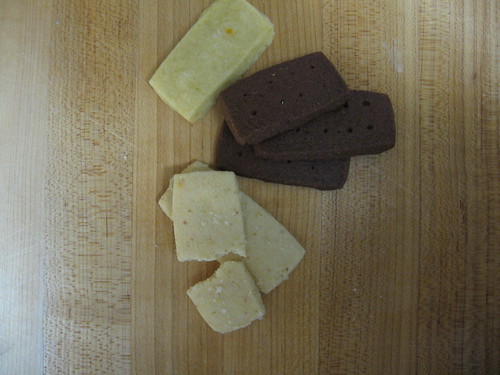
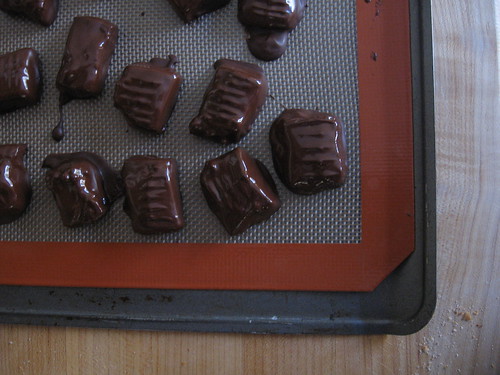
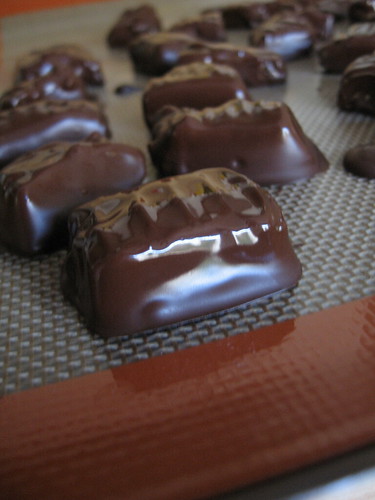
It's an unassuming trio of little rectangles—no fancy shapes for the humble shortbread in my house—of brown butter and salt, Mexican chocolate, and Meyer lemon. Each delights me in different ways, but I'm going to start, as I so often do, with chocolate.

I was inspired by the Salt & Pepper Cocoa Shortbreads from Dorie Greenspan's lovely "Baking: From my Home to Yours," but after several hours pondering black pepper (with chocolate? without chocolate? with lemon instead of chocolate?), I scratched that idea and went with a classic chocolate-cinnamon combination. I think these would be ideal with Ceylon, or "true" cinnamon (see my polemic on cinnamon at the bottom of this post), but I spaced out (I blame the vestiges of migraine) and used cassia. No matter - these are crumbly, intensely chocolaty, and jolted by the shot of spice.

The most important things about shortbread are the butter and the method of mixing them together. While you don't need to bankrupt yourself buying the best butter available, it should definitely taste delicious just by itself. I mix my shortbread by hand only—it lowers the chances of over mixing and dirties nothing more than one bowl and one spoon, and it gives me an arm workout too. Use butter that is softened but still slightly firm—not at all oily—or else you'll lose that sandy texture. Also, don't beat the butter and sugar like you would for, say, chocolate chip cookies, or you'll end up with a cookie that will puff and then, most likely, collapse when cool. Five minutes and a little elbow grease will produce a perfect, light-yet-rich, crumbly-but-melting cookie that you won't be able to keep your hands off. I should know—I ate some for breakfast this morning.

chocolate-cinnamon shortbread


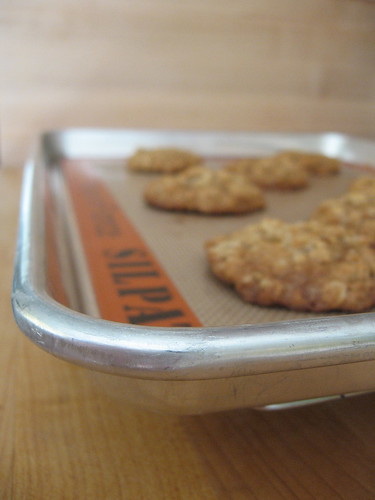
Mexican Chocolate Shortbread Cookies

These cookies are not too sweet—a common occurrence with my desserts, to be honest—so if you like sweeter cookies, you may want to add a few extra tablespoons of sugar. These cookies would be fantastic with a café au lait or an espresso, but they stand alone just fine. An added bonus for those with cookie thieves in the house: cut and bake the ragged ends, reserving the pretty pieces for gift boxes.

1 ½ cups unbleached flour
6 tablespoons cocoa powder
1 teaspoon cinnamon (or cassia, if you prefer)
½ teaspoon salt
1 cup (two sticks) good-quality unsalted butter, mostly softened
⅖ cups confectioners' sugar
1 teaspoon vanilla extract

Mix the flour, cocoa, cinnamon, and salt in a medium bowl and set aside.

Break the butter up with a wooden spoon in a large bowl, then stir briskly to loosen. Add the sugar and beat briefly until well combined, with no lumps. Add the vanilla and beat very briefly, until just combined.

Dump in the flour mixture and carefully stir until just combined—watch out here to avoid flour explosions that dump your carefully measured dry goods onto the floor (ask me how I know this).

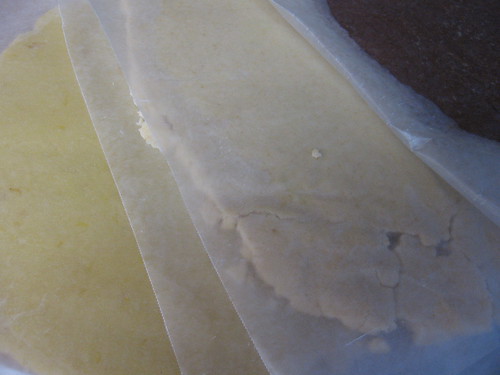
Place a piece of waxed paper on a large board or clean counter. Dump the dough onto the paper, cover with another piece of paper, and quickly roll out the dough about ¼ inch thick (for me, this made a square roughly eight inches by fourteen. Transfer to a baking sheet and refrigerate at least two hours, but the longer the better (cover the entire sheet with plastic wrap if you will chill overnight.

Preheat the oven to 350˚F and place racks in top and bottom third of the oven. Line two baking sheets with parchment or Silpat. Remove the cookies from the oven, peel off the top layer of waxed paper and cut into 1 inch by 3 inch fingers. Using a thin spatula, transfer to the sheets.

Bake 12-14 minutes, swapping sheets midway through the baking time. The cookies will still be a little soft when gently pressed with a finger, but not mushy. Transfer to racks and let cool.

These cookies will keep in a tin for 4 or 5 days at room temperature; alternatively, wrap tightly and freeze for up to two months.

Makes about 3 dozen (plus the ugly bits)

03 December 2010

Not a sabbatical

How life does get away from me sometimes.

I've been offline for days. My meals have been simple, formulaic, and unphotogenic in the early evening darkness: brussels sprouts with brown rice; pasta tossed with tomato sauce and mozzarella; simplest turkey soup with a rich stock from Thanksgiving's carcass.

But the clearest sign that things are not as they are supposed to be? Today is the third day of December, and I have not baked a single cookie. No spritz, no shortbread, no gingerbread, no spiced-treacle, no pumpkin. With a full weekend scheduled—my best friend is in town to visit—I don't know if I'll have an opportunity to rectify this situation before my parents come into town mid-week.

Something had to be done to take the edge off, and I declared that something to be yet another pot of soup. In the winter months I cling to soup like it's the only thing to keep me warm (and with no central heat in our southern California home, it's sometimes true). I miss true winter, with icicles and snowmen and big heavy boots and an endless supply of hand knit mittens, gloves and scarves—but without that available to me, I open my doors to the cold coastal air, put on a sweater and make soup.

I had never eaten split pea soup until a few years ago. Split peas were in the "just throw everything in" vegetable soup from my childhood, but the classic split pea was something reserved for restaurants, where it often looked grey, crusty, and altogether unappetizing.

On a whim one winter day five years ago, I pulled out my computer, some cookbooks, and a plastic tub of green legumes, and a few hours later, I was converted.

Often split pea soup is puréed and sieved into a smooth, sauce, but I prefer to mash the soup roughly with a potato masher, leaving a chunkier soup with more body. No one is ever going to claim that split pea soup is a particularly attractive—in fact, I hesitate to even post a picture.

Shall I? Oh, what the heck. Here is is, in all its baby food-like glory.

split pea soup


Split Pea Soup
For some extra flavor, feel free to add diced ham, lardons of bacon, or a hambone where noted below; otherwise, a sprinkle of smoked salt adds some depth to the flavor of a vegetarian soup.

2 tablespoons olive oil
1 medium bunch carrots, peeled and diced (about 1 ½ cups)
1 large onion, chopped (about 2 cups)
1 cup ham, chopped, or 4 ounces of bacon, sliced, or a small hambone (optional)
2 cups dried green split peas
2 large sprigs fresh thyme
2 bay leaves
4 cups (or more) mild stock or water, or a mixture of the two
salt and freshly cracked black pepper

Heat a large pot over medium-high heat with the olive oil. Add the carrots and onions and cook about five minutes, stirring occasionally. Add the meat, if using, and stir for a few minutes to distribute.

Add the split peas and herbs and stir well, then add the 4 cups stock and/or water. Season with salt and pepper. Bring to a boil, then reduce the heat to a simmer. Cook, partially covered, until the peas are tender and beginning to fall apart, 1 ½ to 2 hours. Add more stock or water by half-cupfuls if the mixture gets dry.

Mash roughly in the pot with a potato masher or big wooden spoon. The soup may be quite thick—add additional stock or water to thin to your tastes. Adjust seasonings as needed.

Serves 4 as a main course or up to 8 as a starter

28 November 2010

Make way for crostata

Having Thanksgiving dinner at another house means many things. It means there will be exponentially fewer dishes to wash, but more importantly, it tells me that I will have fewer leftovers. That may sometimes be beneficial—there's only so much stuffing two people can eat—but it also means no pie.

Pumpkin pie is good, but it's never been my favorite; I tend to prefer it piled with mountains of softly whipped cream. I'm generally more likely to eat apple pie, or pear-cranberry crisp, or perhaps a pumpkin cheesecake with caramel sauce.

This year, I took advantage of the Daring Bakers' Challenge for November and made a few crostate.

pear-almond crostata

The 2010 November Daring Bakers’ challenge was hosted by Simona of briciole. She chose to challenge Daring Bakers’ to make pasta frolla for a crostata. She used her own experience as a source, as well as information from Pellegrino Artusi’s Science in the Kitchen and the Art of Eating Well.

Crostata is simply an Italian tart, traditionally filled with pastry cream, preserves, fresh fruit, or any number of other delicious things.

My first crostata was only half a success. The pasta frolla (crust) was spread with a layer of almond cream, then covered in a layer of sliced poached pears before baking. The almond cream—adapted from a recipe to accommodate my ingredients—was a bit too sweet, and I wished that I had used fresh pears to counteract that sweetness. Still, it was a big hit with the others.

poached pears and almond cream

A few days later, I pulled out my baking supplies and the last of my butter to make another crostata, and I wanted to use preserves. I still hadn't figured out what I wanted to do with my damson plum preserves, and a tart seemed to be the perfect choice. A few adjustments to the pasta frolla recipe, and an ideal dessert was born.

plum preserve crostata

The pasta frolla recipe provided for the challenge calls for either lemon zest or vanilla sugar. However, since the plum preserves are quite tart and already studded with vanilla seeds, I decided to leave out both and keep the crust simple. The buttery, crumbly crust provides an ideal base for the sweet-tart filling; perhaps adding a dollop of whipped cream is gilding the lily, but it made for a delicious dessert-cum-dinner last night.

crostata alla conserva di prugne

24 November 2010

Falling further behind

I had plans for a week of Thanksgiving preparations here.

Cranberry sauce? Certainly! Brussels Sprouts? You bet! Stuffing with Sausage and Apples? Sure!

Unfortunately, life intervened. As a peace offering, I bring you soup.

soup with bread

To be precise, Butternut Squash-Apple Soup, and the perfect answer to a cool fall day. We eat this all winter long—even Mike, who claims to not like soup, has proclaimed that he would happily eat this every week.

Puréed vegetable soups are ideal for winter; the kind of food that makes you dream about climbing down into your mug for a warm, velvety soak.

Also, puréed soups are deceptively easy to make; onions and apples are softened in some butter, then mixed with roasted butternut squash purée, stock, and some minimal seasonings. After simmering, it is blended and reheated with a bit of cream. The sweetness of the squash is tempered by the onions and the slightly tart apples (I like to use an eating apple like Gala or a tart Granny Smith or Pippin), and the cream adds just enough body and richness to bring it all together.

The first few times I made this soup, I forced the purée through a sieve before adding the cream, which resulted in a perfect, even-textured soup. Until I have enough room for a chinois or a food mill, though, I don't think it's worth the effort; a good blender will leave a lovely texture and remove any possible stringiness from the squash.

butternut squash-apple soup

This would be an ideal first course at a fancy Thanksgiving meal, but is equally welcome in a big mug with a slice of crusty bread, eaten while wrapped in a blanket on the couch.

For those of you who celebrate Thanksgiving tomorrow, have a lovely day filled with food, laughter, and friends.


Butternut Squash-Apple Soup
I find that 4 pounds of squash will yield about 3 pounds of purée—I usually leave the leftovers for another use or for a small batch of soup later in the week, but this will scale up just fine.

2 pounds butternut squash flesh(see below)
2 tablespoons unsalted butter
1 medium yellow onion, thinly sliced
2 medium sweet-tart or tart apples (I prefer Gala), peeled, cored & thinly sliced
2 ½ cups mild vegetable or chicken stock, plus more if needed
1 large bay leaf
1 ½ teaspoons salt
½ cup heavy cream
black pepper

To prepare the squash, preheat the oven to 400˚ F. Cut the squash in half lengthwise with a heavy knife, then scoop out the seeds and pulp. Place the squash on a large baking sheet, cut side down, and roast until they are quite tender when pierced with a knife or skewer, 30-60 minutes depending on size. Set on a rack until cool enough to handle. Scoop out the flesh from the skin with a spoon.

Place the butter in a large, heavy pan on medium heat. Add the onions and apples to the hot pan and cook, stirring occasionally, until just softened, 5-10 minutes.

Add the squash, bay leaf, salt, and 2 ½ cups stock and bring to a boil. Reduce heat and let simmer about 30 minutes uncovered, stirring occasionally.

Transfer to a blender and let cool slightly, then carefully purée, working in batches if needed. If preferred, blend in the pot with an immersion blender (this will generally lead to a coarser purée). Transfer to a clean pot or, if desired, force the purée through a fine sieve. Set over medium heat and stir in the cream. Heat just to a boil, then season to taste with salt and pepper and serve.

Serves 4 as a main dish

20 November 2010

Sacrificing hipness for comfort food

We all have some dish that instantly transports us to our childhood. For some, it might be a chocolate milkshake that was a regular bedtime snack; for others a lemony roast chicken. Most of us, in fact, probably have multiple memory-filled meals, each one as comfortable as an old sweater.

stroganoff with green peas

For me, my standby is stroganoff: sliced or ground beef cooked with mushrooms and onions in a sour cream sauce. Stroganoff is an intensely uncool dish, the sort of thing that was featured on the back of a Campbell's soup can in 1973. It's the sort of thing that most people associate with a hospital cafeteria rather than a home-cooked dish of comfort food. But hey, even Thomas Keller has good things to say about it, so it must be good!

I grew up eating Stroganoff, blissfully unaware of my future uncoolness. Despite the frozen peas that were always served with the dish, it was always one of my favorite beef dishes. We made ours with ground beef and concentrated Cream of Mushroom soup, and served it always on a bed of egg noodles. I would always complain about the peas that my mom would pile on top, and they would always end up on my plate anyway. In recent years, I have discovered a love of just-warmed-up peas, and I pile them up on my plate without complaint.

beef stroganoff

Since moving out on my own, the recipe has changed: I add gobs of thickly sliced mushrooms and ample amounts of browned onions. Throughout our years of non-meat-eating, we would brown vegetarian steak strips, which was all right, given that I hadn't had it any other way for years. Economical skirt steak, however, fills out the meal and adds deep, beefy flavor. Skirt can get tough easily, so it's best to sear it at the beginning, then let the slices cook at a simmer until just done. Sirloin or ground chuck would make fine substitutes if you preferred.

browned onions

If you're in a hurry with this meal, you can cook beef, onions, and mushrooms at the same time in different pans, but I generally prefer more cooking time over more dirty dishes.


Beef Stroganoff

Serve over egg noodles or rice; this would also be great with roasted potatoes, and I can see it pairing well with a parsnip purée, too.

Dried porcini mushroom flour can be found at various gourmet food stores, and it adds some rich flavor to the sauce; alternatively, you could finely chop/blend another cup or so of mushrooms and cook those in the pan before making the roux.

3 tablespoons butter, divided
about 12 ounces skirt steak (or other beef as desired)
salt and pepper
1 large onion, halved and sliced
250 grams white or cremini mushrooms, thickly sliced (about 3 cups sliced)
1 tablespoon flour
½ cup milk
½ cup heavy cream
2 sprigs fresh thyme
pinch nutmeg
1 ½ teaspoons mushroom powder (optional)
6 tablespoons (or more) sour cream

Egg noodles: 1 to 1 ½ cups dry per person
Frozen peas (optional)

Heat a very large skillet over medium-high heat. Season the beef well with salt and lots of black pepper. When the pan is quite hot, add a knob of the butter (about ½ tablespoon) and the steaks. Cook, turning after a minute or two, until golden brown on both sides and still rare in the middle, about 5 minutes. Transfer to a plate and set aside.

Add about 1 tablespoon butter to the hot pan and add the sliced onions. Season with a bit of salt, reduce the heat slightly if needed, and cook, stirring regularly, until golden brown and almost completely softened, 8-10 minutes. Transfer to a plate or bowl.

Note: if you are serving this over egg noodles, this is a good time to put the water on to boil.

Add about ½ tablespoon butter to the pan (you should have one tablespoon of butter left) and add the mushrooms in one layer; cook in two batches if necessary. Cook without stirring until golden brown, then flip and finish cooking the second side. Transfer to the bowl with the onions.

While the mushrooms are cooking, take the mostly-cooled steak and slice it thinly across the grain; reserve any juices and transfer to the bowl with the onions.

Add the last of the butter to the pan and reduce heat to medium. Add the flour and cook the roux until medium blonde, 2-3 minutes, scraping the bottom of the pan with your spoon to loosen up the cooked bits of meat. Add the milk, cream, thyme, nutmeg, and mushroom powder if you have it, and stir briskly to combine.

Add the reserved vegetables, beef, and juices and stir well to combine. Bring to a boil, reduce heat to simmer and cook until thickened and the beef is cooked through, about 5 minutes more.

Stir in the sour cream, bring back up to heat, and taste to adjust seasonings.

Serve with egg noodles and green peas, if desired.

Serves about 4

15 November 2010

Free for the taking

There's much to be said about metropolises like Chicago, New York, and Seattle, but if Los Angeles has anything on them, it's the bounty of free-range fruit.

Foraging is second-nature for many, and isn't limited to food—we have dozens of tools in our garage, from ratchets to a whole hammer, that Mike has picked up from the gutter while riding his bike. Many of us may have fond memories from childhood: from blueberries in Alaska to blackberries in Oregon, rhubarb in Michigan to crabapples in New England. While urban foraging is becoming more popular all over the country, I've never seen a bounty like L.A.'s.

If this is starting to sound like an ill-fated expedition to the dumpsters behind the local grocery store, fear not! Countless houses have yards bursting with heavily laden, often un-harvested fruit trees—the lucky ones hang over sidewalks or alley walls for easy, legal, and no-permission-needed picking. (Please note that laws may differ outside of California.) Herbs and fruit trees are used as ornamental plants; kale is sold at garden shops between the azaleas and the snapdragons.

While one must always be concerned with contaminated water, ground pollutants from traffic and animals, and pesticides used by zealous landscapers, there's a steady supply of interesting foods, particularly fruit, throughout the year.

Imagine my excitement, the first winter that I lived in my current home, when I went on a walk and discovered that the attractive, broad-leafed trees lining the blocks around my house were heavily laden with pale orange, fuzzy fruit—loquats! Without stepping off of public property, a stroll around my neighborhood reveals pomelos, lemons, tangerines and oranges ripening before my eyes. My eyes dart from one tree to the next as I look for a reliable source of kumquats this winter, and this summer I spied a few days too late an apricot tree that dropped nearly all of its fruit uneaten.

In the very alley where we drive to park our car, a gnarled old pomegranate tree is beginning to drop its fruit. The fruit is baseball-sized and beginning to split on the tree, revealing deep garnet seeds (or arils, botanically speaking).

pomegranite granita

I couldn't let them go to waste. Lacking a sturdy ladder at the moment, we steered our car below its boughs. After a spry leap to the roof of the car, Mike stretched and contorted and gathered up nearly a dozen big beauties. There was a moment of excitement when one fine specimen slipped and exploded onto the windshield, but no permanent damage was done, and the car needed a rinse anyway.

I made a horrible mess of my kitchen extracting the arils before I read the suggestions from the can't-be-improved Chez Panisse Fruit: Alice Waters recommends filling a large bowl with water (I'd do it in the sink, just to be safe), and plunging the pomegranate pieces into the water before expelling the seeds. Any bits of membrane will float and the seeds will sink; the membrane and peel are very bitter and tannic, and this method makes them easy to remove. I seeded mine directly into the blender, and my kitchen looked like a murder scene; I ended up with pomegranate juice in my eyes, on the backsplash, and on my white carpet (it did come up, wonder of wonders).

pomegranate carnage

But what to do with 8 cups of pomegranate arils? Certainly, pomegranate has its place in salads, and it can't do wrong as a marinade or sauce for roast lamb, but I wanted something simple, something pure, something I could make in my pajamas on a Sunday afternoon.

"What about a granita?"

Mike to the rescue again. He may not care deeply for food, but when it comes to a frozen fruit dessert, he will always be first in line.

granita

I wanted to make a white chocolate mousse to nestle under this, but someone ate the last of my white chocolate ... perhaps next time. Lightly sweetened whipped cream provided an adequate foil for the highly acidic, slightly bitter fruit.


Pomegranate Granita
This would probably also be delicious with ½ cup of the pomegranate replaced with lime juice.

My apologies for an unwieldy recipe.

2 ½ cups pomegranate juice (if making fresh, from about 10 medium pomegranates—see below)
¾ cup water (or diluted juice—see below)
¾ cup sugar
2 tablespoons good-tasting vodka

To extract the pomegranate juice, score the fruit and seed them as instructed above; it will take 7-8 cups of pomegranate arils to make the juice. Place the arils, as much membrane as possible removed, in a blender or food processor. Pulse several times, until the volume reduces by about half and the mixture is mostly liquefied (brief pulses will extract the juice without pulverizing the seeds). Strain through a sieve or fine strainer, pressing gently to remove extra juice. Measure out 2 ½ cups juice and pour into an 8-inch square glass baking dish; reserve any additional juice for another use.

Place the water or diluted juice in a small pan with the sugar. (Use diluted juice to get every last drop out of your fruit: take the drained pomegranate seeds and transfer to a bowl or back to the blender. Pour about 1 C water over and stir briefly to combine; strain again and use the diluted juice in place of water.)

Place the water and sugar over medium high heat and cook, stirring regularly, just until the sugar is dissolved; do not let boil.

Gently stir the syrup into the juice and add the vodka. Cover the dish with foil and transfer carefully to the freezer.

Freeze, breaking up the crystals with a fork every hour or so, until the mixture is frozen throughout, 6-8 hours.

Serve with sweetened whipped cream if desired.

Makes a very scant quart (about 3 ½ cups)

13 November 2010

On family ties and oat cookies

When I was growing up my parents had two close friends that we visited often. They were always a unit—Pat'n'Pam—and they were always fun to be around. I remember them playing Scrabble, I remember their laughs, I remember the living room of their house, and I remember the first time I ever ate lentil soup, sitting in their dining room. I do not remember Pam's Oatmeal Cookies.

Pat'n'Pam moved away when I was still young, and our families lost touch soon after. I've tried to find them over the years, and I think of them whenever I see a Scrabble box or eat lentil soup. Oatmeal cookies were, until recently, free of this bittersweet association.

pam's oatmeal cookies

The trials of being the youngest! The rest of my family remembers those oatmeal cookies fondly, even passionately: very small but thick, chewy and intensely oat-y.

A few months ago, the recipe, transcribed by my six-year-old self, was discovered in my mom's recipe files. She sent it to me, along with her notes from the one or two times she had attempted the recipe.

Perhaps I wasn't careful enough when I wrote out that recipe as a child; perhaps Pam had some secret method that I didn't know about. When I first baked the cookies, they spread, thin and lattice-like, to all edges of the sheet. They tasted delicious—the butter along the bottom browned slightly and the sugar caramelized into a satisfying crunch—but they were more useful for an ice cream mix-in than for eating plain.

cookies and milk = dinner

Two months and half a dozen tries later, we have a cookie that is everything an oatmeal cookie should be: chewy without being tough, thick but not too big, unpretentious but tasting deeply of oats and brown sugar, and entirely without superfluity like raisins or chocolate.

I hesitate to call anything like an oatmeal cookie "perfect"—my blog, with a good dash of irony, is an exception. However, these cookies are the closest to perfect that I've stumbled upon, and they are already winging their way to my grandpa (happy birthday!) and dad (happy latelatelate birthday!). Bake these cookies until the edges are beginning to turn golden brown—they will still be very soft in the middle—then cool completely on the sheets. This will yield a chewy-but-not-tough cookie.

perfect oatmeal cookies


Perfectly Simple Oat Cookies
adapted from Pam's recipe

While these cookies could be made with nothing more than a spoon and some elbow grease, the dough is quite thick, so I recommend a mixer of some kind. You can also make big cookies easily, by using ¼ cup of dough per cookie (you may want only 6 per sheet).

1 ¾ cups all-purpose flour
3 ¼ cups rolled oats
¾ teaspoon baking soda
¾ teaspoon baking powder
generous ¼ teaspoon cassia or cinnamon
½ teaspoon salt (plus a pinch if desired)
1 cup (two sticks) unsalted butter
1 ¼ cups dark brown sugar
½ cup granulated sugar
2 large eggs
2 teaspoons vanilla

Mix the flour, oats, leavening agents, and seasoning in a large bowl until combined.

In a very large bowl, cream the butter until fluffy. Add the sugars and beat until light and creamy. Add the eggs and vanilla; beat until well combined.

Add the dry ingredients and stir or beat on low speed until well integrated. Cover and refrigerate until well chilled, at least one hour; dough will keep well overnight in the refrigerator.

To bake, preheat oven to 350ºF. Line baking sheets with parchment paper or silicone mats. Scoop dough by rounded tablespoonfuls (about 2 tablespoonfuls each) and arrange on baking sheets. For best results, bake 8-9 cookies at a time.

Bake, two sheets at a time, rotating halfway through cooking time, until the edges are set and beginning to brown, 12-14 minutes total. Transfer sheets to racks and cool cookies on sheets until completely cool, 15-20 minutes.

Store at room temperature in an air-tight tin for up to a week.

Makes between 3 and 4 dozen cookies

08 November 2010

Enter braising

We've had a contentious relationship, carrots and I.

braised carrots

Don't get me wrong, I've never had a complaint about a carrot stick, crunched by itself or dipped in hummus for a snack, but until a few years ago, I didn't want to have anything to do with a cooked carrot.

My clearest memories are of pot roast—not one of my preferred childhood meals anyway—at which time I would take the carrots that were forced on my plate and carefully mash them into mounds of potatoes, sometimes theatrically holding my nose and gulping milk after choking them down.

When I visited France in high school, I bravely swallowed endless mouthfuls of carrots puréed in cream without complaint, silently mystified by the radical change from crunchy and sweet to mushy and cloying.

My first positive experience with cooked carrots was in a holiday Tofurky—never my favorite Christmas meal, but one that my husband still adores. The "meat" was tightly wrapped with carrots, potatos, and onions, then dressed with a soy sauce-based dressing before cooking. One Thanksgiving afternoon one of those carrots found its way onto my plate, and never one to refuse a food another chance, I bit into it.

What a revelation! The carrot was sweet and tender, with an earthy complexity that would be unrecognizable in a raw carrot.

From that inauspicious start, I have become quite enamored of the lowly cooked carrot. In soups and stews, puréed or roasted, I spend much of the cooler months finding new ways to cook and eat carrots.

honey-ginger carrots

Enter braising—is there a better way to cook in the winter? The oven warms the house as flavors deepen and vegetables slump into tender piles of comfort. I am partial to this fantastic cabbage recipe, to be sure, but last night I wanted carrots to take center stage.

Here is the result: halved carrots, braised in stock with honey, ginger, and onions until just tender, then heated under the broiler until just beginning to brown. Infused with ginger and the sweet complexity of honey, these would be a delicious accompaniment to roast chicken, pork chops, or even, I suppose, a pot roast.

braised carrots with honey and ginger


Braised Carrots with Honey and Ginger

1 ½ pounds medium carrots (about three bunches)
½ large white onion
3 inches fresh ginger, peel scraped or cut off
2 tablespoons honey (I used avocado because it's what I have in the house)
2 tablespoons olive oil
3-4 tablespoons chicken or vegetable stock, or water
salt and pepper

Preheat the oven to 325˚F.

Peel the carrots, or thoroughly scrub them if you trust where they came from and like the skin. Keep smaller carrots whole and split large ones lengthwise. For presentation, I like to buy carrots with the tops, trim so that about one inch remains. Arrange carrots in an au gratin dish or other medium baking dish.

Thinly slice the onion half and add to the carrots. Cut the peeled ginger into matchsticks, halving once lengthwise if desired, and scatter over the carrots. Drizzle the honey, olive oil, and stock over the carrots, season with salt and pepper, and toss well to combine. Cover with aluminum foil or a tight-fitting lid and place in the oven.

Cook 45 minutes to an hour. Toss the vegetables well; if the carrots are not completely tender, recover and cook 15-20 minutes more. When the vegetables are completely tender, uncover and place the vegetables in the top half of the oven and turn on the broiler. (Note: if you don't have a broiler, simply uncover the dish and increase heat to 450˚.)

Broil until the edges are beginning to blacken, 5-10 minutes.

Serves about 4

06 November 2010

Failure and success

Who doesn't love apple season? Apples may be available year round in some form, but fall and winter bring the crisp Galas, giant Fujis, sweet-tart Pippins, and luscious Rome Reds. At my local grocer or the farmer's market, I find myself picking a few from each variety, planning tarts, cakes, and pies, and wishing desparately for a food mill.

My sophomore year of college I travelled to rural Pennsylvania with a good friend for Thanksgiving. Her family owned an apple orchard, and I spent Wednesday morning pressing my own cider.

It was a heady experience—much like making stock from scratch for the first time and discovering the true inferiority of box, can, and foil-wrapped brick. Why had I ever bought apple cider before? How would I ever enjoy it again? What reason had I for going to college when my true calling was to be an apple farmer?

In retrospect, I probably wouldn't be a very good apple farmer; I would be far too likely to hoard my apples, sitting on a slowly mounting pile of pastries and cores, licking applesauce off my fingers while growing to monstrous proportions.

Earlier in the week I made a pie for a friend. She had been sick earlier in the year, and I promised her a pie all for herself when she convalesced.

Is there any easier pie than apple? Don't ask me that today. A confluence of events left me with a lackluster filling, a soggy bottom crust, and a mockingly delicious, flaky, shatter-under-your-fork top crust.

I love the way the top crust sets before the fruit collapses on itself, leaving a little apple cathedral inside—the Duomo delle mele, if you will.

a cavern of apples!

Luckily for my friend, I embarked upon an experiment while the pie dripped apple syrup all over my oven—an experiment, based on vague memories of articles and blog postings, that became a resounding success.

chocolate and caramel and apples ... oh my

As you might know by now, I don't like to waste food if I can avoid it: no fewer than 4 bags of vegetable bits reside in my freezer, ready for stock, soup, or anywhere else I can fit them; I carefully hoard fat from roasting chickens for gravy or potatoes; I never need an excuse for ice cream or macarons—especially since I always have yolks or whites sitting in my fridge.

I remembered something about quince syrup being used for caramel (I did some research and remembered that it was this post from Chez Pim). As I prepared the apples for my pie, I tossed the peels and cores—stems, seeds, and all— into a large pot with just enough cold water to cover. I plopped it on the stove and set it to a boil for about 30 minutes, until the cores were softened and the peels limp. The mixture of Jonathan and Granny Smith apples that I was using for my failed pie left a lovely pink juice.

caramels aux pommes

My biggest problem with caramel is avoiding crystallization: I just can't leave things alone in the kitchen, so I tend to overstir. Even crystallized caramel couldn't make this plan go wrong: the resulting candies, coated with chocolate, were similar to New Orleans praline or butterscotch squares. A few tweaks to the recipe, though, and the second batch was even more successful. The tang of the apple comes through in a rich, buttery, chewy bite of whimsy: this is my answer to caramel apples.

dark chocolate

Another bonus, of course, is that you can use your trash to make holiday gifts for your loved ones.

apple caramels


Caramels aux Pommes, or Apple Caramels

1 cup Poor Man's Apple Cider (see below)
½ cup brown sugar
1 ½ cup granulated sugar
½ cup butter, softened and cut into small pieces
¼ cup heavy cream
Tempered Chocolate for dipping (optional)

To make the cider

Place a large pot in your sink with about ¾ cup cold water. As you peel 2-4 pounds apples for some delicious treat, toss the refuse (all peels, cores, stems, etc.—I shake out the loose seeds, but I don't worry about the rest) into the pot. After peeling and coring all the apples, place over medium-high heat and bring to a boil. Lower heat to medium and cook, stirring from time to time, until the juice is colorful and fragrant and the cores have completely distintegrated, 20-45 minutes. Let cool slightly, then strain through a sieve, pressing on the solids to extract as much juice as possible.

For the caramels

Butter an eight-inch square pan and line with parchment paper. Butter the parchment and set aside.

Place the sugar in a medium saucepan; add the apple juice, stir just to combine with a clean spoon and place over medium high heat. Bring to a full bowl.

When the sugars are completely dissolved, add the butter, a few pieces at a time, then the cream. Stir just to combine. Cook without stirring until your thermometer reaches between 248 and 250ºF (cook to a lower temperature if your kitchen is cold or if you prefer squishy caramel).

Remove from heat and pour into the prepared pan without stirring or scraping the pan. If desired, you can scrape the remaining caramel onto another small plate (it may crystallize).

Let cool, then cut into pieces and wrap in waxed paper or dip in tempered chocolate.

Notes for cutting: use a sharp knife dipped in hot water and saw gently with little pressure. It will take a bit of time, but it will be a lot less messy than the alternatives.

Makes about 60 small caramels

01 November 2010

Some things will always be ours

My husband and I bonded over carrot cake before we even started dating. He has much less interest in food than I—eating 7000 calories a day to maintain weight for several years will do that to anyone, I suppose—but there are a few things that he genuinely loves, and carrot cake is one of them.

topped with candied orange peel

One Thursday, six-and-a-half years ago, we were sitting together at work craving cake. Not just any cake, but a moist carrot cake with pineapple, coconut, and a not-too-sweet cream cheese frosting.

Internet searches were made, plans were set, and that Saturday we combined our efforts in the kitchen to cook our first dish together. Over the next week he brought big slices to work for us to share; I should have known right then that we were meant for one another.

hallowe'en batter

I've tweaked the recipe over the years, adjusting amounts and scribbling them onto the smeared and stained pink index cards, and the end result is always delicious. The lightness of the buttermilk counteracts the proclivity of fruit & vegetables to make a heavy, bread-like cake, and the citrus-laced cream cheese frosting offers a tang that accentuates the flavors without overpowering them.

Oft-requested by friends and family, I have been known to bake the three layers but to only assemble a two layer cake, leaving the last just for us. Mike's favorite part is the thin slice cut from the top of the layer, smeared with frosting and rolled up like a taquito.

carrot cake

There are some dishes that will always be ours, no matter who cooks them: falafal, salsa, farfalle pasta with a chunky tomato-and-vegetable sauce ... and carrot cake.


Carrot Cake with Orange-Cream Cheese Frosting
Makes three nine-inch layers.

I shred about half of the carrots with the coarse grater and half with the fine; the finely shredded bits seem to dissolve into the cake, and the coarser pieces add a little texture and visual appeal. I've also been known to add chopped walnuts upon request, but I feel that chunks of nuts don't belong in cookies and cakes, so I prefer it plain.

For the cake

3 cups unbleached, all-purpose flour
2 teaspoons baking soda
1 ½ teaspoons baking powder
1 tablespoon cassia (see note below)
1 ½ teaspoons cinnamon
¼ teaspoon nutmeg
¼ teaspoon cloves
¾ teaspoon salt
3 large eggs
2 ½ cups granulated sugar
1 cup canola oil
1 ½ cups buttermilk
1 tablespoon vanilla extract
¾ cup pineapple, drained, well chopped, and packed
3 cups shredded carrots, lightly packed
¾ cup dried, sweetened coconut, lightly packed

For the frosting

½ pound butter (two sticks)
1 pound cream cheese (preferably regular, although low-fat or Neufchâtel will work)
2 teaspoons vanilla extract
1 tablespoon freshly-squeezed orange juice
2 teaspoons orange zest
approximately 4 cups confectioners' sugar


Grease and flour three 9-inch cake pans; set aside. Preheat oven to 350ºF and place racks in the top and bottom thirds of the oven.

Whisk together the flour, leavening, spices and salt in a medium bowl; set aside. In a large mixing bowl, beat the eggs until light yellow. Add the sugar and beat until very pale and slightly fluffy, 2-4 minutes by hand. Add the oil, buttermilk and vanilla; mix well. Quickly beat in the flour mixture, then add the pineapple, carrots, and coconut. Mix well just until combined.

Divide evenly between the prepared cake pans and transfer to the oven, placing one pan on the lower rack and two on the top. Bake 50-60 minutes or until skewer comes out clean, switching from top to bottom after thirty minutes. Cool on racks 10-15 minutes, then remove from pans and cool completely.

For the frosting:

Have all ingredients at room temperature. Cream butter and cream cheese until quite fluffy. Add vanilla, juice, and zest; beat well to combine. Add the first three cups of frosting, sifting directly into the bowl and beating to combine. Add additional frosting if desired.

For best results while assembling cake, transfer the frosting to the refrigerator for 5-10 minutes before frosting. Otherwise, your frosting between the layers may be thin, and nobody wants that.

A note about cassia/cinnamon

What you usually buy at the store as "cinnamon" is actually cassia, a similar spice from a related plant. It typically comes from Indonesia, China, or Vietnam (the best, in my opinion, is the "Saigon Cinnamon" from Vietnam), and it is quite spicy and perfect for savoury dishes. "True" cinnamon, sometimes marketed as "Ceylon" cinnamon, has a more delicate, floral flavor, and it is the cinnamon flavor common in Mexican cooking and many cinnamon flavored candies. I prefer a mixture of the two in this recipe, but you can interchange them as you like.

27 October 2010

A toe in the pool and a deep breath

Whew.

Since my birthday weekend, I've been faced with a bout of culinary ennui more powerful than I could have expected. Dinners have been mindless batches of pasta with tomato sauce from the freezer, big bowls of spicy lentils with rice, or simple salads and sandwiches. Lunches were comprised of leftovers, and my camera languished in the back of the drawer.

After a great meal of roast chicken with sausage-and-apple stuffing and a big deadline at work passing, I think I'm back—and what plans have I for the coming weeks!

I have so many things to show you: I've perfected a cookie recipe; I finally have a book I've craved for years; the cool weather is making me crave my family's lentil-and-kielbasa stew.

This Sunday I woke up to rain, and decided to celebrate by baking my first Daring Bakers' challenge - doughnuts!

a slow rise

The October 2010 Daring Bakers challenge—myfirst—was hosted by Lori of Butter Me Up. Lori chose to challenge DBers to make doughnuts. She used several sources for her recipes including Alton Brown, Nancy Silverton, Kate Neumann and Epicurious.

I've made cake doughnuts dozens of times in my life, but I've never made yeast doughnuts. A flour-coated kitchen and endless bowls of glaze later, we had a feast of fried dough.

wide variety

Doughnuts offer endless variations. In addition to plain, creamy maple and sweet-tart raspberry glazes, I filled some hole-less varieties with sweetened fresh ricotta and lemon. A granny-smith apple, chopped and cooked in butter and brown sugar until tender. The apple fritters were oddly puffy, but delicious.

maple glaze

The cake doughnuts held so much promise—I tried to duplicate the fantastic blueberry-buttermilk doughnuts from Stan's, but my oil temperature was off, and they turned out as slightly gooey bites of almost-perfection.

cake doughnut

Recipes for the adapted recipes will follow—everyone should make homemade doughnuts at least once.

18 October 2010

On virtuous eating ... with bacon

The beans-and-greens combination is nearly perfect. Not only are both ingredients healthy and delicious, but there are so many combinations! Kale-cannelini, chard-chickpea, beet-black bean; in soups, salads, or sautés, the final result is a dish that will leave you feeling righteous, even while you lick your bowl clean.

Unfortunately for you and me, even the warmer climes are reaching the sad end of fresh black-eyed peas. After six weeks of walking past heaping boxes of purple-green pods, I took the plunge in time for only two meals; at the market this Saturday, only one vendor had one sad pile of beans left.

fresh black-eyed peas

Even when I've bought canned beans for the sake of simplicity, I've long been in the dried-beans-are-better-than-canned camp, but I have had few opportunities to try fresh shelling beans. The spring is filled with hours of thumbnail-splitting fava bean preparation, but I've yet to see the beloved fresh limas, borlotti, or cranberry beans of which I've heard so many tales. If they're anything like black-eyed peas, though, I'll be on the hunt.

This is a virtuous dish despite the use of bacon. After lardons of bacon are sautéed until crisp, sweet onions are caramelized in some of the rendered bacon fat. The greens are added with some stock, garlic, and liberal amounts of pepper, then gently mixed with the tender beans and the bacon. I served it over brown rice, but it would be equally delicious with pasta, or perhaps made with a little bit more broth and poured over a piece of crusty, toasted bread.

fresh black-eyed peas with swiss chard and bacon

If you can't find fresh black-eyed peas, this dish would also be great with dried beans—I've included notes for adjusted soaking/cooking times in the recipe below.


Fresh Black-Eyed Peas with Swiss Chard
This dish can easily be made kosher/vegan by omitting the bacon and replacing the bacon grease with 2 tablespoons of good olive oil. If you would like a smoky flavor that the bacon brings, try sprinkling the dish with a bit of smoked sea salt before serving.

This dish doubles easily and reheats well, so make lots while fresh beans are available!

¾ to 1 pound (unshelled) fresh black-eyed peas (for 1 ½-2 cups shelled beans), or 1 cup dried
2 slices bacon
½ large sweet onion, thinly sliced
2 cloves garlic, peeled and chopped
½ cup chicken or vegetable stock
2-3 sprigs fresh thyme (optional)
1 medium bunch Swiss chard, center ribs removed (about 8 oz net), chopped or roughly torn up
salt and coarsely ground black pepper
1 teaspoon apple cider vinegar

Shell the fresh beans into a medium saucepan. Rinse well and cover with cold water at least one inch above the beans. Bring to a boil over medium-high heat; reduce heat, cover, and simmer until just tender, 15-25 minutes (for best results, do not salt). Rinse with cold water, drain, and set aside.

Meanwhile, cut the bacon crosswise about ½ inch (1 cm) thick and cook until golden and crisp over medium-high heat. Transfer the bacon to a paper towel to drain. Pour off roughly half the grease, leaving about 2 tablespoons in the pan. Add the onion, reduce the heat to medium-low, and cook, stirring regularly, until caramelized to your taste, about 20 minutes.

Add the garlic and cook, stirring until fragrant. Add the stock and thyme; deglaze the pan, then increase heat to medium. Add the chard a handful at a time, stirring gently until wilted. When all the chard is added, partially cover and simmer until tender, about 10 minutes.

Add the bacon, drained beans, and cider vinegar; taste and add salt as needed and liberal amounts of cracked pepper.

Serve over rice, toss with pasta or add additional stock to make a hearty stew.

NOTE: If you are using dried black-eyed peas, you can pre-soak or not.

To pre-soak: rinse, then cover with cold water in a medium saucepan. Bring to a boil, then turn off the heat, cover, and set aside for one hour. Drain, cover again with cold water and simmer until tender, about 30 minutes. (Pre-soaking will take longer; some people think it makes the beans easier to digest, but it is not necessary with black-eyed peas)

To cook directly: rince, cover with cold water in a medium saucepan. Bring to a boil, then reduce heat. Cover and simmer until tender, about 45-60 minutes.

Serves 2-3; doubles easily to serve 3-6.

16 October 2010

Not that we need a reason for cake

for the birthday girl

A birthday is always a good reason for cake, no?

After my cake-off a couple weeks ago, I settled on a recipe that I liked: an adapted version of this recipe, made with strong coffee and bittersweet chocolate. I first frosted it with a simple bittersweet ganache, but after a few bites decided that the flavors were fighting for dominance. A simple whipped cream was fantastic; a soft counterpoint to the assertive cake.

In the end, I chose a mild espresso buttercream, an adapted version of this frosting recipe. I've never been a fan of buttercreams—they are generally cloyingly sweet and much too rich—but the sweetness of this frosting is tempered by both the espresso and the bitter-but-not-too-sweet cake.

My cake-decorating skills aren't the sharpest—the cake resembles a shoddy spackle job from 1973 more than anything else—but modern art food styling aside, this cake was a perfect end to the day.

espresso buttercream

The cake itself is marvelous and grown-up, with a tender crumb and a complex flavor. The coffee, chocolate's favorite supporting cast member, is only identifiable in the cake if you're looking for it, but it makes the bittersweet chocolate stand up and get noticed. In fact, the only thing I would change would be to increase the coffee in the buttercream.

cake geometry


Bittersweet Chocolate Cake with Espresso Buttercream
Adapted from Epicurious and Baking: From My Home to Yours

I used an Americano-style coffee in the cake batter, as I only have a small stovetop espresso maker. This recipe makes 3 eight-inch layers, 2 ten-inch layers, or 3 dozen cupcakes. My third eight-inch pan was mysteriously swallowed by my pantry, so I made 2 eight-inch layers and a dozen cupcakes.

Note: in my experience, this cake is vastly improved from an overnight nap in the refrigerator before frosting; just make sure to let the cakes come to room temperature fully wrapped before frosting.

Cake

3 ounces bittersweet chocolate (I use Valrhona)
1 ½ cups hot coffee, or 6 ounces espresso mixed with water to make 1 ½ cups
3 cups sugar
2 ½ cups unbleached flour
1 ½ cups natural unsweetened cocoa powder (I ran out and used a 9 ounce for $1.99 box from Trader Joe's—and it was remarkably good)
2 teaspoons baking soda
¾ teaspoon baking powder
1 ¼ teaspoons salt
3 large eggs
¾ cup canola oil
1 ½ cups buttermilk, shaken
¾ teaspoon vanilla

Buttercream

1 cup granulated sugar
5 large egg whites
1 ½ cups (3 sticks) unsalted butter, completely softened
¼ cup strong espresso, cooled completely
1 teaspoon pure vanilla extract

To make the cakes

If you are using cake pans, butter the pans, line the bottoms with parchment paper, then butter the parchment; set aside. If making cupcakes, line the pans with cupcake liners or butter and dust with additional cocoa powder.

Coarsely chop the chocolate and pour the hot coffee over. Let cool, stirring occasionally, until the chocolate is completely melted. Set aside.

Sift together the sugar, flour, cocoa powder, soda, baking powder, and salt into a large bowl; set aside. Place the eggs in a very large bowl and beat with a hand mixer on medium speed until pale yellow and slightly thickened, 3-5 minutes. Beating constantly, slowly add the oil, buttermilk, coffee mixture, and vanilla. Add the dry ingredients in one go, beating just until combined; to avoid overbeating, stop the machine a bit early and use a stout spatula to finish the job.

Bake just until a skewer or toothpicks poked into the center comes out clean, 20-30 minutes for cupcakes, 50-70 minutes for cakes. Cool completely in pans on racks, then remove from pans. Peel the paper from the bottom of the layers, wrap tightly in plastic wrap, and keep at room temperature or refrigerate overnight. Let come to room temperature before frosting.

To make the frosting

Place the sugar and egg whites in a large heatproof bowl over a pan of simmering water. With a hand mixer at medium speed, beat constantly until hot to the touch, 5 to 6 minutes. The sugar should be dissolved and it should look like a shiny, thick foam. Remove from the heat.

Beat on medium speed until the meringue is well-cooled, 6 to 7 minutes. Add the butter one stick at a time, beating until smooth. (Note: the butter should be completely softened)

Beat the buttercream on medium-high speed until thick and very smooth, Anywhere from 6 to 25 minutes. If it looks thin or curdles, keep beating until it comes together - I've heard of buttercreams taking up to 45 minutes of solid beating to come together, so if it looks like a failure, give it a good long time before you give up on it.

On medium speed, beat in the espresso a little at a time, then the vanilla. The frosting should be thick, shiny, and smooth. Cover with plastic wrap and set aside.

Store the cake in the refrigerator. For the neatest slices, cut while cold and let come to room temperature on individual plates.

Serves 8-12 as a two-layer 8" cake, 14-16 as a three-layer

14 October 2010

The best and the worst

I've been eyeing the fresh black-eyed peas at the market every Saturday for a month, coveting and planning—and getting distracted. I buy favas in huge amounts throughout the spring, spending hours shelling, blanching, and peeling—I've never shied away from working for my dinner—but I never really new what to do with fresh black-eyed peas.

Enter Alice Waters' Chez Panisse Vegetables, a leftover package of bacon, and the mother of all swiss chard (that's a large dinner fork).

big chard!

Add some caramelized onions, a dab of cider vinegar, and some brown rice, and we sat down to the best dinner I've eaten in months. The beans-and-greens combination is always a great one, and this is no exception.

As I tasted, wrote notes, and muttered to myself about how good it was going to be, I was already planning my post, excited to share such a healthy, easy, and fan-freaking-tastic meal with you, when I stumbled upon a problem.

We ate it all. Every bite. That photo of the chard up there? It's all I've got.

In my defense, it's far too dark here for photos when dinner is ready, and I have to rely upon leftovers for a picture of anything that I cook at night. Unfortunately, the empty skillet and a bowl of rice was all that was left to photograph.

So, I leave you with a request, and a promise: look for fresh black-eyed peas at your local market, and if you find them, by a pound or two and stash the bag in your crisper drawer. This weekend, I will post the recipe (and some photos). I'm only sorry I didn't start doing this a month ago.

11 October 2010

Crab canapés

Growing up by the sea has distinct advantages.

The salt-seaweed-shellfish smell, the funny feeling when you poke an anemone, a slip on kelp-covered rocks and hands bleeding with barnacle cuts—all of these things are tied up in my childhood.

scavengers
(Picture taken by my cousin José)

We drove past the harbor whenever we went, well, anywhere. On a lucky day, we would see a piece of plywood propped at the entrance with a dripping orange spray-paint sign: HALIBUT $4/LB, and I've never quite forgiven a close family friend for bringing us King Crab straight off his boat the same day I had my wisdom teeth removed.

If you are every lucky enough to visit Juneau, Alaska, make sure you go to Jerry's Meats. Nestled in an industrial area behind the wetlands and near Lemon Creek, Jerry's does a fine business smoking and packing everything the locals bring in, from halibut to moose. Luckily for the rest of us, they also sell a wide variety of fresh and frozen seafood and meats. Every time I go to Juneau I stock up with a styrofoam box full of halibut, King, and the best smoked Sockeye salmon you'll find—but I never have enough room left for Jerry's famous crab dip.

butter crackers

I've seen all sorts of recipes for hot crab dip online, but this dip is from a different world. It tastes like something you would find on a canapé platter from 1957: creamy and delicately flavored, it pairs equally well with crusty bread or a buttery table cracker.

Good articifical crab (or "krab," as it once was called) is not to be scorned—made properly, it's better in dip than real crab. Besides, who wants to take that carefully-extracted crab meat and mash it all up? Still, if you have a source of cheap crab or are prepping half a dozen for freezing, it's worth tossing the little bits in a bowl and making up some of this dip.

crab dip


Cold Crab Dip
Inspired by Jerry's Meats

Note: if you choose to use artificial crab, please take a look at the ingredients and buy the most environmentally-friendly variety you can find. Many varieties of articifical crab are made with overfished or farmed varieties; Wild Alaskan Pollock is a good-tasting, well-managed fish (listed as a "good alternative" on the Seafood Watch website).

5 oz real or artificial crab, cooked and chilled (or frozen and thawed)
¼ cup cream cheese
2 tablespoons mayonnaise
¼ teaspoon celery salt
1 teaspoon fresh dill, finely chopped
salt and pepper to taste
lemon juice (optional)

Place the crab in a medium bowl and shred it into small pieces with two forks.

Add the cream cheese and mayonnaise and mix well to combine. Add the celery salt, fresh dill, and black pepper. Mix well, taste, and add salt and/or lemon juice as needed.

Serve with bruschette, warm crusty bread, or crackers.

Makes a scant 2 cups